Deploy NTT to Hyperliquid#
Native Token Transfers (NTT) enable seamless multichain transfers of tokens using Wormhole's messaging protocol. On Hyperliquid, NTT contracts are deployed to HyperEVM (the EVM-compatible execution layer), and can then be linked to HyperCore (the L1 order book layer) to enable spot trading of your token.
This guide walks you through the Hyperliquid-specific steps: deploying a HyperCore spot token, linking it to your HyperEVM ERC-20 contract, and bridging tokens between the two layers using the NTT CLI.
Warning
The HyperEVM integration is experimental, as its node software is not open source. Use Wormhole messaging on HyperEVM with caution.
Prerequisites#
Before following this guide, ensure you have:
- An NTT deployment on HyperEVM. If you haven't deployed yet, follow the Deploy NTT to EVM Chains guide using HyperEVM as your target chain.
- Your
ETH_PRIVATE_KEYenvironment variable set to the deployer wallet private key. - The NTT CLI installed and up to date.
Overview of the Deployment Process#
After deploying NTT on HyperEVM, integrating with HyperCore follows these steps:
- Deploy a spot token on HyperCore - use the Hyperliquid Deploy Spot UI to register your token and obtain a token index.
- Link HyperCore to HyperEVM - use
ntt hype linkto connect your HyperCore spot token to its HyperEVM ERC-20 contract. - Bridge tokens - use
ntt hype bridge-inandntt hype bridge-outto move tokens between HyperEVM and HyperCore.
Deploy a Spot Token on HyperCore#
Before linking your ERC-20 token on HyperEVM to HyperCore, you must first deploy a HIP-1 spot token through Hyperliquid's Deploy Spot interface. This is a multi-step process performed directly on the Hyperliquid platform.
Navigate to the Deploy Spot page:
- Testnet - app.hyperliquid-testnet.xyz/deploySpot
- Mainnet - app.hyperliquid.xyz/deploySpot
Warning
Each step is permanent. You cannot change inputs after proceeding to the next step. Hyperliquid recommends testing the exact configuration on testnet before using mainnet.
Step 1: Deploy Token#
Register the token name and configure its decimal precision:
szDecimals- tradable precision on the order book. For example,2means the minimum order increment is0.01tokens.weiDecimals- smallest indivisible unit. For example,8means the smallest unit is0.00000001tokens.
These values must satisfy the constraint: szDecimals + 5 <= weiDecimals as defined in the HIP-1 specification.
Note
The HIP-1 token on HyperCore uses weiDecimals, which may differ from your ERC-20 token's decimals on HyperEVM. The asset bridge handles the conversion between the two.
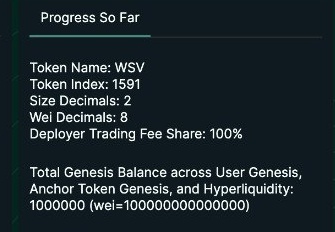
Step 2: Set Deployer Trading Fee Share#
Configure the percentage of trading fees on the spot pair that go to your deployer address. The remainder is burned. This value can only be decreased after deployment, never increased.
After completing this step, the Progress So Far panel on the right side of the screen displays your Token Index, the unique integer identifier for your spot token on HyperCore. Save this value as you'll need it for the ntt hype link command after completing the Deploy Spot process.

Step 3: Set Genesis Balances#
This step allocates the initial HIP-1 token supply. For an NTT bridge token, you must mint the genesis supply to the asset bridge address so the bridge has reserves to back bridged tokens.
Warning
Hyperliquidity (Step 5) reserves a portion of the genesis supply for its automated market making. Account for this when choosing your genesis amount.
The asset bridge address is deterministic based on your token index. The format is a fixed prefix followed by the token index as a 4-character hex value:
For example, token index 1591 = hex 0637:
In the Deploy Spot UI:
- Enter the asset bridge address in the User field.
- Enter the genesis amount in the Amount field. This is a whole number in the smallest unit (wei). For example, with
weiDecimals=8, an amount of10000000000000000equals 100 million tokens. - Click Register User Genesis to register the entry.
- Click Complete User Genesis to finalize (irreversible).
Note
Why mint to the asset bridge? The bridge credits HIP-1 tokens on HyperCore when ERC-20 deposits arrive on HyperEVM. It can only release tokens it already holds. Minting the genesis supply to the bridge ensures it has reserves to back any deposited ERC-20 tokens.
Step 4: Deploy Spot Trading Pair#
This step creates the trading pair between your token and USDC on HyperCore via a RegisterSpot action. It requires specifying the base token index (your token) and the quote token index (USDC). The initial pricing is determined through a Dutch auction mechanism.
Step 5: Deploy Hyperliquidity#
Hyperliquidity commits permanent on-chain liquidity to the order book. It is not required for the asset bridge to function, but the UI requires you to configure it before proceeding to Step 6.
Step 6: Review and Trigger Genesis#
Review all inputs and trigger genesis. This step creates the HIP-1 token on HyperCore and is irreversible. Without triggering genesis, the token does not exist on HyperCore.
The Progress So Far panel on the right side of the screen summarizes your deployment, including the Token Index you'll need for the next step.
Link HyperCore to HyperEVM#
Once your spot token is deployed on HyperCore, use the ntt hype link command to connect it to your HyperEVM ERC-20 contract. This two-step process registers the EVM contract with HyperCore and finalizes the link.
Replace INSERT_TOKEN_INDEX with the token index from the Deploy Spot process (e.g., 1591).
The command performs two actions automatically:
- Request - registers the EVM contract address with HyperCore.
- Finalize - completes the link by confirming the contract deployment nonce.
After the command completes, it saves the tokenIndex to your deployment.json under a hypercore key:
{
  "network": "Testnet",
  "chains": {
    "HyperEVM": {
      "token": "0x..."
    }
  },
  "hypercore": {
    "tokenIndex": 1591
  }
}
Additional Options
| Option | Description | Default |
|---|---|---|
--only-finalize | Skip the request step and only run finalize. Useful if the request was already submitted separately. | false |
--evm-extra-wei-decimals | Set evmExtraWeiDecimals (ERC-20 decimals minus weiDecimals). | 10 |
--deploy-nonce | Explicitly set the ERC-20 CREATE deploy nonce. Auto-derived from the deployer address if omitted. | Auto |
--testnet | Override the network setting from deployment.json to use testnet. | From deployment.json |
Bridge Tokens Between HyperEVM and HyperCore#
After linking, you can move tokens between HyperEVM and HyperCore using the asset bridge. Each HyperCore spot token has a deterministic asset bridge address derived from its token index.
Bridge Into HyperCore#
Transfer tokens from HyperEVM into HyperCore:
Replace INSERT_AMOUNT_DECIMAL with the human-readable token amount (e.g., 100, 0.5). This sends an ERC-20 transfer to the asset bridge address on HyperEVM, which credits the equivalent HIP-1 tokens to your HyperCore account.
Bridge Out to HyperEVM#
Transfer tokens from HyperCore back to HyperEVM:
Replace INSERT_AMOUNT_DECIMAL with the token amount to withdraw. This performs a spotSend on HyperCore to the asset bridge, which releases the tokens as ERC-20 on HyperEVM to your wallet address.
Check Status#
At any point after linking, you can check your HyperCore token configuration:
This displays:
- Token index - the HyperCore spot token identifier.
- Asset bridge address - the deterministic bridge address for your token.
- Token string - the HyperCore token identifier (e.g.,
WSV:0x7d816f...). - Network - testnet or mainnet.
- EVM token address - the linked ERC-20 contract on HyperEVM.
| Created: March 20, 2026