# Wormhole Developer Documentation (LLMS Format) This file contains documentation for Wormhole (https://wormhole.com). A cross-chain messaging protocol used to move data and assets between blockchains. It is intended for use with large language models (LLMs) to support developers working with Wormhole. The content includes selected pages from the official docs, organized by product category and section. This file includes documentation for the product: Transfer ## AI Prompt Template You are an AI developer assistant for Wormhole (https://wormhole.com). Your task is to assist developers in understanding and using the product described in this file. - Provide accurate answers based on the included documentation. - Do not assume undocumented features, behaviors, or APIs. - If unsure, respond with “Not specified in the documentation. ## List of doc pages: Doc-Page: https://raw.githubusercontent.com/wormhole-foundation/wormhole-docs/refs/heads/main/products/cctp-bridge/overview.md [type: overview] Doc-Page: https://raw.githubusercontent.com/wormhole-foundation/wormhole-docs/refs/heads/main/products/connect/overview.md [type: overview] Doc-Page: https://raw.githubusercontent.com/wormhole-foundation/wormhole-docs/refs/heads/main/products/native-token-transfers/overview.md [type: overview] Doc-Page: https://raw.githubusercontent.com/wormhole-foundation/wormhole-docs/refs/heads/main/products/overview.md [type: overview] Doc-Page: https://raw.githubusercontent.com/wormhole-foundation/wormhole-docs/refs/heads/main/products/settlement/overview.md [type: overview] Doc-Page: https://raw.githubusercontent.com/wormhole-foundation/wormhole-docs/refs/heads/main/products/token-bridge/overview.md [type: overview] Doc-Page: https://raw.githubusercontent.com/wormhole-foundation/wormhole-docs/refs/heads/main/products/cctp-bridge/get-started.md [type: get-started] Doc-Page: https://raw.githubusercontent.com/wormhole-foundation/wormhole-docs/refs/heads/main/products/connect/get-started.md [type: get-started] Doc-Page: https://raw.githubusercontent.com/wormhole-foundation/wormhole-docs/refs/heads/main/products/native-token-transfers/get-started.md [type: get-started] Doc-Page: https://raw.githubusercontent.com/wormhole-foundation/wormhole-docs/refs/heads/main/products/settlement/get-started.md [type: get-started] Doc-Page: https://raw.githubusercontent.com/wormhole-foundation/wormhole-docs/refs/heads/main/products/cctp-bridge/reference/supported-networks.md [type: reference] Doc-Page: https://raw.githubusercontent.com/wormhole-foundation/wormhole-docs/refs/heads/main/products/connect/reference/support-matrix.md [type: reference] Doc-Page: https://raw.githubusercontent.com/wormhole-foundation/wormhole-docs/refs/heads/main/products/connect/reference/supported-networks.md [type: reference] Doc-Page: https://raw.githubusercontent.com/wormhole-foundation/wormhole-docs/refs/heads/main/products/native-token-transfers/reference/cli-commands.md [type: reference] Doc-Page: https://raw.githubusercontent.com/wormhole-foundation/wormhole-docs/refs/heads/main/products/native-token-transfers/reference/managers-transceivers.md [type: reference] Doc-Page: https://raw.githubusercontent.com/wormhole-foundation/wormhole-docs/refs/heads/main/products/native-token-transfers/reference/supported-networks.md [type: reference] Doc-Page: https://raw.githubusercontent.com/wormhole-foundation/wormhole-docs/refs/heads/main/products/settlement/reference/supported-networks.md [type: reference] Doc-Page: https://raw.githubusercontent.com/wormhole-foundation/wormhole-docs/refs/heads/main/products/token-bridge/reference/supported-networks.md [type: reference] Doc-Page: https://raw.githubusercontent.com/wormhole-foundation/wormhole-docs/refs/heads/main/products/cctp-bridge/guides/cctp-contracts.md [type: guide] Doc-Page: https://raw.githubusercontent.com/wormhole-foundation/wormhole-docs/refs/heads/main/products/cctp-bridge/tutorials/complete-usdc-transfer.md [type: tutorial] Doc-Page: https://raw.githubusercontent.com/wormhole-foundation/wormhole-docs/refs/heads/main/products/connect/concepts/routes.md [type: concept] Doc-Page: https://raw.githubusercontent.com/wormhole-foundation/wormhole-docs/refs/heads/main/products/connect/configuration/data.md [type: other] Doc-Page: https://raw.githubusercontent.com/wormhole-foundation/wormhole-docs/refs/heads/main/products/connect/configuration/theme.md [type: other] Doc-Page: https://raw.githubusercontent.com/wormhole-foundation/wormhole-docs/refs/heads/main/products/connect/faqs.md [type: other] Doc-Page: https://raw.githubusercontent.com/wormhole-foundation/wormhole-docs/refs/heads/main/products/connect/guides/hosted-version.md [type: guide] Doc-Page: https://raw.githubusercontent.com/wormhole-foundation/wormhole-docs/refs/heads/main/products/connect/guides/upgrade.md [type: guide] Doc-Page: https://raw.githubusercontent.com/wormhole-foundation/wormhole-docs/refs/heads/main/products/connect/tutorials/react-dapp.md [type: tutorial] Doc-Page: https://raw.githubusercontent.com/wormhole-foundation/wormhole-docs/refs/heads/main/products/native-token-transfers/concepts/architecture.md [type: concept] Doc-Page: https://raw.githubusercontent.com/wormhole-foundation/wormhole-docs/refs/heads/main/products/native-token-transfers/concepts/security.md [type: concept] Doc-Page: https://raw.githubusercontent.com/wormhole-foundation/wormhole-docs/refs/heads/main/products/native-token-transfers/configuration/access-control.md [type: other] Doc-Page: https://raw.githubusercontent.com/wormhole-foundation/wormhole-docs/refs/heads/main/products/native-token-transfers/configuration/rate-limiting.md [type: other] Doc-Page: https://raw.githubusercontent.com/wormhole-foundation/wormhole-docs/refs/heads/main/products/native-token-transfers/faqs.md [type: other] Doc-Page: https://raw.githubusercontent.com/wormhole-foundation/wormhole-docs/refs/heads/main/products/native-token-transfers/guides/deploy-to-evm.md [type: guide] Doc-Page: https://raw.githubusercontent.com/wormhole-foundation/wormhole-docs/refs/heads/main/products/native-token-transfers/guides/deploy-to-solana.md [type: guide] Doc-Page: https://raw.githubusercontent.com/wormhole-foundation/wormhole-docs/refs/heads/main/products/native-token-transfers/guides/evm-launchpad.md [type: guide] Doc-Page: https://raw.githubusercontent.com/wormhole-foundation/wormhole-docs/refs/heads/main/products/native-token-transfers/guides/post-deployment.md [type: guide] Doc-Page: https://raw.githubusercontent.com/wormhole-foundation/wormhole-docs/refs/heads/main/products/native-token-transfers/guides/troubleshoot.md [type: guide] Doc-Page: https://raw.githubusercontent.com/wormhole-foundation/wormhole-docs/refs/heads/main/products/settlement/concepts/architecture.md [type: concept] Doc-Page: https://raw.githubusercontent.com/wormhole-foundation/wormhole-docs/refs/heads/main/products/settlement/faqs.md [type: other] Doc-Page: https://raw.githubusercontent.com/wormhole-foundation/wormhole-docs/refs/heads/main/products/token-bridge/concepts/transfer-flow.md [type: concept] Doc-Page: https://raw.githubusercontent.com/wormhole-foundation/wormhole-docs/refs/heads/main/products/token-bridge/faqs.md [type: other] Doc-Page: https://raw.githubusercontent.com/wormhole-foundation/wormhole-docs/refs/heads/main/products/token-bridge/guides/attest-tokens.md [type: guide] Doc-Page: https://raw.githubusercontent.com/wormhole-foundation/wormhole-docs/refs/heads/main/products/token-bridge/guides/fetch-signed-vaa.md [type: guide] Doc-Page: https://raw.githubusercontent.com/wormhole-foundation/wormhole-docs/refs/heads/main/products/token-bridge/guides/token-bridge-contracts.md [type: guide] Doc-Page: https://raw.githubusercontent.com/wormhole-foundation/wormhole-docs/refs/heads/main/products/token-bridge/portal/faqs.md [type: other] ## Full content for each doc page Doc-Content: https://raw.githubusercontent.com/wormhole-foundation/wormhole-docs/refs/heads/main/products/cctp-bridge/overview.md --- BEGIN CONTENT --- --- title: CCTP Bridge with Wormhole description: Learn how the integration of Circle's CCTP with Wormhole enables secure and efficient native USDC transfers and complex cross-chain interactions. categories: Transfer, CCTP --- # CCTP with Wormhole Overview The integration of [Circle's Cross-Chain Transfer Protocol (CCTP)](https://www.circle.com/cross-chain-transfer-protocol){target=\_blank} with the Wormhole messaging protocol creates a robust system for securely and efficiently transferring native USDC across different blockchain networks while enabling more complex multichain interactions. This combination streamlines the movement of stablecoins, reduces risk, and unlocks new possibilities for decentralized applications. ## Key Features - **Secure native USDC transfers**: At its core, CCTP provides a "burn-and-mint" mechanism for transferring native USDC. This eliminates the need for wrapped assets and the associated risks of intermediary bridges. - **Atomic execution**: By combining CCTP and Wormhole, the transfer of USDC and the execution of accompanying instructions on the destination chain can occur as a single atomic transaction. - **Automated relaying**: Eliminates the need for users to redeem USDC transfers themselves. - **Enhanced composability**: Developers can build more sophisticated cross-chain applications by sending additional data alongside the transfer. - **Gas drop off**: Enables users to convert a portion of USDC into the destination chain's gas token upon a successful transfer. - **Gas payment**: Covering destination gas in automated vs. manual transfers. - **Automated**: Users often don't need destination gas tokens upfront, relayers cover these gas costs, reimbursed via gas drop-off or initial fees. - **Manual**: Users pay destination gas directly, the protocol may offer post-claim USDC-to-gas conversion. ## How It Works This section outlines the end-to-end flow for transferring native USDC across chains using CCTP while optionally triggering an action on the destination chain. Circle and Wormhole coordinate each step to ensure a secure, verifiable transfer and execution process. 1. **Alice initiates a transfer on Ethereum**: She submits a request to the Circle Bridge to send 100 USDC to Avalanche. If desired, she could include optional payload data. 2. **Tokens are taken into custody and burned**: The Circle Bridge takes custody of Alice's USDC and initiates a burn using Circle's CCTP, triggering an off-chain attestation process. 3. **A Wormhole message is published**: The transfer metadata is emitted as a Wormhole message. [Guardians](/docs/protocol/infrastructure/guardians/){target=\_blank} validate and sign it to produce a [Verifiable Action Approval (VAA)](/docs/protocol/infrastructure/vaas/){target=\_blank}. 4. **A relayer automatically processes the messages**: Once the VAA and Circle attestation are available, a relayer submits them to the Circle Bridge on Avalanche. 5. **Tokens are minted**: The Circle Bridge verifies both proofs and mints 100 USDC to Alice using Circle's CCTP. If a payload is included, it can be executed atomically. ```mermaid sequenceDiagram participant User as Alice participant SourceChain as Circle Bridge
on Ethereum participant Circle participant Guardians as Wormhole Guardians participant Relayer participant DestinationChain as Circle Bridge
on Avalanche User->>SourceChain: Submit transfer
(100 USDC to Avalanche) SourceChain->>Circle: Initiate a burn Circle->>Circle: Burn USDC and provide attestation SourceChain->>Guardians: Emit Wormhole message (transfer metadata) Guardians->>Guardians: Sign message and produce VAA Relayer->>Guardians: Fetch signed VAA Relayer->>Circle: Fetch Circle burn attestation Relayer->>DestinationChain: Submit VAA and
attestation DestinationChain->>Circle: Verify Circle attestation Circle->>User: Mint USDC to Alice ``` !!! note For a cross-chain transfer to be successful, both the source and destination chains must be among those supported by [Circle's CCTP](https://developers.circle.com/cctp/supported-domains){target=\_blank}. ## Use Cases Integrating Wormhole's messaging with CCTP enables the secure transfer of native USDC across blockchains, unlocking key cross-chain use cases, which include: - **USDC Payments Across Chains** - [**CCTP**](/docs/products/cctp-bridge/get-started/): Transfer native USDC using Circle’s burn-and-mint protocol. - [**Wormhole TypeScript SDK**](/docs/tools/typescript-sdk/sdk-reference/): Automate attestation delivery and gas handling. - [**Connect**](/docs/products/connect/overview/): Embed multichain USDC transfers directly in your app. ## Next Steps Now that you're familiar with CCTP, here is a list of resources for more hands-on practice: - [**Get started with CCTP Bridge**](/docs/products/cctp-bridge/get-started/): Perform a multichain USDC transfer from Avalanche to Sepolia using Wormhole's TypeScript SDK and Circle's CCTP. - [**Complete USDC Transfer Flow**](/docs/products/cctp-bridge/tutorials/complete-usdc-transfer/): Execute a USDC cross-chain transfer using Wormhole SDK and Circle's CCTP, covering manual, automatic, and partial transfer recovery. - [**Checkout Circle's CCTP Docs**](https://developers.circle.com/cctp){target=\_blank}: Learn more about Circle's cross-chain transfer protocol in their documentation. --- END CONTENT --- Doc-Content: https://raw.githubusercontent.com/wormhole-foundation/wormhole-docs/refs/heads/main/products/connect/overview.md --- BEGIN CONTENT --- --- title: Wormhole Connect description: With Wormhole Connect, you can seamlessly bridge digital assets and data across a wide range of supported blockchain networks. categories: Connect, Transfer --- # Connect Overview With the Wormhole Connect widget, you can enable users to perform multichain asset transfers directly within your application. Connect simplifies the complexity of bridging, offering a single, intuitive point of interaction for moving assets across diverse blockchains. This empowers you to access liquidity and opportunities across any connected network seamlessly. ## Key Features Connect's notable features include: - **In-app multichain transfers**: Bridge assets without leaving your app. - **Customizable features**: Specify chains and custom RPCs, manage tokens, and select bridging [routes](/docs/products/connect/concepts/routes/){target=\_blank} such as Token Bridge, CCTP, or NTT. - **Customizable UI**: Style the bridge interface to match your brand. - **Optional destination gas**: Provide gas for initial transactions on the target chain. - **Wrapped and native assets support**: Supports both wrapped and native tokens and integrates with Settlement. Be sure to check the [Feature Support Matrix](/docs/products/connect/reference/support-matrix/#feature-support-matrix){target=\_blank} to find out which routes and features are supported for each chain. ## How It Works When a user initiates a multichain transfer, Connect walks them through key steps and automates the transfer process behind the scenes, including: 1. **Initiating the transfer**: Connect your chosen wallet to the source chain, select asset and source chain for the transfer. 2. **Finalize transfer setup**: Connect the destination wallet, select the target chain and select a bridging route (manual or automatic). 3. **Transaction submission on source chain**: Confirms the transfer details to trigger the asset lock or deposit on the initial blockchain. Connect will guide you through the transaction process. 4. **VAA or attestation creation**: Wormhole [Guardians](/docs/protocol/infrastructure/guardians/){target=\_blank} observe the source transaction and produce a [Verifiable Action Approval (VAA)](/docs/protocol/infrastructure/vaas/){target=\_blank}. 5. **Relaying to destination**: The VAA or attestation is automatically relayed to the destination chain. 6. **Verification on destination**: Contracts on the target chain receive and verify the incoming VAA. 7. **Asset release/minting**: Upon successful verification, the equivalent assets are either released or minted on the target chain and delivered to your wallet. !!! tip If you want more hands on experience with Connect, checkout [Portal Bridge](https://portalbridge.com/){target=\_blank}. ## Use Cases Here are some key use cases that highlight the power and versatility of Connect: - **Cross-Chain Swaps and Liquidity Aggregation** - [**Connect**](/docs/products/connect/get-started/): Handles user-friendly asset transfers. - [**Native Token Transfers**](/docs/products/native-token-transfers/overview/): Moves native assets across chains. - [**Queries**](/docs/products/queries/overview/): Fetches real-time prices for optimal trade execution. - **Cross-Chain Payment Widgets** - [**Connect**](/docs/products/connect/get-started/): Facilitates seamless payments in various tokens. - [**Native Token Transfers**](/docs/products/native-token-transfers/overview/): Ensures direct, native asset transfers. - **Web3 Game Asset Transfers** - [**Connect**](/docs/products/connect/get-started/): Provide a user-friendly way to move game tokens across chains. - [**Token Bridge**](/docs/products/token-bridge/overview/): Handle the underlying lock-and-mint logic securely. ## Next Steps Add Connect to your app with these key setup steps: [timeline(wormhole-docs/.snippets/text/products/connect/overview/connect-timeline.json)] --- END CONTENT --- Doc-Content: https://raw.githubusercontent.com/wormhole-foundation/wormhole-docs/refs/heads/main/products/native-token-transfers/overview.md --- BEGIN CONTENT --- --- title: Native Token Transfers Overview description: With Native Token Transfers, you can directly transfer a blockchain's native assets across various connected networks. categories: NTT, Transfer --- ## Native Token Transfers Overview Native Token Transfers (NTT) provides an adaptable framework for transferring your native tokens across different blockchains. Unlike traditional wrapped assets, NTT maintains your token's native properties on every chain. This ensures that you retain complete control over crucial aspects, such as metadata, ownership, upgradeability, and custom features. ## Key Features - **Control and customization**: Ensure ownership and configurable access controls, permissions, and thresholds, preventing unauthorized calls. - **Advanced rate limiting**: Set rate limits per chain and period to prevent abuse, manage network congestion, and control deployments. - **Global accountant**: Ensures the amount burned and transferred on chains never exceeds the amount of tokens minted. - **No wrapped tokens**: Tokens are used directly within their native ecosystem, eliminating intermediary transfer steps. ## Deployment Models NTT offers two operational modes for your existing tokens: - **Hub-and-spoke**: Locks tokens on a central "hub" chain and mints equivalents on "spoke" chains, maintaining the total supply on the hub. It's ideal for integrating existing tokens onto new blockchains without altering their original contracts. - **Burn-and-mint**: Burns tokens on the source chain and mints new ones on the destination, distributing the total supply across multiple chains. It's best suited for new token deployments or projects willing to upgrade existing contracts for a truly native multichain token. ## Supported Token Standards Native Token Transfers (NTT) primarily support ERC-20 tokens, the most widely used standard for fungible assets on Ethereum and other EVM-compatible chains, including ERC-20 Burnable tokens, which can be burned on the source chain during cross-chain transfers when required. It also supports fungible SPL tokens on Solana for secure cross-chain transfers. The NttManager is a contract that oversees the secure and reliable transfer of native tokens across supported blockchains. It leverages the standard IERC20 interface and OpenZeppelin’s SafeERC20 library to interact with these tokens securely across chains. NTT does not currently support token standards like ERC-721 (non-fungible tokens), ERC-1155 (a multi-token standard), or SPL-based tokens, such as Metaplex NFTs. Support is currently limited to ERC-20 tokens. ## Deployment Process Here's a breakdown of the key steps involved when deploying NTT: - **Prepare tokens**: Ensure your ERC-20 or SPL tokens are ready. - **Choose deployment model**: Choose your cross-chain token model: either burn-and-mint or hub-and-spoke. - **Choose deployment tool**: Use the [NTT Launchpad](https://ntt.wormhole.com/){target=\_blank} (for EVM chains only) or the [NTT CLI](/docs/products/native-token-transfers/reference/cli-commands/){target=\_blank}. - **Initialization**: Specify target chains and token details, and set up your CLI environment if using it. - **Deploy contracts**: Deploy NTT Manager contracts to all selected chains, confirming transactions and covering gas fees. - **Finalize configurations**: Grant minting authority, configure rate limits, establish peer manager connections, and assign administrative roles. - **Monitor and maintain**: Verify deployment, monitor total supply with the [Global Accountant](/docs/products/native-token-transfers/concepts/security/#global-accountant){target=\_blank}, and adjust configurations as needed. ## Use Cases - **Cross-Chain Swaps and Liquidity Aggregation** - [**Native Token Transfers**](/docs/products/native-token-transfers/get-started/): Transmits native assets across chains. - [**Connect**](/docs/products/connect/overview/): Manages user-friendly asset transfers. - [**Queries**](/docs/products/queries/overview/): Acquires real-time prices for optimal trade execution. - **Borrowing and Lending Across Chains** - [**Native Token Transfers**](/docs/products/native-token-transfers/get-started/): Moves collateral as native assets. - [**Messaging**](/docs/products/messaging/overview/): Propagates loan requests and liquidations across chains. - [**Queries**](/docs/products/queries/overview/): Retrieves interest rates and asset prices in real-time. - **Gas Abstraction** - [**Native Token Transfers**](/docs/products/native-token-transfers/get-started/): Facilitates native token conversion for gas payments. - [**Messaging**](/docs/products/messaging/overview/): Sends gas fee payments across chains. - **Cross-Chain Payment Widgets** - [**Native Token Transfers**](/docs/products/native-token-transfers/get-started/): Ensures direct, native asset transfers. - [**Connect**](/docs/products/connect/overview/): Facilitates seamless payments in various tokens. - **Cross-Chain Staking** - [**Native Token Transfers**](/docs/products/native-token-transfers/get-started/): Transfers staked assets natively between networks. - [**Messaging**](/docs/products/messaging/overview/): Moves staking rewards and governance signals across chains. ## Next Steps Follow these steps to get started with NTT: [timeline(wormhole-docs/.snippets/text/products/native-token-transfers/overview/ntt-timeline.json)] --- END CONTENT --- Doc-Content: https://raw.githubusercontent.com/wormhole-foundation/wormhole-docs/refs/heads/main/products/overview.md --- BEGIN CONTENT --- --- title: Compare Wormhole's Cross-Chain Solutions description: Compare Wormhole’s cross-chain solutions for bridging, native transfers, data queries, and governance to enable seamless blockchain interoperability. categories: Transfer, Basics --- # Products Wormhole provides a comprehensive suite of cross-chain solutions, enabling seamless asset transfers, data retrieval, and governance across blockchain ecosystems. Wormhole provides multiple options for asset transfers: Connect for a plug-and-play bridging UI, Native Token Transfers (NTT) for moving native assets without wrapped representations, and Token Bridge for a secure lock-and-mint mechanism. Beyond transfers, Wormhole extends interoperability with tools for cross-chain data access, decentralized governance, and an intent-based protocol through Wormhole Settlement. ## Transfer Products Wormhole offers different solutions for cross-chain asset transfer, each designed for various use cases and integration requirements. - [**Native Token Transfers (NTT)**](/docs/products/native-token-transfers/overview/){target=\_blank} - a mechanism to transfer native tokens cross-chain seamlessly without conversion to a wrapped asset. Best for projects that require maintaining token fungibility and native chain functionality across multiple networks - [**Token Bridge**](/docs/products/token-bridge/overview/){target=\_blank} - a bridging solution that uses a lock and mint mechanism. Best for projects that need cross-chain liquidity using wrapped assets and the ability to send messages - [**Settlement**](/docs/products/settlement/overview/){target=\_blank} - intent-based protocols enabling fast multichain transfers, optimized liquidity flows, and interoperability without relying on traditional bridging methods
::spantable:: | | Criteria | NTT | Token Bridge | Settlement | |--------------------------------|---------------------------------------|--------------------|--------------------|--------------------| | Supported Transfer Types @span | Token Transfers | :white_check_mark: | :white_check_mark: | :white_check_mark: | | | Token Transfers with Payloads | :white_check_mark: | :white_check_mark: | :white_check_mark: | | Supported Assets @span | Wrapped Assets | :x: | :white_check_mark: | :white_check_mark: | | | Native Assets | :white_check_mark: | :x: | :white_check_mark: | | Features @span | Out-of-the-Box UI | :x: | :x: | :white_check_mark: | | | Event-Based Actions | :white_check_mark: | :white_check_mark: | :x: | | | Intent-Based Execution | :x: | :x: | :white_check_mark: | | | Fast Settlement | :x: | :x: | :white_check_mark: | | Requirements @span | Contract Deployment | :white_check_mark: | :x: |:x: | ::end-spantable::
## Choose a Transfer Mechanism Wormhole provides two distinct mechanisms for transferring assets cross-chain: [Native Token Transfers (NTT)](/docs/products/native-token-transfers/overview/){target=\_blank} and [Token Bridge](/docs/products/token-bridge/overview/){target=\_blank}. Both options offer distinct integration paths and feature sets tailored to your requirements, as outlined below. | Feature | Native Token Transfers | Token Bridge | |------------------------|----------------------------------------------------------------------------|-----------------------------------------------| | **Best for** | DeFi governance, native assets with multichain liquidity | Consumer apps, games, wrapped-token use cases | | **Mechanism** | Burn-and-mint or hub-and-spoke | Lock-and-mint | | **Security** | Configurable rate limiting, pausing, access control, threshold attestations. Integrated Global Accountant | Preconfigured rate limiting and integrated Global Accountant | | **Contract Ownership** | User retains ownership and upgrade authority on each chain | Managed via Wormhole Governance | | **Token Contracts** | Native contracts owned by your protocol governance | Wrapped asset contract owned by the Wormhole Token Bridge contract, upgradeable via a 13/19 Guardian governance process. | | **Integration** | Customizable, flexible framework for advanced deployments | Straightforward, permissionless deployment | | **Examples** | [NTT Connect](https://github.com/wormhole-foundation/demo-ntt-connect){target=\_blank}, [NTT TypeScript SDK](https://github.com/wormhole-foundation/demo-ntt-ts-sdk){target=\_blank} | [Portal Bridge UI](https://portalbridge.com/){target=\_blank} | In the following video, Wormhole Foundation DevRel Pauline Barnades walks you through the key differences between Wormhole’s Native Token Transfers (NTT) and Token Bridge and how to select the best option for your use case:
Beyond asset transfers, Wormhole provides additional tools for cross-chain data and governance. ## Bridging UI [**Connect**](/docs/products/connect/overview/){target=\_blank} is a pre-built bridging UI for cross-chain token transfers, requiring minimal setup. Best for projects seeking an easy-to-integrate UI for bridging without modifying contracts. ## Real-time Data [**Queries**](/docs/products/queries/overview/){target=\_blank} is a data retrieval service to fetch on-chain data from multiple networks. Best for applications that need multichain analytics, reporting, and data aggregation. ## Multichain Governance [**MultiGov**](/docs/products/multigov/overview/){target=\_blank} is a unified governance framework that manages multichain protocol governance through a single mechanism. Best for projects managing multichain governance and protocol updates. --- END CONTENT --- Doc-Content: https://raw.githubusercontent.com/wormhole-foundation/wormhole-docs/refs/heads/main/products/settlement/overview.md --- BEGIN CONTENT --- --- title: Settlement Overview description: Discover how Settlement enables fast, intent-based token transfers across chains using a unified system of solver auctions and integrated execution routes. categories: Settlement, Transfer --- # Settlement Overview Wormhole Settlement is a multichain transfer system that allows users to specify what they want to happen, such as sending or swapping tokens, without handling the execution themselves. Instead, off-chain agents called solvers compete to fulfill these user intents. Settlement prioritizes speed, execution quality, and reliability. Its primary route, Mayan Swift, leverages fast off-chain auctions among a curated set of solvers to achieve low-latency bridging with minimal slippage. All settlement steps remain verifiable on-chain through Wormhole messages. For broader use cases and protocol-level execution, Mayan MCTP provides an alternative path. It wraps Circle’s CCTP to facilitate native USDC bridging and token delivery in a single, verifiable flow. While slower due to chain finality constraints, MCTP offers a reliable mechanism for cross-chain transfers. ## Key Features - **Intent-based architecture**: Users express what they want to happen (e.g., swap X for Y on chain Z), and solvers execute it. - **Solver auctions**: Solvers compete in on-chain auctions for the right to fulfill intents, improving execution quality. - **Fast and fallback-capable**: Combines high-speed execution with a reliable fallback path. - **Minimal slippage**: Settlement abstracts away complex balancing operations and uses shuttle assets like USDC and tokens deployed via NTT. - **On-chain verifiability**: Even though auctions are off-chain, all settlement steps remain verifiable on-chain via Wormhole messages. - **Two integrated routes**: Mayan Swift for speed, Mayan MCTP for compatibility and redundancy. ## How It Works At the core of Settlement are two components: - **Intents**: Signed transactions where a user defines what outcome they want (e.g., send USDC to another chain and receive ETH). It abstracts what the user wants, not how it should be executed. - **Solvers**: Third-party agents that compete in auctions to fulfill these intents. They front capital, perform swaps or transfers, and receive fees in return. Settlement currently supports the following integrated protocols. ### Mayan Swift Mayan Swift implements a traditional intent-based architecture, where solvers compete to fulfill user intents by utilizing their inventory. It offers fast execution, typically around 12 seconds. To participate, solvers must hold assets on multiple chains, which can lead to imbalances: some chains may get depleted while others accumulate excess. This requires occasional rebalancing and adds operational overhead. Despite that, Mayan Swift is ideal for high-speed transfers and benefits from open, competitive auctions that can drive down execution prices. The diagram below shows how Mayan Swift handles a cross-chain intent when a user wants to swap ARB on Arbitrum for WIF on Solana. Behind the scenes, the process is more involved and relies on solver-managed liquidity across both chains. 1. **Solver initiates on Arbitrum**: Solver swaps ARB → ETH and deposits ETH into an escrow on Arbitrum. 2. **VAA emitted to Solana**: A [Verifiable Action Approval (VAA)](/docs/protocol/infrastructure/vaas/){target=\_blank} triggers the solver to release SOL on Solana, which is swapped to WIF using an aggregator. 3. **User receives WIF**: Once the user receives WIF, a second VAA is emitted to finalize the transfer and releases the ETH held in the escrow to the solver. 4. **Failure handling**: If any step fails, the ETH in escrow is either retained or returned to the user — the solver only gets paid if execution succeeds. ```mermaid sequenceDiagram participant User participant Solver_ARB as Solver (Arbitrum) participant Escrow participant Wormhole participant Solver_SOL as Solver (Solana) participant Aggregator Note over User,Aggregator: User has ARB and wants WIF User->>Solver_ARB: Submit intent (ARB → WIF) Solver_ARB->>Escrow: Swaps ARB → ETH and deposits ETH Escrow-->>Wormhole: Emits VAA Wormhole-->>Solver_SOL: Delivers VAA Solver_SOL->>Aggregator: Releases SOL and swaps to WIF Aggregator->>Solver_SOL: Receives WIF Solver_SOL->>User: Sends WIF User-->>Wormhole: Emits final VAA Wormhole-->>Escrow: Confirms receipt Escrow->>Solver_ARB: Releases ETH to solver ``` ### Mayan MCTP Mayan MCTP is a fallback protocol that wraps Circle’s CCTP into the Settlement framework. It bundles USDC bridging and swaps into a single operation handled by protocol logic. This route is slower due to its reliance on chain finality. However, it provides broad compatibility and redundancy, making it useful when faster routes are unavailable or when targeting chains that aren’t supported by Swift. While typically more expensive due to protocol fees, it ensures reliable settlement when faster options are unavailable. ## Use Cases - **Cross-Chain Perpetuals** - [**Settlement**](/docs/products/settlement/get-started/){target=\_blank}: Provides fast token execution across chains. - [**Queries**](/docs/products/queries/overview/){target=\_blank}: Fetch live prices and manage position state across chains. - **Bridging Intent Library** - [**Settlement**](/docs/products/settlement/get-started/){target=\_blank}: Handles user-defined bridge intents. - [**Messaging**](/docs/products/messaging/overview/){target=\_blank}: Triggers cross-chain function calls. - **Multichain Prediction Markets** - [**Settlement**](/docs/products/settlement/get-started/){target=\_blank}: Executes token flows between chains. - [**Queries**](/docs/products/queries/overview/){target=\_blank}: Gets market data and tracks state. ## Next Steps Start building with Settlement or dive deeper into specific components: - **[Get Started with Settlement](/docs/products/settlement/get-started/)**: Follow a hands-on demo using Mayan Swift. - **[Architecture Documentation](/docs/products/settlement/concepts/architecture/)**: Explore the Settlement architecture and components. --- END CONTENT --- Doc-Content: https://raw.githubusercontent.com/wormhole-foundation/wormhole-docs/refs/heads/main/products/token-bridge/overview.md --- BEGIN CONTENT --- --- title: Token Bridge Overview description: With Wormhole Token Bridge, you can enable secure, multichain communication, build multichain apps, sync data, and coordinate actions across blockchains. categories: Token Bridge, Transfer --- # Token Bridge Overview The Token Bridge is a Wormhole module for bridging wrapped tokens across various blockchain networks. Locking assets on one network and minting corresponding wrapped tokens on another facilitates secure, efficient, and composable multichain token movement. This overview covers Token Bridge's main features, general processes, and possible next steps to begin building a cross-chain application. ## Key Features Token Bridge is built to solve interoperability problems in multichain token transfers. Key features include: - **Interoperability**: Transfer standards-compliant tokens (e.g., ERC-20, SPL) across over 30 [supported chains](/docs/products/reference/supported-networks/#token-bridge){target=\_blank}. - **Lock-and-mint mechanism**: Mint wrapped tokens backed 1:1 by locked assets on the source chain. - **Preserved metadata**: Ensure that token properties like name, symbol, and decimals persist across chains. - **Transfer with payload**: Attach arbitrary data to token transfers, enabling the triggering of specific actions. - **Decentralized security**: Verified by the [Guardian Network](/docs/protocol/infrastructure/guardians/){target=\_blank}, ensuring cross-chain consistency and message authenticity. ## How It Works The Token Bridge provides a reliable foundation for multichain interoperability at scale. The transfer process follows these key steps: 1. **Attestation**: The token’s metadata (e.g., symbol, name, decimals) is registered on the destination chain. This step is only required once per token. 2. **Locking**: On the source chain, the native token is locked in a custody account. 3. **Message emission**: The [Guardian Network](/docs/protocol/infrastructure/guardians/){target=\_blank} verifies and emits a [VAA](/docs/protocol/infrastructure/vaas/){target=\_blank}. 4. **Verification**: The VAA is submitted and verified on the destination chain to confirm authenticity. 5. **Minting**: A wrapped version of the token is minted (or the native token is released) to the recipient on the destination chain. This diagram showcases a simplified flow of Alice bridging ETH from Ethereum to her account on Solana. ```mermaid sequenceDiagram participant Alice participant Ethereum participant GuardianNetwork participant Solana Alice->>Ethereum: Lock ETH in Token Bridge contract Ethereum->>GuardianNetwork: Emit transfer message GuardianNetwork->>GuardianNetwork: Verify and sign message GuardianNetwork->>Solana: Submit signed message Solana->>Solana: Verify message and mint wrapped ETH (WETH) Solana->>Alice: Deliver wrapped ETH on Solana ``` For a more in-depth understanding of how the Token Bridge works, see the [Flow of a Transfer](/docs/products/token-bridge/concepts/transfer-flow/){target=\_blank} page. ## Use Cases Here are key use cases that highlight the power and versatility of the Token Bridge. - **Multichain Rewards and Token Utility in Decentralized Platforms (e.g., [Chingari](https://chingari.io/){target=\_blank})** - [**Token Bridge**](/docs/products/token-bridge/get-started/): Transfer tokens between chains. - [**Messaging**](/docs/products/messaging/overview/): Facilitate the distribution and claiming processes of rewards. - **Tokenized Gaming Rewards** - [**Token Bridge**](/docs/products/token-bridge/get-started/): Handle the underlying lock-and-mint logic securely. - [**Connect**](/docs/products/connect/overview/): Provide a user-friendly way to move game tokens across chains. - **Multichain DeFi Arbitrage** - [**Token Bridge**](/docs/products/token-bridge/get-started/): Enables rapid and secure movement of DeFi assets. - [**Connect**](/docs/products/connect/overview/): Provides a UI widget to onboard users and facilitate seamless multichain swaps within DeFi aggregator platforms. ## Next Steps If you are looking for more guided practice, take a look at: - [**Get Started with Token Bridge**](/docs/products/token-bridge/get-started/): Perform token transfers using the Token Bridge, including manual and automatic transfers. - [**Complete Token Transfer Flow**](/docs/products/token-bridge/tutorials/transfer-workflow/): Build a cross-chain native token transfer app using Wormhole’s TypeScript SDK, supporting native token transfers across EVM and non-EVM chains. - [**Create Multichain Tokens**](/docs/products/token-bridge/tutorials/multichain-token/): Craft a multichain token using Wormhole's Portal Bridge. --- END CONTENT --- Doc-Content: https://raw.githubusercontent.com/wormhole-foundation/wormhole-docs/refs/heads/main/products/cctp-bridge/get-started.md --- BEGIN CONTENT --- --- title: Get Started with CCTP description: Transfer USDC across chains using Wormhole's CCTP integration with the TypeScript SDK, including setup, attestation, and redemption steps. categories: Transfer, CCTP --- # Get Started with CCTP [Wormhole CCTP](/docs/products/cctp-bridge/overview/){target=\_blank} enables native USDC transfers between supported chains by burning tokens on the source chain and minting them on the destination. This provides native, canonical USDC movement without the need for wrapped tokens. In this guide, you will use the [Wormhole TypeScript SDK](https://github.com/wormhole-foundation/wormhole-sdk-ts){target=\_blank} to perform an automatic cross-chain USDC transfer using Circle's CCTP protocol. You will initiate the transfer on the source chain, and Wormhole's relayer will automatically handle Circle's attestation and redemption steps to complete the transfer on the destination chain. ## Prerequisites Before you begin, make sure you have the following: - [Node.js and npm](https://docs.npmjs.com/downloading-and-installing-node-js-and-npm){target=\_blank} - Wallets funded with native tokens and USDC on two [supported CCTP chains](/docs/products/reference/supported-networks/#cctp){target=\_blank} This example uses an Avalanche Fuji wallet with [USDC](https://faucet.circle.com/){target=\_blank} and [AVAX](https://core.app/tools/testnet-faucet/?subnet=c&token=c){target=\_blank}, as well as a Sepolia wallet with testnet [ETH](https://www.alchemy.com/faucets/ethereum-sepolia){target=\_blank}, to pay the transaction fees. You can adapt the steps to work with any [supported EVM chains](/docs/products/reference/supported-networks/#cctp){target=\_blank} that support CCTP. ## Configure Your Token Transfer Environment 1. Create a new directory and initialize a Node.js project: ```bash mkdir cctp-bridge cd cctp-bridge npm init -y ``` 2. Install the required dependencies: ```bash npm install @wormhole-foundation/sdk npm install -D tsx typescript ``` 3. Create a `transfer.ts` file to handle the multichain transfer logic and a `helper.ts` file to manage wallet signers: ```bash touch transfer.ts helper.ts ``` 4. Set up secure access to your wallets. This guide assumes you are loading your `EVM_PRIVATE_KEY` from a secure keystore of your choice, such as a secrets manager or a CLI-based tool like [`cast wallet`](https://book.getfoundry.sh/reference/cast/cast-wallet){target=\_blank}. !!! warning If you use a `.env` file during development, add it to your `.gitignore` to exclude it from version control. Never commit private keys or mnemonics to your repository. ## Perform a CCTP Transfer This section walks you through a complete automatic USDC transfer using Wormhole's CCTP integration. You will initiate the transfer on Avalanche Fuji, and Wormhole's relayer will automatically handle the Circle attestation and finalize the redemption on Sepolia. Start by defining utility functions for signer and token setup: 1. In `helper.ts`, define functions to load private keys and instantiate EVM signers: ```ts title="helper.ts" import { ChainAddress, ChainContext, Network, Signer, Wormhole, Chain, } from '@wormhole-foundation/sdk'; import solana from '@wormhole-foundation/sdk/solana'; import sui from '@wormhole-foundation/sdk/sui'; import evm from '@wormhole-foundation/sdk/evm'; /** * Returns a signer for the given chain using locally scoped credentials. * The required values (EVM_PRIVATE_KEY, SOL_PRIVATE_KEY, SUI_MNEMONIC) must * be loaded securely beforehand, for example via a keystore, secrets * manager, or environment variables (not recommended). */ export async function getSigner( chain: ChainContext ): Promise<{ chain: ChainContext; signer: Signer; address: ChainAddress; }> { let signer: Signer; const platform = chain.platform.utils()._platform; switch (platform) { case 'Evm': signer = await ( await evm() ).getSigner(await chain.getRpc(), EVM_PRIVATE_KEY!); break; case 'Solana': signer = await ( await solana() ).getSigner(await chain.getRpc(), SOL_PRIVATE_KEY!); break; case 'Sui': signer = await ( await sui() ).getSigner(await chain.getRpc(), SUI_MNEMONIC!); break; default: throw new Error(`Unsupported platform: ${platform}`); } return { chain, signer: signer as Signer, address: Wormhole.chainAddress(chain.chain, signer.address()), }; } ``` 2. In `transfer.ts`, add the script to perform the automatic transfer using CCTP: ```ts title="transfer.ts" import { wormhole, amount } from '@wormhole-foundation/sdk'; import evm from '@wormhole-foundation/sdk/evm'; import solana from '@wormhole-foundation/sdk/solana'; import sui from '@wormhole-foundation/sdk/sui'; import { getSigner } from './helper'; (async function () { // Initialize the Wormhole object for the Testnet environment and add supported chains (evm, solana and sui) const wh = await wormhole('Testnet', [evm, solana, sui]); // Grab chain Contexts -- these hold a reference to a cached rpc client const sendChain = wh.getChain('Avalanche'); const rcvChain = wh.getChain('Sepolia'); // Get signer from local key const source = await getSigner(sendChain); const destination = await getSigner(rcvChain); // Define the amount of USDC to transfer (in the smallest unit, so 1.000001 USDC = 1,000,001 units assuming 6 decimals) const amt = 1_000_001n; // Whether to use automatic delivery const automatic = true; // The amount of native gas to send with the transfer const nativeGas = amount.units(amount.parse('0.1', 6)); // Create the circleTransfer transaction (USDC-only) const xfer = await wh.circleTransfer( amt, source.address, destination.address, automatic, undefined, nativeGas ); // Initiate the transfer on the source chain (Avalanche) console.log('Starting Transfer'); const srcTxids = await xfer.initiateTransfer(source.signer); console.log(`Started Transfer: `, srcTxids); process.exit(0); })(); ``` 3. Run the script to execute the transfer: ```bash npx tsx transfer.ts ``` You will see terminal output similar to the following:
npx tsx transfer.ts Starting Transfer Started Transfer: [ '0xa3a545e65865c95f814132ac689c2ff5a20bfa3ca3d68bab48230708de342841']
To verify the transaction and view its details, paste the transaction hash into [Wormholescan](https://wormholescan.io/#/?network=Testnet){target=\_blank}. ## Next Steps Now that you've completed a CCTP USDC transfer using the Wormhole SDK, you're ready to explore more advanced features and expand your integration: - [**Circle CCTP Documentation**](https://developers.circle.com/cctp){target=\_blank}: Learn how USDC cross-chain transfers work and explore advanced CCTP features. --- END CONTENT --- Doc-Content: https://raw.githubusercontent.com/wormhole-foundation/wormhole-docs/refs/heads/main/products/connect/get-started.md --- BEGIN CONTENT --- --- title: Get Started with Connect description: Follow this guide to configure and use the Connect UI widget to easily add an intuitive, multichain asset transfer UI to your web applications. categories: Connect, Transfer --- # Get Started with Connect :simple-github: [Source code on GitHub](https://github.com/wormhole-foundation/demo-basic-connect){target=\_blank} Connect helps you to easily add an intuitive, multichain asset transfer UI to your web applications. The guide demonstrates how to configure the Connect widget, add it to a React application, and view it locally. ## Install Connect To install the [Wormhole Connect npm package](https://www.npmjs.com/package/@wormhole-foundation/wormhole-connect){target=\_blank}, run the following command: ```bash npm i @wormhole-foundation/wormhole-connect ``` ## Prerequisites Before you begin, make sure you have the following: - [Node.js and npm](https://docs.npmjs.com/downloading-and-installing-node-js-and-npm){target=\_blank} - (Optional) To test a transfer from your demo app, you'll need: - A wallet with [Sui testnet tokens](https://faucet.sui.io/){target=\_blank} - A wallet with an Avalanche Fuji address (to use as the recipient; no tokens required) ## Install and Set Up Project 1. Clone the demo repository and navigate to the project directory: ```bash git clone https://github.com/wormhole-foundation/demo-basic-connect.git cd demo-basic-connect ``` 2. Install the dependencies: ```bash npm install ``` 3. Start the application: ```bash npm start ``` 4. Open your browser to `http://localhost:3000` to view the application locally. It will look similar to the following: ![Deployed Connect Widget](/docs/images/products/connect/tutorials/react-dapp/get-started/connect-get-started-01.webp) ## Configure Connect Open the `App.tsx` file in your code editor of choice. You will see code similar to the following: ```typescript title="App.tsx" import './App.css'; import WormholeConnect, { type config, WormholeConnectTheme } from '@wormhole-foundation/wormhole-connect'; function App() { const config: config.WormholeConnectConfig = { // Define the network network: 'Testnet', // Define the chains chains: ['Sui', 'Avalanche'], // UI configuration ui: { title: 'SUI Connect TS Demo', }, }; const theme: WormholeConnectTheme = { // Define the theme mode: 'dark', primary: '#78c4b6', }; return ; } export default App; ``` The preceding sample code configures Connect by setting values inside `config` and `theme` as follows: - **Defines the network**: Options include `Mainnet`, `Testnet`, or `Devnet`. - **Defines chains to include**: This example uses Sui and Avalanche. See the complete list of [Connect-supported chain names](https://github.com/wormhole-foundation/wormhole-sdk-ts/blob/main/core/base/src/constants/chains.ts){target=\_blank} if you would like to use different chains. - **Adds a title to UI**: (Optional) If defined, it will render above the widget in the UI. - **Defines the theme**: This example sets the mode to `dark` and adds a primary color. ## Interact with Connect Congratulations! You've successfully used Connect to create a simple multichain token transfer application. You can now follow the prompts in the UI to connect your developer wallets and send a test transfer. ## Next Steps Use the following guides to configure your Connect instance and integrate it into your application: - **[Data Configuration](/docs/products/connect/configuration/data/)**: Learn how to specify custom networks and RPC endpoints, integrate different bridging protocols, add new tokens, and more. - **[Theme Configuration](/docs/products/connect/configuration/theme/)**: Learn how to customize Connect's look and feel to match your application's branding. - **[Integrate Connect into a React DApp](/docs/products/connect/tutorials/react-dapp/)**: Learn how to integrate Connect into a React application, including setting up the widget and handling transfers. --- END CONTENT --- Doc-Content: https://raw.githubusercontent.com/wormhole-foundation/wormhole-docs/refs/heads/main/products/native-token-transfers/get-started.md --- BEGIN CONTENT --- --- title: Get Started with NTT description: NTT enables cross-chain token movement without wrapping. Install the CLI, deploy test tokens, and scaffold a project to integrate NTT into your app. categories: NTT, Transfer --- # Get Started with NTT ## Introduction The [Native Token Transfers (NTT)](/docs/products/native-token-transfers/overview){target=\_blank} framework enables seamless cross-chain token movement without wrapping or liquidity pools. This guide shows you how to install the NTT CLI, which is used to configure and deploy native token contracts, and scaffold your first project for deployment on testnet or mainnet. If you are looking for a no-code experience to deploy on mainnet, you can explore the [NTT Launchpad](https://ntt.wormhole.com){target=\_blank}. ## Prerequisites Before you begin, make sure you have: - [Node.js and npm installed](https://docs.npmjs.com/downloading-and-installing-node-js-and-npm){target=\_blank} - [Bun installed](https://bun.sh/){target=\_blank} - A wallet private key with tokens on supported chains - ERC-20 or SPL tokens already deployed on the source and destination chains ## Don’t Have a Token Yet? To use NTT, you must have a token already deployed on the source and destination chains. If you don’t have one, follow the quick guides below to deploy a basic test token. ???- interface "Deploy an ERC-20 Token on EVM" Use the [example NTT token repository](https://github.com/wormhole-foundation/example-ntt-token){target=\_blank} to deploy a basic ERC-20 token contract on testnet. 1. **Install Foundry** - install the [Forge CLI](https://getfoundry.sh/introduction/installation/){target=\_blank} 2. **Clone the repository** – fetch the example contract repository ```bash git clone https://github.com/wormhole-foundation/example-ntt-token.git cd example-ntt-token ``` 3. **Deploy the token contract** – deploy to testnet with your preferred name, symbol, minter, and owner addresses ```bash forge create --broadcast \ --rpc-url INSERT_RPC_URL \ --private-key INSERT_YOUR_PRIVATE_KEY \ src/PeerToken.sol:PeerToken \ --constructor-args "INSERT_TOKEN_NAME" "INSERT_TOKEN_SYMBOL" INSERT_MINTER_ADDRESS INSERT_OWNER_ADDRESS ``` 4. **Mint tokens** – send tokens to your address ```bash cast send INSERT_TOKEN_ADDRESS \ "mint(address,uint256)" \ INSERT_RECIPIENT_ADDRESS \ INSERT_AMOUNT_IN_WEI \ --private-key INSERT_YOUR_PRIVATE_KEY \ --rpc-url INSERT_RPC_URL ``` !!! note This token uses 18 decimals by default. All minting values must be specified in `wei` (1 token = 10^18). ???- interface "Create and Mint SPL Tokens" This section walks you through generating a Solana wallet, deploying an SPL token, creating a token account, and minting tokens. 1. **Generate a Solana key pair** - run the following command to create a new wallet: ```bash solana-keygen grind --starts-with w:1 --ignore-case ``` 2. **Set Solana configuration** - configure the Solana CLI to use the generated key pair using the following command: ```bash solana config set --keypair INSERT_PATH_TO_KEYPAIR_JSON ``` 3. **Select an RPC URL** - configure Solana to use the appropriate network using one of the following commands: === "Mainnet" ```bash solana config set -um ``` === "Testnet" ```bash solana config set -ut ``` === "Devnet" ```bash solana config set -ud ``` 4. **Fund your wallet** - ensure you have enough SOL to create a token. If deploying on devnet, request an airdrop with the following commands: ```bash solana airdrop 2 solana balance ``` 5. **Install SPL Token CLI** - install or update the required [CLI tool](https://www.solana-program.com/docs/token#setup){target=\_blank} ```bash cargo install spl-token-cli ``` 6. **Create a new SPL token** - initialize the token on Solana ```bash spl-token create-token ``` 7. **Create a token account** - generate an account to hold the token ```bash spl-token create-account INSERT_TOKEN_ADDRESS ``` 8. **Mint tokens** - send 1000 tokens to the created account ```bash spl-token mint INSERT_TOKEN_ADDRESS 1000 ``` !!! note NTT versions `>=v2.0.0+solana` support SPL tokens with [transfer hooks](https://www.solana-program.com/docs/transfer-hook-interface){target=\_blank}. ## Install NTT CLI
The NTT CLI is recommended to deploy and manage your cross-chain token configuration. 1. Run the installation command in your terminal: ```bash curl -fsSL https://raw.githubusercontent.com/wormhole-foundation/native-token-transfers/main/cli/install.sh | bash ``` 2. Verify the NTT CLI is installed: ```bash ntt --version ``` ??? warning "Command not found?" If the `ntt` command is not recognized after installation, ensure that [Bun](https://bun.sh/) is installed and that its binary directory is included in your shell’s PATH. Append this line to your shell config (e.g., `~/.zshrc` or `~/.bashrc`): ```bash echo 'export PATH="$HOME/.bun/bin:$PATH"' >> ~/.zshrc ``` Then, restart your terminal or run `source ~/.zshrc`. ## Initialize a New NTT Project 1. Once the CLI is installed, scaffold a new project by running: ```bash ntt new my-ntt-project cd my-ntt-project ``` 2. Initialize a new `deployment.json` file specifying the network: === "Mainnet" ```bash ntt init Mainnet ``` === "Testnet" ```bash ntt init Testnet ``` After initialization, the `deployment.json` file contains your NTT configuration and starts with the selected network. === "Mainnet" ```json { "network": "Mainnet", "chains": {} } ``` === "Testnet" ```json { "network": "Testnet", "chains": {} } ``` In the deployment steps, you will add your supported chains, their token addresses, deployment modes, and any custom settings. ## Next Steps You have scaffolded your NTT project and initialized the configuration file. Next, follow the appropriate guide below to configure your supported chains and deploy NTT contracts: - [Deploy to EVM](/docs/products/native-token-transfers/guides/deploy-to-evm/){target=\_blank}: Deploy NTT on EVM-compatible chains. - [Deploy to Solana](/docs/products/native-token-transfers/guides/deploy-to-solana/){target=\_blank}: Deploy NTT on Solana. --- END CONTENT --- Doc-Content: https://raw.githubusercontent.com/wormhole-foundation/wormhole-docs/refs/heads/main/products/settlement/get-started.md --- BEGIN CONTENT --- --- title: Get Started description: Perform a cross-chain token swap using Wormhole Settlement and the Mayan Swift route with the TypeScript SDK on mainnet. categories: Settlement, Transfer --- # Get Started with Settlement [Settlement](/docs/products/settlement/overview/){target=\_blank} is Wormhole’s intent-based execution layer, enabling fast, multichain token transfers. It coordinates routing logic, relayers, and on-chain infrastructure to let users express what they want to be done, not how. This guide walks you through performing a real token swap using the [Mayan Swift route](https://mayan.finance){target=\_blank}, one of the three integrated Settlement protocols, with the [Wormhole TypeScript SDK](/docs/tools/typescript-sdk/get-started/){target=\_blank}. By the end, you'll have a working script that: - Resolves token transfer routes using Mayan Swift - Quotes and validates the best route - Initiates a swap on a source chain and completes the transfer on a destination chain !!! note Mayan Swift currently supports **mainnet only**. Attempting to run this demo on a testnet will fail. ## Prerequisites Before you begin, ensure you have the following: - [Node.js and npm](https://docs.npmjs.com/downloading-and-installing-node-js-and-npm){target=\_blank} installed on your machine - Wallets funded with tokens on two [supported chains](/docs/products/reference/supported-networks/#settlement){target=\_blank} This example uses Ethereum as the source chain and Solana as the destination. As a result, you'll need an Ethereum wallet with ETH for gas and a Solana wallet with SOL for fees. You can adapt the example to match your preferred chains. ## Set Up a Project Start by scaffolding a basic Node.js project and installing the required SDKs. 1. Create a new project folder: ```bash mkdir settlement-swap cd settlement-swap npm init -y ``` 2. Install the required dependencies: ```bash npm install @wormhole-foundation/sdk-connect \ @wormhole-foundation/sdk-evm \ @wormhole-foundation/sdk-solana \ @mayanfinance/wormhole-sdk-route \ dotenv npm install -D typescript tsx ``` 3. Create the file structure: ```bash mkdir src touch src/helpers.ts src/swap.ts .env .gitignore ``` 4. Set up secure access to your wallets. This guide assumes you are loading your `MAINNET_ETH_PRIVATE_KEY` and `MAINNET_SOL_PRIVATE_KEY` from a secure keystore of your choice, such as a secrets manager or a CLI-based tool like [cast wallet](https://getfoundry.sh/cast/reference/cast-wallet){target=\_blank}. !!! warning If you use a .env file during development, add it to your .gitignore to exclude it from version control. Never commit private keys or mnemonics to your repository. ## Perform a Token Swap This section shows you how to perform a token swap using the Mayan Swift route. You will define a helper function to configure the source and destination chain signers. Then, you'll create a script that initiates a transfer on Ethereum, uses the Mayan Swift resolver to find valid routes, sends the transaction, and completes the transfer on Solana. 1. Open `helper.ts` and define the `getSigner` utility function to load private keys, instantiate signers for Ethereum and Solana, and return the signers along with the Wormhole-formatted address: ```ts title="src/helpers.ts" import { Chain, ChainAddress, ChainContext, Network, Signer, Wormhole, } from '@wormhole-foundation/sdk-connect'; import { getEvmSignerForKey } from '@wormhole-foundation/sdk-evm'; import { getSolanaSigner } from '@wormhole-foundation/sdk-solana'; /** * Returns a signer for the given chain using locally scoped credentials. * The required values (MAINNET_ETH_PRIVATE_KEY, MAINNET_SOL_PRIVATE_KEY) * must be loaded securely beforehand, for example via a keystore, * secrets manager, or environment variables (not recommended). */ // Define Transfer Interface export interface SignerContext { signer: Signer; address: ChainAddress; } export async function getSigner( chain: ChainContext ): Promise> { let signer: Signer; const platform = chain.platform.utils()._platform; switch (platform) { case 'Solana': signer = await getSolanaSigner( await chain.getRpc(), getEnv('MAINNET_SOL_PRIVATE_KEY') ); break; case 'Evm': signer = await getEvmSignerForKey( await chain.getRpc(), getEnv('MAINNET_ETH_PRIVATE_KEY') ); break; default: throw new Error('Unrecognized platform: ' + platform); } return { signer: signer as Signer, address: Wormhole.chainAddress(chain.chain, signer.address()), }; } ``` 2. In `swap.ts`, add the following script, which will handle all of the logic required to perform the token swap: ```ts title="src/swap.ts" import { Wormhole, routes } from '@wormhole-foundation/sdk-connect'; import { EvmPlatform } from '@wormhole-foundation/sdk-evm'; import { SolanaPlatform } from '@wormhole-foundation/sdk-solana'; import { MayanRouteSWIFT } from '@mayanfinance/wormhole-sdk-route'; import { getSigner } from './helpers'; (async function () { // Setup const wh = new Wormhole('Mainnet', [EvmPlatform, SolanaPlatform]); const sendChain = wh.getChain('Ethereum'); const destChain = wh.getChain('Solana'); // To transfer native ETH on Ethereum to native SOL on Solana const source = Wormhole.tokenId(sendChain.chain, 'native'); const destination = Wormhole.tokenId(destChain.chain, 'native'); // Create a new Wormhole route resolver, adding the Mayan route to the default list // @ts-ignore: Suppressing TypeScript error because the resolver method expects a specific type, // but MayanRouteSWIFT is compatible and works as intended in this context. const resolver = wh.resolver([MayanRouteSWIFT]); // Show supported tokens const dstTokens = await resolver.supportedDestinationTokens( source, sendChain, destChain ); console.log(dstTokens.slice(0, 5)); // Load signers and addresses from helpers const sender = await getSigner(sendChain); const receiver = await getSigner(destChain); // Creating a transfer request fetches token details // since all routes will need to know about the tokens const tr = await routes.RouteTransferRequest.create(wh, { source, destination, }); // Resolve the transfer request to a set of routes that can perform it const foundRoutes = await resolver.findRoutes(tr); const bestRoute = foundRoutes[0]!; // Specify the amount as a decimal string const transferParams = { amount: '0.002', options: bestRoute.getDefaultOptions(), }; // Validate the queries route let validated = await bestRoute.validate(tr, transferParams); if (!validated.valid) { console.error(validated.error); return; } console.log('Validated: ', validated); const quote = await bestRoute.quote(tr, validated.params); if (!quote.success) { console.error(`Error fetching a quote: ${quote.error.message}`); return; } console.log('Quote: ', quote); // Initiate the transfer const receipt = await bestRoute.initiate( tr, sender.signer, quote, receiver.address ); console.log('Initiated transfer with receipt: ', receipt); await routes.checkAndCompleteTransfer( bestRoute, receipt, receiver.signer, 15 * 60 * 1000 ); })(); ``` 3. Execute the script to initiate and complete the transfer: ```bash npx tsx src/swap.ts ``` If successful, you’ll see terminal output like this:
npx tsx src/swap.ts Validated: { valid: true, ... } Quote: { success: true, ... } Initiated transfer with receipt: ... Checking transfer state... Current Transfer State: SourceInitiated Current Transfer State: SourceInitiated Current Transfer State: SourceInitiated Current Transfer State: DestinationFinalized
Congratulations! You've just completed a cross-chain token swap from Ethereum to Solana using Settlement. ## Customize the Integration You can tailor the example to your use case by adjusting: - **Tokens and chains**: Use `getSupportedTokens()` to explore what's available. - **Source and destination chains**: Modify `sendChain` and `destChain` in `swap.ts`. - **Transfer settings**: Update the amount or route parameters. - **Signer management**: Modify `src/helpers.ts` to integrate with your preferred wallet setup. ## Next Steps Once you've chosen a path, follow the corresponding guide to start building: - [**`demo-mayanswift`**](https://github.com/wormhole-foundation/demo-mayanswift){target=\_blank}: Check out the repository for the full code example. --- END CONTENT --- Doc-Content: https://raw.githubusercontent.com/wormhole-foundation/wormhole-docs/refs/heads/main/products/cctp-bridge/reference/supported-networks.md --- BEGIN CONTENT --- --- title: CCTP Supported Networks description: Explore all blockchains supported by Wormhole CCTP, including network availability, block explorers, and cross-chain transfer support. categories: Transfer, CCTP --- # Supported Networks
| Ethereum | EVM | :white_check_mark: | :white_check_mark: | :x: | :material-web:Website:material-file-document:Developer Docs:octicons-package-16:Block Explorer | | Solana | SVM | :white_check_mark: | :white_check_mark: | :x: | :material-web:Website:material-file-document:Developer Docs:octicons-package-16:Block Explorer | | Aptos | Move VM | :white_check_mark: | :white_check_mark: | :x: | :material-web:Website:material-file-document:Developer Docs:octicons-package-16:Block Explorer | | Arbitrum | EVM | :white_check_mark: | :white_check_mark: | :x: | :material-web:Website:material-file-document:Developer Docs:octicons-package-16:Block Explorer | | Avalanche | EVM | :white_check_mark: | :white_check_mark: | :x: | :material-web:Website:material-file-document:Developer Docs:octicons-package-16:Block Explorer | | Base | EVM | :white_check_mark: | :white_check_mark: | :x: | :material-web:Website:material-file-document:Developer Docs:octicons-package-16:Block Explorer | | Linea | EVM | :white_check_mark: | :white_check_mark: | :x: | :material-web:Website:material-file-document:Developer Docs:octicons-package-16:Block Explorer | | Optimism | EVM | :white_check_mark: | :white_check_mark: | :x: | :material-web:Website:material-file-document:Developer Docs:octicons-package-16:Block Explorer | | Polygon | EVM | :white_check_mark: | :white_check_mark: | :x: | :material-web:Website:material-file-document:Developer Docs:octicons-package-16:Block Explorer | | Seievm | EVM | :white_check_mark: | :white_check_mark: | :x: | :material-web:Website:material-file-document:Developer Docs:octicons-package-16:Block Explorer | | Sonic | EVM | :white_check_mark: | :white_check_mark: | :x: | :material-web:Website:material-file-document:Developer Docs:octicons-package-16:Block Explorer | | Sui | Sui Move VM | :white_check_mark: | :white_check_mark: | :x: | :material-web:Website:material-file-document:Developer Docs:octicons-package-16:Block Explorer | | Unichain | EVM | :white_check_mark: | :white_check_mark: | :x: | :material-web:Website:material-file-document:Developer Docs:octicons-package-16:Block Explorer | | World Chain | EVM | :white_check_mark: | :x: | :x: | :material-web:Website:material-file-document:Developer Docs:octicons-package-16:Block Explorer |
--- END CONTENT --- Doc-Content: https://raw.githubusercontent.com/wormhole-foundation/wormhole-docs/refs/heads/main/products/connect/reference/support-matrix.md --- BEGIN CONTENT --- --- title: Features description: Explore a comprehensive Feature Support matrix and explain Wormhole's capabilities across networks for Token Bridge, CCTP, ETH Bridge, and more. categories: Connect, Transfer --- ## Feature Support Matrix {: #feature-support-matrix} *Scroll down for details about each column.* | **Network** | **Token Bridge** | **Token Bridge Relayer** | **Circle CCTP** | **ETH Bridge** | **Gas Drop Off** | |:-----------:|:----------------:|:------------------------:|:---------------:|:--------------:|:----------------:| | Solana | ✅ | ✅ | ✅ | ❌ | ✅ | | Ethereum | ✅ | ✅ | ✅ | ✅ | ✅ | | BSC | ✅ | ✅ | ❌ | ✅ | ✅ | | Polygon | ✅ | ✅ | ✅ | ✅ | ✅ | | Avalanche | ✅ | ✅ | ✅ | ✅ | ✅ | | Fantom | ✅ | ✅ | ❌ | ❌ | ✅ | | Kaia | ✅ | ❌ | ❌ | ❌ | ❌ | | Celo | ✅ | ✅ | ❌ | ❌ | ✅ | | Moonbeam | ✅ | ✅ | ❌ | ❌ | ✅ | | Injective | ✅ | ❌ | ❌ | ❌ | ❌ | | Sui | ✅ | ✅ | ✅ | ❌ | ✅ | | Aptos | ✅ | ❌ | ✅ | ❌ | ❌ | | Arbitrum | ✅ | ✅ | ✅ | ✅ | ✅ | | Optimism | ✅ | ✅ | ✅ | ✅ | ✅ | | Base | ✅ | ✅ | ✅ | ✅ | ✅ | | Sei | ✅ | ❌ | ❌ | ❌ | ❌ | | Scroll | ✅ | ❌ | ❌ | ❌ | ❌ | | Blast | ✅ | ❌ | ❌ | ❌ | ❌ | | X Layer | ✅ | ❌ | ❌ | ❌ | ❌ | ## Feature Explanation {: #feature-explanation} ### Token Bridge {: #token-bridge} Wormhole is best known for its Token Bridge transfer method. It locks assets on the source chain and mints Wormhole-wrapped "IOU" tokens on the destination chain. To transfer the assets back, the Wormhole-wrapped tokens are burned, unlocking the tokens on their original chain. This route appears if both of the following conditions are satisfied: - Both the origin and destination chains support Token Bridge - No non-Token Bridge routes are available for the selected token ### Token Bridge Relayer {: #token-bridge-relayer} On the [routes](/docs/products/connect/concepts/routes/){target=\_blank} page, this is referred to as the automatic route in the Token Bridge section. Trustless relayers can execute the second transaction on behalf of the user, so the user only needs to perform one transaction on the origin chain to have the tokens delivered to the destination automatically—for a small fee. This route appears if all of the following conditions are satisfied: - Both the origin and destination chains support Token Bridge - Both the origin and destination chains support Token Bridge relayer - No non-Token Bridge routes are available for the selected token - The relayer supports the selected token on the origin chain ### Circle CCTP {: #circle-cctp} [Circle](https://www.circle.com/){target=\_blank}, the issuer of USDC, provides a native way for native USDC to be transferred between [CCTP-enabled](https://www.circle.com/cross-chain-transfer-protocol){target=\_blank} chains. This route appears if all of the following conditions are satisfied: - Both the origin and destination chains support Circle CCTP - The selected token is native Circle-issued USDC ### ETH Bridge {: #eth-bridge} [Powered by Uniswap liquidity pools](https://github.com/wormhole-foundation/example-uniswap-liquidity-layer){target=\_blank}, this route can transfer native ETH or wstETH between certain EVMs without going through the native bridges. This route appears if all of the following conditions are satisfied: - Both the origin and destination chains support the ETH Bridge - The selected token is native ETH, wstETH, or canonical wETH ### Gas Drop Off {: #gas-drop-off} A relayer can drop off some gas tokens on the destination chain by swapping some of the assets transferred to the native gas token. This is useful if the user wishes to transfer assets to a chain where they don't already have gas. This way, they don't need to onboard into the ecosystem from a centralized exchange. This route appears if all of the following conditions are satisfied: - Both the origin and destination chains support gas drop off - An automatic route is selected - The relayer accepts the selected token to swap into the gas token --- END CONTENT --- Doc-Content: https://raw.githubusercontent.com/wormhole-foundation/wormhole-docs/refs/heads/main/products/connect/reference/supported-networks.md --- BEGIN CONTENT --- --- title: Connect Supported Networks description: Explore all blockchains supported by Wormhole Connect, including network availability, block explorers, and cross-chain transfer support. categories: Connect, Transfer --- # Supported Networks
| Ethereum | EVM | :white_check_mark: | :white_check_mark: | :white_check_mark: | :material-web:Website:material-file-document:Developer Docs:octicons-package-16:Block Explorer | | Solana | SVM | :white_check_mark: | :white_check_mark: | :x: | :material-web:Website:material-file-document:Developer Docs:octicons-package-16:Block Explorer | | Aptos | Move VM | :white_check_mark: | :white_check_mark: | :x: | :material-web:Website:material-file-document:Developer Docs:octicons-package-16:Block Explorer | | Arbitrum | EVM | :white_check_mark: | :white_check_mark: | :x: | :material-web:Website:material-file-document:Developer Docs:octicons-package-16:Block Explorer | | Avalanche | EVM | :white_check_mark: | :white_check_mark: | :x: | :material-web:Website:material-file-document:Developer Docs:octicons-package-16:Block Explorer | | Base | EVM | :white_check_mark: | :white_check_mark: | :x: | :material-web:Website:material-file-document:Developer Docs:octicons-package-16:Block Explorer | | Berachain | EVM | :white_check_mark: | :x: | :x: | :material-web:Website:material-file-document:Developer Docs:octicons-package-16:Block Explorer | | BNB Smart Chain | EVM | :white_check_mark: | :white_check_mark: | :x: | :material-web:Website:material-file-document:Developer Docs:octicons-package-16:Block Explorer | | Celo | EVM | :white_check_mark: | :white_check_mark: | :x: | :material-web:Website:material-file-document:Developer Docs:octicons-package-16:Block Explorer | | Fantom | EVM | :white_check_mark: | :white_check_mark: | :x: | :material-web:Website:material-file-document:Developer Docs:octicons-package-16:Block Explorer | | Mantle | EVM | :white_check_mark: | :white_check_mark: | :x: | :material-web:Website:material-file-document:Developer Docs:octicons-package-16:Block Explorer | | Mezo | EVM | :x: | :white_check_mark: | :x: | :material-web:Website:material-file-document:Developer Docs:octicons-package-16:Block Explorer | | Moonbeam | EVM | :white_check_mark: | :white_check_mark: | :x: | :material-web:Website:material-file-document:Developer Docs:octicons-package-16:Block Explorer | | Optimism | EVM | :white_check_mark: | :white_check_mark: | :x: | :material-web:Website:material-file-document:Developer Docs:octicons-package-16:Block Explorer | | Osmosis | CosmWasm | :x: | :x: | :white_check_mark: | :material-web:Website:material-file-document:Developer Docs:octicons-package-16:Block Explorer | | Polygon | EVM | :white_check_mark: | :x: | :x: | :material-web:Website:material-file-document:Developer Docs:octicons-package-16:Block Explorer | | Scroll | EVM | :white_check_mark: | :white_check_mark: | :x: | :material-web:Website:material-file-document:Developer Docs:octicons-package-16:Block Explorer | | Sui | Sui Move VM | :white_check_mark: | :white_check_mark: | :x: | :material-web:Website:material-file-document:Developer Docs:octicons-package-16:Block Explorer | | Unichain | EVM | :white_check_mark: | :white_check_mark: | :x: | :material-web:Website:material-file-document:Developer Docs:octicons-package-16:Block Explorer | | World Chain | EVM | :white_check_mark: | :white_check_mark: | :x: | :material-web:Website:material-file-document:Developer Docs:octicons-package-16:Block Explorer | | X Layer | EVM | :white_check_mark: | :white_check_mark: | :x: | :material-web:Website:material-file-document:Developer Docs:octicons-package-16:Block Explorer |
--- END CONTENT --- Doc-Content: https://raw.githubusercontent.com/wormhole-foundation/wormhole-docs/refs/heads/main/products/native-token-transfers/reference/cli-commands.md --- BEGIN CONTENT --- --- title: NTT CLI Commands description: A comprehensive guide to the Native Token Transfers (NTT) CLI, detailing commands for managing token transfers across chains within the Wormhole ecosystem. categories: NTT, Transfer --- # NTT CLI Commands The NTT Command-Line Interface (CLI) is a powerful tool for managing native token transfers across multiple blockchain networks within the Wormhole ecosystem. This page provides a comprehensive list of available commands, their descriptions, and examples to help you interact with and configure the NTT system effectively. Whether initializing deployments, updating configurations, or working with specific chains, the NTT CLI simplifies these operations through its intuitive commands. If you haven't installed the NTT CLI yet, follow the [NTT Installation](/docs/products/native-token-transfers/get-started/#install-ntt-cli){target=\_blank} instructions to set it up before proceeding. ## Table of Commands The following table lists the available NTT CLI commands, descriptions, and examples. To explore detailed information about any NTT CLI command, including its options and examples, you can append `--help` to the command. This will display a comprehensive guide for the specific command. ### General Commands | Command | Description | Example | |-----------------------------------------|--------------------------------------------------------|--------------------------------------------------------------------| | `ntt update` | update the NTT CLI | `ntt update` | | `ntt new ` | create a new NTT project | `ntt new my-ntt-project` | | `ntt add-chain ` | add a chain to the deployment file | `ntt add-chain Ethereum --token 0x1234... --mode burning --latest` | | `ntt upgrade ` | upgrade the contract on a specific chain | `ntt upgrade Solana --ver 1.1.0` | | `ntt clone
` | initialize a deployment file from an existing contract | `ntt clone Mainnet Solana Sol5678...` | | `ntt init ` | initialize a deployment file | `ntt init devnet` | | `ntt pull` | pull the remote configuration | `ntt pull` | | `ntt push` | push the local configuration | `ntt push` | | `ntt status` | check the status of the deployment | `ntt status` | ### Configuration Commands | Command | Description | Example | |----------------------------------------------|-----------------------------------------|------------------------------------------------| | `ntt config set-chain ` | set a configuration value for a chain | `ntt config set-chain Ethereum scan_api_key` | | `ntt config unset-chain ` | unset a configuration value for a chain | `ntt config unset-chain Ethereum scan_api_key` | | `ntt config get-chain ` | get a configuration value for a chain | `ntt config get-chain Ethereum scan_api_key` | ### Solana Commands | Command | Description | Example | |------------------------------------------------|----------------------------------------------------------|-------------------------------------------------| | `ntt solana key-base58 ` | print private key in base58 | `ntt solana key-base58 /path/to/keypair.json` | | `ntt solana token-authority ` | print the token authority address for a given program ID | `ntt solana token-authority Sol1234...` | | `ntt solana ata ` | print the token authority address for a given program ID | `ntt solana ata Mint123... Owner123... token22` | ## Where to Go Next
- :octicons-gear-16:{ .lg .middle } **Configure NTT** --- Find information on configuring NTT, including guidance on setting Owner and Pauser access control roles and management of rate-limiting. [:custom-arrow: Configure your NTT deployment](/docs/products/native-token-transfers/configuration/access-control/) - :octicons-question-16:{ .lg .middle } **NTT FAQs** --- Frequently asked questions about Wormhole Native Token Transfers, including cross-chain lending, SDK usage, custom RPCs, and integration challenges. [:custom-arrow: Check out the FAQs](/docs/products/native-token-transfers/faqs/)
--- END CONTENT --- Doc-Content: https://raw.githubusercontent.com/wormhole-foundation/wormhole-docs/refs/heads/main/products/native-token-transfers/reference/managers-transceivers.md --- BEGIN CONTENT --- --- title: Managers and Transceivers description: Explore the roles of Managers and Transceivers in NTT cross-chain token transfers, including key functions, lifecycle events, and rate-limiting mechanisms. categories: NTT, Transfer --- # Managers and Transceivers ## Managers _Managers_ oversee the token transfer process and handle rate-limiting and message attestation. They manage interactions with multiple transceivers and ensure that tokens are locked or burned on the source chain before being minted or unlocked on the destination chain. Each NTT manager corresponds to a single token but can control multiple transceivers. Key functions include: - **`transfer`** - initiate the transfer process where tokens on the source chain are locked or burned. This process ensures that an equivalent amount of tokens can be minted or unlocked on the destination chain ```solidity function transfer( uint256 amount, // amount (in atomic units) uint16 recipientChain, // chain ID (Wormhole formatted) bytes32 recipient // recipient address (Wormhole formatted) ) external payable nonReentrant whenNotPaused returns (uint64) ``` - **`quoteDeliveryPrice`** - calculate the cost of sending messages across chains by querying the transceivers for estimates on message delivery fees, allowing users to know the price before initiating a transfer ```solidity function quoteDeliveryPrice( uint16 recipientChain, // chain ID (Wormhole formatted) bytes memory transceiverInstructions // extra instructions for transceivers (Transceiver-dependent on whether extra instructions are used/accepted) ) public view returns (uint256[] memory, uint256) ``` - **`setPeer`** - to maintain secure cross-chain communication, managers establish trust relationships between different instances of NTT manager contracts across chains. By recognizing each other as peers, they ensure that the token transfers happen securely and that rate limits on inbound transactions are respected ```solidity function setPeer( uint16 peerChainId, // chain ID (Wormhole formatted) bytes32 peerContract, // peer NTT Manager address (Wormhole formatted) uint8 decimals, // token decimals on the peer chain uint256 inboundLimit // inbound rate limit (in atomic units) ) public onlyOwner ``` ## Transceivers _Transceivers_ are responsible for routing NTT transfers through the manager on the source chain and ensuring they are delivered to the corresponding manager on the recipient chain. They work with managers to ensure that messages are accurately processed and tokens are correctly transferred, providing a reliable system for cross-chain token transfers. Transceivers can be defined independently of the Wormhole core and modified to support any verification backend. Key functions: - **`sendMessage`** - this external function sends token transfer messages to a specified recipient chain. It encodes the token transfer details into a message format recognized by the system ```solidity function sendMessage( uint16 recipientChain, // chain ID (Wormhole formatted) TransceiverStructs.TransceiverInstruction memory instruction, // extra instruction for the Transceiver (optional, dependent on whether extra instructions are used/accepted for this Transceiver) bytes memory nttManagerMessage, // serialized NTT Manager message, provided by the NTT Manager bytes32 recipientNttManagerAddress, // NTT Manager address on the recipient chain (Wormhole formatted) bytes32 refundAddress // address to receive refunds on the destination chain in case of excess quotes (Wormhole formatted) ) external payable nonReentrant onlyNttManager ``` - **`quoteDeliveryPrice`** - provides an estimation of the cost associated with delivering a message to a target chain and gauges transaction fees ```solidity function quoteDeliveryPrice( uint16 targetChain, // chain ID (Wormhole formatted) TransceiverStructs.TransceiverInstruction memory instruction // extra instruction for the Transceiver (optional, dependent on whether extra instructions are used/accepted for this Transceiver) ) external view returns (uint256) ``` ## Lifecycle of a Message ### EVM #### Transfer A client calls on `transfer` to initiate an NTT transfer. The client must specify, at minimum, the transfer amount, the recipient chain, and the recipient address on the recipient chain. `transfer` also supports a flag to specify whether the `NttManager` should queue rate-limited transfers or revert. Clients can also include additional instructions to forward along to the transceiver on the source chain. Depending on the mode set in the initial configuration of the `NttManager` contract, transfers are either "locked" or "burned." Once the transfer has been forwarded to the transceiver, the `NttManager` emits the `TransferSent` event. **Events** ```ts /// @notice Emitted when a message is sent from the nttManager. /// @dev Topic0 /// 0x9716fe52fe4e02cf924ae28f19f5748ef59877c6496041b986fbad3dae6a8ecf /// @param recipient The recipient of the message. /// @param amount The amount transferred. /// @param fee The amount of ether sent along with the tx to cover the delivery fee. /// @param recipientChain The chain ID of the recipient. /// @param msgSequence The unique sequence ID of the message. event TransferSent( bytes32 recipient, uint256 amount, uint256 fee, uint16 recipientChain, uint64 msgSequence ); ``` #### Rate Limit A transfer can be rate-limited on both the source and destination chains. If a transfer is rate-limited on the source chain and the `shouldQueue` flag is enabled, it is added to an outbound queue. The transfer can be released after the configured `_rateLimitDuration` has expired via the `completeOutboundQueuedTransfer` method. The `OutboundTransferQueued` and `OutboundTransferRateLimited` events are emitted. If the client attempts to release the transfer from the queue before the expiry of the `rateLimitDuration`, the contract reverts with an `OutboundQueuedTransferStillQueued` error. Similarly, rate-limited transfers on the destination chain are added to an inbound queue. These transfers can be released from the queue via the `completeInboundQueuedTransfer` method, and the `InboundTransferQueued` event is emitted. If the client attempts to release the transfer from the queue before the `rateLimitDuration` expires, the contract reverts with an `InboundQueuedTransferStillQueued` error. To deactivate the rate limiter, set `_rateLimitDuration` to 0 and enable the `_skipRateLimiting` field in the `NttManager` constructor. Configuring this incorrectly will throw an error. If the rate limiter is deactivated, the inbound and outbound rate limits can be set to 0. **Events** ```ts /// @notice Emitted whenn an outbound transfer is queued. /// @dev Topic0 /// 0x69add1952a6a6b9cb86f04d05f0cb605cbb469a50ae916139d34495a9991481f. /// @param queueSequence The location of the transfer in the queue. event OutboundTransferQueued(uint64 queueSequence); ``` ```ts /// @notice Emitted when an outbound transfer is rate limited. /// @dev Topic0 /// 0x754d657d1363ee47d967b415652b739bfe96d5729ccf2f26625dcdbc147db68b. /// @param sender The initial sender of the transfer. /// @param amount The amount to be transferred. /// @param currentCapacity The capacity left for transfers within the 24-hour window. event OutboundTransferRateLimited( address indexed sender, uint64 sequence, uint256 amount, uint256 currentCapacity ); ``` ```ts /// @notice Emitted when an inbound transfer is queued /// @dev Topic0 /// 0x7f63c9251d82a933210c2b6d0b0f116252c3c116788120e64e8e8215df6f3162. /// @param digest The digest of the message. event InboundTransferQueued(bytes32 digest); ``` #### Send Once the `NttManager` forwards the message to the transceiver, the message is transmitted via the `sendMessage method`. The method signature is enforced by the transceiver but transceivers are free to determine their own implementation for transmitting messages. (e.g. a message routed through the Wormhole transceiver can be sent via Wormhole relaying, a custom relayer, or manually published via the core bridge). Once the message has been transmitted, the contract emits the `SendTransceiverMessage` event. **Events** ```ts /// @notice Emitted when a message is sent from the transceiver. /// @dev Topic0 /// 0x53b3e029c5ead7bffc739118953883859d30b1aaa086e0dca4d0a1c99cd9c3f5. /// @param recipientChain The chain ID of the recipient. /// @param message The message. event SendTransceiverMessage( uint16 recipientChain, TransceiverStructs.TransceiverMessage message ); ``` #### Receive Once a message has been emitted by a transceiver on the source chain, an off-chain process (for example, a relayer) will forward the message to the corresponding transceiver on the recipient chain. The relayer interacts with the transceiver via an entry point to receive messages. For example, the relayer will call the `receiveWormholeMessage` method on the `WormholeTransceiver` contract to execute the message. The `ReceiveRelayedMessage` event is emitted during this process. This method should also forward the message to the `NttManager` on the destination chain. Note that the transceiver interface doesn't declare a signature for this method because receiving messages is specific to each transceiver, and a one-size-fits-all solution would be overly restrictive. The `NttManager` contract allows an M of N threshold for transceiver attestations to determine whether a message can be safely executed. For example, if the threshold requirement is 1, the message will be executed after a single transceiver delivers a valid attestation. If the threshold requirement is 2, the message will only be executed after two transceivers deliver valid attestations. When a transceiver attests to a message, the contract emits the `MessageAttestedTo` event. NTT implements replay protection, so if a given transceiver attempts to deliver a message attestation twice, the contract reverts with `TransceiverAlreadyAttestedToMessage` error. NTT also implements replay protection against re-executing messages. This check also acts as reentrancy protection as well. If a message has already been executed, the contract ends execution early and emits the `MessageAlreadyExecuted` event instead of reverting via an error. This mitigates the possibility of race conditions from transceivers attempting to deliver the same message when the threshold is less than the total number of available of transceivers (i.e. threshold < totalTransceivers) and notifies the client (off-chain process) so they don't attempt redundant message delivery. **Events** ```ts /// @notice Emitted when a relayed message is received. /// @dev Topic0 /// 0xf557dbbb087662f52c815f6c7ee350628a37a51eae9608ff840d996b65f87475 /// @param digest The digest of the message. /// @param emitterChainId The chain ID of the emitter. /// @param emitterAddress The address of the emitter. event ReceivedRelayedMessage(bytes32 digest, uint16 emitterChainId, bytes32 emitterAddress); ``` ```ts /// @notice Emitted when a message is received. /// @dev Topic0 /// 0xf6fc529540981400dc64edf649eb5e2e0eb5812a27f8c81bac2c1d317e71a5f0. /// @param digest The digest of the message. /// @param emitterChainId The chain ID of the emitter. /// @param emitterAddress The address of the emitter. /// @param sequence The sequence of the message. event ReceivedMessage( bytes32 digest, uint16 emitterChainId, bytes32 emitterAddress, uint64 sequence ); ``` ```ts /// @notice Emitted when a message has already been executed to notify client of against retries. /// @dev Topic0 /// 0x4069dff8c9df7e38d2867c0910bd96fd61787695e5380281148c04932d02bef2. /// @param sourceNttManager The address of the source nttManager. /// @param msgHash The keccak-256 hash of the message. event MessageAlreadyExecuted(bytes32 indexed sourceNttManager, bytes32 indexed msgHash); ``` #### Mint or Unlock Once a transfer has been successfully verified, the tokens can be minted (if the mode is "burning") or unlocked (if the mode is "locking") to the recipient on the destination chain. Note that the source token decimals are bounded between `0` and `TRIMMED_DECIMALS` as enforced in the wire format. The transfer amount is untrimmed (scaled-up) if the destination chain token decimals exceed `TRIMMED_DECIMALS`. Once the appropriate number of tokens have been minted or unlocked to the recipient, the `TransferRedeemed` event is emitted. **Events** ```ts /// @notice Emitted when a transfer has been redeemed /// (either minted or unlocked on the recipient chain). /// @dev Topic0 /// 0x504e6efe18ab9eed10dc6501a417f5b12a2f7f2b1593aed9b89f9bce3cf29a91. /// @param digest The digest of the message. event TransferRedeemed(bytes32 indexed digest); ``` ### Solana #### Transfer A client calls the `transfer_lock` or `transfer_burn` instruction based on whether the program is in `LOCKING` or `BURNING` mode. The program mode is set during initialization. When transferring, the client must specify the amount of the transfer, the recipient chain, the recipient address on the recipient chain, and the boolean flag `should_queue` to specify whether the transfer should be queued if it hits the outbound rate limit. If `should_queue` is set to false, the transfer reverts instead of queuing if the rate limit were to be hit. !!! note Using the wrong transfer instruction, i.e. `transfer_lock` for a program that is in `BURNING` mode, will result in an `InvalidMode` error. Depending on the mode and instruction, the following will be produced in the program logs: ```ts Program log: Instruction: TransferLock Program log: Instruction: TransferBurn ``` Outbound transfers are always added to an Outbox via the `insert_into_outbox` method. This method checks the transfer against the configured outbound rate limit amount to determine whether the transfer should be rate-limited. An `OutboxItem` is a Solana Account that holds details of the outbound transfer. The transfer can be released from the Outbox immediately if no rate limit is hit. The transfer can be released from the Outbox immediately unless a rate limit is hit, in which case it will only be released after the delay duration associated with the rate limit has expired. #### Rate Limit During the transfer process, the program checks rate limits via the `consume_or_delay` function. The Solana rate-limiting logic is equivalent to the EVM rate-limiting logic. If the transfer amount fits within the current capacity: - Reduce the current capacity - Refill the inbound capacity for the destination chain - Add the transfer to the Outbox with `release_timestamp` set to the current timestamp, so it can be released immediately. If the transfer amount doesn't fit within the current capacity: - If `shouldQueue = true`, add the transfer to the Outbox with `release_timestamp` set to the current timestamp plus the configured `RATE_LIMIT_DURATION`. - If `shouldQueue = false`, revert with a `TransferExceedsRateLimit` error #### Send The caller then needs to request each transceiver to send messages via the `release_outbound` instruction. To execute this instruction, the caller needs to pass the account of the Outbox item to be released. The instruction will then verify that the transceiver is one of the specified senders for the message. Transceivers then send the messages based on the verification backend they are using. For example, the Wormhole transceiver will send by calling `post_message` on the Wormhole program, so that the Wormhole Guardians can observe and verify the message. !!! note When `revert_on_delay` is true, the transaction will revert if the release timestamp hasn't been reached. When `revert_on_delay` is false, the transaction succeeds, but the outbound release isn't performed. The following will be produced in the program logs: ```ts Program log: Instruction: ReleaseOutbound ``` #### Receive Similar to EVM, transceivers vary in how they receive messages since message relaying and verification methods may differ between implementations. The Wormhole transceiver receives a verified Wormhole message on Solana via the `receive_message` entrypoint instruction. Callers can use the `receive_wormhole_message` Anchor library function to execute this instruction. The instruction verifies the Wormhole Verified Action Approvals (VAAs) and stores it in a `VerifiedTransceiverMessage` account. The following will be produced in the program logs: ```ts Program log: Instruction: ReceiveMessage ``` `redeem` checks the inbound rate limit and places the message in an Inbox. Logic works the same as the outbound rate limit mentioned previously. The following will be produced in the program logs: ```ts Program log: Instruction: Redeem ``` #### Mint or Unlock The inbound transfer is released and the tokens are unlocked or minted to the recipient through either `release_inbound_mint` if the mode is `BURNING`, or `release_inbound_unlock` if the mode is `LOCKING`. Similar to transfer, using the wrong transfer instruction (such as `release_inbound_mint` for a program that is in locking mode) will result in `InvalidMode` error. !!! note When `revert_on_delay` is true, the transaction will revert if the release timestamp hasn't been reached. When `revert_on_delay` is false, the transaction succeeds, but the minting/unlocking isn't performed. Depending on the mode and instruction, the following will be produced in the program logs: ```ts Program log: Instruction: ReleaseInboundMint Program log: Instruction: ReleaseInboundUnlock ``` --- END CONTENT --- Doc-Content: https://raw.githubusercontent.com/wormhole-foundation/wormhole-docs/refs/heads/main/products/native-token-transfers/reference/supported-networks.md --- BEGIN CONTENT --- --- title: NTT Supported Networks description: See which blockchains support Wormhole’s Native Token Transfers (NTT), including mainnet, testnet, and devnet availability by chain. categories: NTT, Transfer --- # Supported Networks
| Ethereum | EVM | :white_check_mark: | :white_check_mark: | :white_check_mark: | :material-web:Website:material-file-document:Developer Docs:octicons-package-16:Block Explorer | | Solana | SVM | :white_check_mark: | :white_check_mark: | :white_check_mark: | :material-web:Website:material-file-document:Developer Docs:octicons-package-16:Block Explorer | | Arbitrum | EVM | :white_check_mark: | :white_check_mark: | :x: | :material-web:Website:material-file-document:Developer Docs:octicons-package-16:Block Explorer | | Avalanche | EVM | :white_check_mark: | :white_check_mark: | :x: | :material-web:Website:material-file-document:Developer Docs:octicons-package-16:Block Explorer | | Base | EVM | :white_check_mark: | :white_check_mark: | :x: | :material-web:Website:material-file-document:Developer Docs:octicons-package-16:Block Explorer | | Berachain | EVM | :white_check_mark: | :white_check_mark: | :x: | :material-web:Website:material-file-document:Developer Docs:octicons-package-16:Block Explorer | | BNB Smart Chain | EVM | :white_check_mark: | :white_check_mark: | :white_check_mark: | :material-web:Website:material-file-document:Developer Docs:octicons-package-16:Block Explorer | | Celo | EVM | :white_check_mark: | :white_check_mark: | :x: | :material-web:Website:material-file-document:Developer Docs:octicons-package-16:Block Explorer | | Fantom | EVM | :white_check_mark: | :white_check_mark: | :x: | :material-web:Website:material-file-document:Developer Docs:octicons-package-16:Block Explorer | | Ink | EVM | :white_check_mark: | :white_check_mark: | :x: | :material-web:Website:material-file-document:Developer Docs:octicons-package-16:Block Explorer | | Kaia | EVM | :white_check_mark: | :x: | :x: | :material-web:Website:material-file-document:Developer Docs:octicons-package-16:Block Explorer | | Mantle | EVM | :white_check_mark: | :x: | :x: | :material-web:Website:material-file-document:Developer Docs:octicons-package-16:Block Explorer | | Mezo | EVM | :x: | :white_check_mark: | :x: | :material-web:Website:material-file-document:Developer Docs:octicons-package-16:Block Explorer | | Monad | EVM | :x: | :white_check_mark: | :x: | :material-web:Website:material-file-document:Developer Docs:octicons-package-16:Block Explorer | | Moonbeam | EVM | :white_check_mark: | :white_check_mark: | :x: | :material-web:Website:material-file-document:Developer Docs:octicons-package-16:Block Explorer | | Optimism | EVM | :white_check_mark: | :white_check_mark: | :x: | :material-web:Website:material-file-document:Developer Docs:octicons-package-16:Block Explorer | | Polygon | EVM | :white_check_mark: | :white_check_mark: | :x: | :material-web:Website:material-file-document:Developer Docs:octicons-package-16:Block Explorer | | Scroll | EVM | :white_check_mark: | :x: | :x: | :material-web:Website:material-file-document:Developer Docs:octicons-package-16:Block Explorer | | Seievm | EVM | :white_check_mark: | :white_check_mark: | :x: | :material-web:Website:material-file-document:Developer Docs:octicons-package-16:Block Explorer | | Unichain | EVM | :white_check_mark: | :white_check_mark: | :x: | :material-web:Website:material-file-document:Developer Docs:octicons-package-16:Block Explorer | | World Chain | EVM | :white_check_mark: | :x: | :x: | :material-web:Website:material-file-document:Developer Docs:octicons-package-16:Block Explorer | | X Layer | EVM | :white_check_mark: | :x: | :x: | :material-web:Website:material-file-document:Developer Docs:octicons-package-16:Block Explorer |
--- END CONTENT --- Doc-Content: https://raw.githubusercontent.com/wormhole-foundation/wormhole-docs/refs/heads/main/products/settlement/reference/supported-networks.md --- BEGIN CONTENT --- --- title: Settlement Supported Networks description: Explore all blockchains supported by Wormhole Settlement, including network availability, block explorers, and cross-chain transfer support. categories: Settlement, Transfer --- # Supported Networks
| Ethereum | EVM | :white_check_mark: | :x: | :x: | :material-web:Website:material-file-document:Developer Docs:octicons-package-16:Block Explorer | | Solana | SVM | :white_check_mark: | :white_check_mark: | :x: | :material-web:Website:material-file-document:Developer Docs:octicons-package-16:Block Explorer | | Arbitrum | EVM | :white_check_mark: | :white_check_mark: | :x: | :material-web:Website:material-file-document:Developer Docs:octicons-package-16:Block Explorer | | Avalanche | EVM | :white_check_mark: | :x: | :x: | :material-web:Website:material-file-document:Developer Docs:octicons-package-16:Block Explorer | | Base | EVM | :white_check_mark: | :x: | :x: | :material-web:Website:material-file-document:Developer Docs:octicons-package-16:Block Explorer | | Optimism | EVM | :white_check_mark: | :white_check_mark: | :x: | :material-web:Website:material-file-document:Developer Docs:octicons-package-16:Block Explorer | | Polygon | EVM | :white_check_mark: | :x: | :x: | :material-web:Website:material-file-document:Developer Docs:octicons-package-16:Block Explorer | | Sui | Sui Move VM | :white_check_mark: | :x: | :x: | :material-web:Website:material-file-document:Developer Docs:octicons-package-16:Block Explorer | | Unichain | EVM | :white_check_mark: | :x: | :x: | :material-web:Website:material-file-document:Developer Docs:octicons-package-16:Block Explorer |
--- END CONTENT --- Doc-Content: https://raw.githubusercontent.com/wormhole-foundation/wormhole-docs/refs/heads/main/products/token-bridge/reference/supported-networks.md --- BEGIN CONTENT --- --- title: Token Bridge Supported Networks description: Explore all blockchains supported by Wormhole Token Bridge, including network availability, block explorers, and cross-chain transfer support. categories: Token Bridge, Transfer --- # Supported Networks
| Ethereum | EVM | :white_check_mark: | :white_check_mark: | :white_check_mark: | :material-web:Website:material-file-document:Developer Docs:octicons-package-16:Block Explorer | | Solana | SVM | :white_check_mark: | :white_check_mark: | :white_check_mark: | :material-web:Website:material-file-document:Developer Docs:octicons-package-16:Block Explorer | | Algorand | AVM | :white_check_mark: | :white_check_mark: | :white_check_mark: | :material-web:Website:material-file-document:Developer Docs:octicons-package-16:Block Explorer | | Aptos | Move VM | :white_check_mark: | :white_check_mark: | :white_check_mark: | :material-web:Website:material-file-document:Developer Docs:octicons-package-16:Block Explorer | | Arbitrum | EVM | :white_check_mark: | :white_check_mark: | :x: | :material-web:Website:material-file-document:Developer Docs:octicons-package-16:Block Explorer | | Avalanche | EVM | :white_check_mark: | :white_check_mark: | :x: | :material-web:Website:material-file-document:Developer Docs:octicons-package-16:Block Explorer | | Base | EVM | :white_check_mark: | :white_check_mark: | :x: | :material-web:Website:material-file-document:Developer Docs:octicons-package-16:Block Explorer | | Berachain | EVM | :white_check_mark: | :white_check_mark: | :x: | :material-web:Website:material-file-document:Developer Docs:octicons-package-16:Block Explorer | | BNB Smart Chain | EVM | :white_check_mark: | :white_check_mark: | :white_check_mark: | :material-web:Website:material-file-document:Developer Docs:octicons-package-16:Block Explorer | | Celo | EVM | :white_check_mark: | :white_check_mark: | :x: | :material-web:Website:material-file-document:Developer Docs:octicons-package-16:Block Explorer | | Fantom | EVM | :white_check_mark: | :white_check_mark: | :x: | :material-web:Website:material-file-document:Developer Docs:octicons-package-16:Block Explorer | | Fogo | SVM | :x: | :white_check_mark: | :x: | :material-web:Website:octicons-package-16:Block Explorer | | HyperEVM :material-information-outline:{ title='⚠️ The HyperEVM integration is experimental, as its node software is not open source. Use Wormhole messaging on HyperEVM with caution.' } | EVM | :x: | :white_check_mark: | :x: | :material-web:Website:material-file-document:Developer Docs | | Injective | CosmWasm | :white_check_mark: | :white_check_mark: | :x: | :material-web:Website:material-file-document:Developer Docs:octicons-package-16:Block Explorer | | Ink | EVM | :white_check_mark: | :white_check_mark: | :x: | :material-web:Website:material-file-document:Developer Docs:octicons-package-16:Block Explorer | | Kaia | EVM | :white_check_mark: | :white_check_mark: | :x: | :material-web:Website:material-file-document:Developer Docs:octicons-package-16:Block Explorer | | Linea | EVM | :x: | :white_check_mark: | :x: | :material-web:Website:material-file-document:Developer Docs:octicons-package-16:Block Explorer | | Mantle | EVM | :white_check_mark: | :white_check_mark: | :x: | :material-web:Website:material-file-document:Developer Docs:octicons-package-16:Block Explorer | | Mezo | EVM | :x: | :white_check_mark: | :x: | :material-web:Website:material-file-document:Developer Docs:octicons-package-16:Block Explorer | | Monad | EVM | :x: | :white_check_mark: | :x: | :material-web:Website:material-file-document:Developer Docs:octicons-package-16:Block Explorer | | Moonbeam | EVM | :white_check_mark: | :white_check_mark: | :x: | :material-web:Website:material-file-document:Developer Docs:octicons-package-16:Block Explorer | | NEAR | NEAR VM | :white_check_mark: | :white_check_mark: | :white_check_mark: | :material-web:Website:material-file-document:Developer Docs:octicons-package-16:Block Explorer | | Neon | EVM | :x: | :white_check_mark: | :x: | :material-web:Website:material-file-document:Developer Docs:octicons-package-16:Block Explorer | | Optimism | EVM | :white_check_mark: | :white_check_mark: | :x: | :material-web:Website:material-file-document:Developer Docs:octicons-package-16:Block Explorer | | Polygon | EVM | :white_check_mark: | :white_check_mark: | :x: | :material-web:Website:material-file-document:Developer Docs:octicons-package-16:Block Explorer | | Scroll | EVM | :white_check_mark: | :white_check_mark: | :x: | :material-web:Website:material-file-document:Developer Docs:octicons-package-16:Block Explorer | | Sei | CosmWasm | :white_check_mark: | :white_check_mark: | :x: | :material-web:Website:material-file-document:Developer Docs:octicons-package-16:Block Explorer | | Seievm | EVM | :white_check_mark: | :white_check_mark: | :x: | :material-web:Website:material-file-document:Developer Docs:octicons-package-16:Block Explorer | | Sui | Sui Move VM | :white_check_mark: | :white_check_mark: | :white_check_mark: | :material-web:Website:material-file-document:Developer Docs:octicons-package-16:Block Explorer | | Unichain | EVM | :white_check_mark: | :white_check_mark: | :x: | :material-web:Website:material-file-document:Developer Docs:octicons-package-16:Block Explorer | | World Chain | EVM | :white_check_mark: | :white_check_mark: | :x: | :material-web:Website:material-file-document:Developer Docs:octicons-package-16:Block Explorer | | X Layer | EVM | :white_check_mark: | :white_check_mark: | :x: | :material-web:Website:material-file-document:Developer Docs:octicons-package-16:Block Explorer |
--- END CONTENT --- Doc-Content: https://raw.githubusercontent.com/wormhole-foundation/wormhole-docs/refs/heads/main/products/cctp-bridge/guides/cctp-contracts.md --- BEGIN CONTENT --- --- title: Interacting with CCTP Contracts description: Learn how to interact directly with Circle's CCTP Bridge contracts, including TokenMessenger, TokenMinter, and MessageTransmitter. categories: Transfer, CCTP --- # Interact with CCTP Contracts Circle's [Cross-Chain Transfer Protocol (CCTP)](/docs/products/cctp-bridge/overview/){target=\_blank} is a permissionless utility that facilitates secure and efficient USDC transfers across blockchain networks through native burning and minting mechanisms. As decentralized finance (DeFi) protocols evolve, the need for flexible, secure cross-chain messaging has expanded, requiring solutions beyond simple asset transfers. Wormhole enhances CCTP's capabilities by allowing developers to compose more complex cross-chain interactions. With Wormhole's generic messaging, applications can execute smart contract logic alongside native USDC transfers, enabling richer, more versatile cross-chain experiences. This guide will walk you through getting started with Wormhole's CCTP contracts and show you how to integrate CCTP into your smart contracts, enabling the composition of advanced cross-chain functions with native USDC transfers. ## Prerequisites To interact with the Wormhole CCTP, you'll need the following: - [The address of the CCTP contract](/docs/products/reference/contract-addresses/#cctp){target=\_blank} on the chains you're deploying your contract on - [The Wormhole chain ID](/docs/products/reference/chain-ids/){target=\_blank} of the chains you're deploying your contract on ## Wormhole's CCTP Integration Contract Wormhole's Circle Integration contract, `CircleIntegration.sol`, is the contract you'll interact with directly. It burns and mints Circle-supported tokens by using [Circle's CCTP contracts](#circles-cctp-contracts). The Circle Integration contract emits Wormhole messages with arbitrary payloads to allow additional composability when performing cross-chain transfers of Circle-supported assets. This contract can be found in [Wormhole's `wormhole-circle-integration` repository](https://github.com/wormhole-foundation/wormhole-circle-integration/){target=\_blank} on GitHub. !!! note Wormhole supports all CCTP-supported chains, but Circle currently supports only a [handful of chains](https://developers.circle.com/cctp/supported-domains){target=\_blank}. Please refer to the [CCTP section of the Contract Addresses](/docs/products/reference/contract-addresses/#cctp){target=\_blank} reference page to view the complete list of supported chains. ??? code "Circle Integration contract" ```solidity // SPDX-License-Identifier: Apache 2 pragma solidity ^0.8.19; import {ReentrancyGuard} from "@openzeppelin/contracts/security/ReentrancyGuard.sol"; import {IERC20} from "@openzeppelin/contracts/token/ERC20/IERC20.sol"; import {SafeERC20} from "@openzeppelin/contracts/token/ERC20/utils/SafeERC20.sol"; import {IWormhole} from "wormhole/interfaces/IWormhole.sol"; import {BytesLib} from "wormhole/libraries/external/BytesLib.sol"; import {ICircleBridge} from "../interfaces/circle/ICircleBridge.sol"; import {CircleIntegrationGovernance} from "./CircleIntegrationGovernance.sol"; import {CircleIntegrationMessages} from "./CircleIntegrationMessages.sol"; /** * @notice This contract burns and mints Circle-supported tokens by using Circle's Cross-Chain Transfer Protocol. It also emits * Wormhole messages with arbitrary payloads to allow for additional composability when performing cross-chain * transfers of Circle-suppored assets. */ contract CircleIntegration is CircleIntegrationMessages, CircleIntegrationGovernance, ReentrancyGuard { using BytesLib for bytes; /** * @notice Emitted when Circle-supported assets have been minted to the mintRecipient * @param emitterChainId Wormhole chain ID of emitter contract on source chain * @param emitterAddress Address (bytes32 zero-left-padded) of emitter on source chain * @param sequence Sequence of Wormhole message used to mint tokens */ event Redeemed( uint16 indexed emitterChainId, bytes32 indexed emitterAddress, uint64 indexed sequence ); /** * @notice `transferTokensWithPayload` calls the Circle Bridge contract to burn Circle-supported tokens. It emits * a Wormhole message containing a user-specified payload with instructions for what to do with * the Circle-supported assets once they have been minted on the target chain. * @dev reverts if: * - user passes insufficient value to pay Wormhole message fee * - `token` is not supported by Circle Bridge * - `amount` is zero * - `targetChain` is not supported * - `mintRecipient` is bytes32(0) * @param transferParams Struct containing the following attributes: * - `token` Address of the token to be burned * - `amount` Amount of `token` to be burned * - `targetChain` Wormhole chain ID of the target blockchain * - `mintRecipient` The recipient wallet or contract address on the target chain * @param batchId ID for Wormhole message batching * @param payload Arbitrary payload to be delivered to the target chain via Wormhole * @return messageSequence Wormhole sequence number for this contract */ function transferTokensWithPayload( TransferParameters memory transferParams, uint32 batchId, bytes memory payload ) public payable nonReentrant returns (uint64 messageSequence) { // cache wormhole instance and fees to save on gas IWormhole wormhole = wormhole(); uint256 wormholeFee = wormhole.messageFee(); // confirm that the caller has sent enough ether to pay for the wormhole message fee require(msg.value == wormholeFee, "insufficient value"); // Call the circle bridge and `depositForBurnWithCaller`. The `mintRecipient` // should be the target contract (or wallet) composing on this contract. (uint64 nonce, uint256 amountReceived) = _transferTokens{value: wormholeFee}( transferParams.token, transferParams.amount, transferParams.targetChain, transferParams.mintRecipient ); // encode DepositWithPayload message bytes memory encodedMessage = encodeDepositWithPayload( DepositWithPayload({ token: addressToBytes32(transferParams.token), amount: amountReceived, sourceDomain: localDomain(), targetDomain: getDomainFromChainId(transferParams.targetChain), nonce: nonce, fromAddress: addressToBytes32(msg.sender), mintRecipient: transferParams.mintRecipient, payload: payload }) ); // send the DepositWithPayload wormhole message messageSequence = wormhole.publishMessage{value: wormholeFee}( batchId, encodedMessage, wormholeFinality() ); } function _transferTokens( address token, uint256 amount, uint16 targetChain, bytes32 mintRecipient ) internal returns (uint64 nonce, uint256 amountReceived) { // sanity check user input require(amount > 0, "amount must be > 0"); require(mintRecipient != bytes32(0), "invalid mint recipient"); require(isAcceptedToken(token), "token not accepted"); require( getRegisteredEmitter(targetChain) != bytes32(0), "target contract not registered" ); // take custody of tokens amountReceived = custodyTokens(token, amount); // cache Circle Bridge instance ICircleBridge circleBridge = circleBridge(); // approve the Circle Bridge to spend tokens SafeERC20.safeApprove( IERC20(token), address(circleBridge), amountReceived ); // burn tokens on the bridge nonce = circleBridge.depositForBurnWithCaller( amountReceived, getDomainFromChainId(targetChain), mintRecipient, token, getRegisteredEmitter(targetChain) ); } function custodyTokens( address token, uint256 amount ) internal returns (uint256) { // query own token balance before transfer (, bytes memory queriedBalanceBefore) = token.staticcall( abi.encodeWithSelector(IERC20.balanceOf.selector, address(this)) ); uint256 balanceBefore = abi.decode(queriedBalanceBefore, (uint256)); // deposit tokens SafeERC20.safeTransferFrom( IERC20(token), msg.sender, address(this), amount ); // query own token balance after transfer (, bytes memory queriedBalanceAfter) = token.staticcall( abi.encodeWithSelector(IERC20.balanceOf.selector, address(this)) ); uint256 balanceAfter = abi.decode(queriedBalanceAfter, (uint256)); return balanceAfter - balanceBefore; } /** * @notice `redeemTokensWithPayload` verifies the Wormhole message from the source chain and * verifies that the passed Circle Bridge message is valid. It calls the Circle Bridge * contract by passing the Circle message and attestation to mint tokens to the specified * mint recipient. It also verifies that the caller is the specified mint recipient to ensure * atomic execution of the additional instructions in the Wormhole message. * @dev reverts if: * - Wormhole message is not properly attested * - Wormhole message was not emitted from a registered contrat * - Wormhole message was already consumed by this contract * - msg.sender is not the encoded mintRecipient * - Circle Bridge message and Wormhole message are not associated * - `receiveMessage` call to Circle Transmitter fails * @param params Struct containing the following attributes: * - `encodedWormholeMessage` Wormhole message emitted by a registered contract including * information regarding the token burn on the source chain and an arbitrary message. * - `circleBridgeMessage` Message emitted by Circle Bridge contract with information regarding * the token burn on the source chain. * - `circleAttestation` Serialized EC Signature attesting the cross-chain transfer * @return depositInfo Struct containing the following attributes: * - `token` Address (bytes32 left-zero-padded) of token to be minted * - `amount` Amount of tokens to be minted * - `sourceDomain` Circle domain for the source chain * - `targetDomain` Circle domain for the target chain * - `nonce` Circle sequence number for the transfer * - `fromAddress` Source CircleIntegration contract caller's address * - `mintRecipient` Recipient of minted tokens (must be caller of this contract) * - `payload` Arbitrary Wormhole message payload */ function redeemTokensWithPayload( RedeemParameters calldata params ) public returns (DepositWithPayload memory depositInfo) { // verify the wormhole message IWormhole.VM memory verifiedMessage = verifyWormholeRedeemMessage( params.encodedWormholeMessage ); // Decode the message payload into the DepositWithPayload struct. Call the Circle TokenMinter // contract to determine the address of the encoded token on this chain. depositInfo = decodeDepositWithPayload(verifiedMessage.payload); depositInfo.token = fetchLocalTokenAddress( depositInfo.sourceDomain, depositInfo.token ); // confirm that circle gave us a valid token address require(depositInfo.token != bytes32(0), "invalid local token address"); // confirm that the caller is the `mintRecipient` to ensure atomic execution require( addressToBytes32(msg.sender) == depositInfo.mintRecipient, "caller must be mintRecipient" ); // confirm that the caller passed the correct message pair require( verifyCircleMessage( params.circleBridgeMessage, depositInfo.sourceDomain, depositInfo.targetDomain, depositInfo.nonce ), "invalid message pair" ); // call the circle bridge to mint tokens to the recipient bool success = circleTransmitter().receiveMessage( params.circleBridgeMessage, params.circleAttestation ); require(success, "CIRCLE_INTEGRATION: failed to mint tokens"); // emit Redeemed event emit Redeemed( verifiedMessage.emitterChainId, verifiedMessage.emitterAddress, verifiedMessage.sequence ); } function verifyWormholeRedeemMessage( bytes memory encodedMessage ) internal returns (IWormhole.VM memory) { require(evmChain() == block.chainid, "invalid evm chain"); // parse and verify the Wormhole core message ( IWormhole.VM memory verifiedMessage, bool valid, string memory reason ) = wormhole().parseAndVerifyVM(encodedMessage); // confirm that the core layer verified the message require(valid, reason); // verify that this message was emitted by a trusted contract require(verifyEmitter(verifiedMessage), "unknown emitter"); // revert if this message has been consumed already require( !isMessageConsumed(verifiedMessage.hash), "message already consumed" ); consumeMessage(verifiedMessage.hash); return verifiedMessage; } function verifyEmitter( IWormhole.VM memory vm ) internal view returns (bool) { // verify that the sender of the wormhole message is a trusted return (getRegisteredEmitter(vm.emitterChainId) == vm.emitterAddress && vm.emitterAddress != bytes32(0)); } function verifyCircleMessage( bytes memory circleMessage, uint32 sourceDomain, uint32 targetDomain, uint64 nonce ) internal pure returns (bool) { // parse the circle bridge message inline uint32 circleSourceDomain = circleMessage.toUint32(4); uint32 circleTargetDomain = circleMessage.toUint32(8); uint64 circleNonce = circleMessage.toUint64(12); // confirm that both the Wormhole message and Circle message share the same transfer info return (sourceDomain == circleSourceDomain && targetDomain == circleTargetDomain && nonce == circleNonce); } /** * @notice Fetches the local token address given an address and domain from * a different chain. * @param sourceDomain Circle domain for the sending chain. * @param sourceToken Address of the token for the sending chain. * @return Address bytes32 formatted address of the `sourceToken` on this chain. */ function fetchLocalTokenAddress( uint32 sourceDomain, bytes32 sourceToken ) public view returns (bytes32) { return addressToBytes32( circleTokenMinter().remoteTokensToLocalTokens( keccak256(abi.encodePacked(sourceDomain, sourceToken)) ) ); } /** * @notice Converts type address to bytes32 (left-zero-padded) * @param address_ Address to convert to bytes32 * @return Address bytes32 */ function addressToBytes32(address address_) public pure returns (bytes32) { return bytes32(uint256(uint160(address_))); } } ``` The functions provided by the Circle Integration contract are as follows: - **`transferTokensWithPayload`** - calls the Circle Bridge contract to burn Circle-supported tokens. It emits a Wormhole message containing a user-specified payload with instructions for what to do with the Circle-supported assets once they have been minted on the target chain ??? interface "Parameters" `transferParams` ++"TransferParameters"++ A tuple containing the parameters for the transfer. ??? child "`TransferParameters` struct" `token` ++"address"++ Address of the token to be burned. --- `amount` ++"uint256"++ Amount of the token to be burned. --- `targetChain` ++"uint16"++ Wormhole chain ID of the target blockchain. --- `mintRecipient` ++"bytes32"++ The recipient wallet or contract address on the target chain. --- `batchId` ++"uint32"++ The ID for Wormhole message batching. --- `payload` ++"bytes"++ Arbitrary payload to be delivered to the target chain via Wormhole. ??? interface "Returns" `messageSequence` ++"uint64"++ Wormhole sequence number for this contract. - `redeemTokensWithPayload` - verifies the Wormhole message from the source chain and verifies that the passed Circle Bridge message is valid. It calls the Circle Bridge contract by passing the Circle message and attestation to the `receiveMessage` function, which is responsible for minting tokens to the specified mint recipient. It also verifies that the caller is the specified mint recipient to ensure atomic execution of the additional instructions in the Wormhole message ??? interface "Parameters" `params` ++"RedeemParameters"++ A tuple containing the parameters for the redemption. ??? child "`RedeemParameters` struct" `encodedWormholeMessage` ++"bytes"++ Wormhole message emitted by a registered contract including information regarding the token burn on the source chain and an arbitrary message. --- `circleBridgeMessage` ++"bytes"++ Message emitted by Circle Bridge contract with information regarding the token burn on the source chain. --- `circleAttestation` ++"bytes"++ Serialized EC signature attesting the cross-chain transfer. ??? interface "Returns" `depositInfo` ++"DepositWithPayload"++ Information about the deposit. ??? child "`DepositWithPayload` struct" `token` ++"bytes32"++ Address (`bytes32` left-zero-padded) of token to be minted. --- `amount` ++"uint256"++ Amount of tokens to be minted. --- `sourceDomain` ++"uint32"++ Circle domain for the source chain. --- `targetDomain` ++"uint32"++ Circle domain for the target chain. --- `nonce` ++"uint64"++ Circle sequence number for the transfer. --- `fromAddress` ++"bytes32"++ Source Circle Integration contract caller's address. --- `mintRecipient` ++"bytes32"++ Recipient of minted tokens (must be caller of this contract). --- `payload` ++"bytes"++ Arbitrary Wormhole message payload. ??? interface "Emits" `Redeemed` - event emitted when Circle-supported assets have been minted to the `mintRecipient` ??? child "Event arguments" `emitterChainId` ++"uint16"++ Wormhole chain ID of emitter contract on source chain. --- `emitterAddress` ++"bytes32"++ Address (`bytes32` zero-left-padded) of emitter on source chain. --- `sequence` ++"uint64"++ Sequence of Wormhole message used to mint tokens. ## Circle's CCTP Contracts Three key contracts power Circle's CCTP: - **`TokenMessenger`** - the entry point for cross-chain USDC transfers, routing messages to initiate USDC burns on the source chain, and mint USDC on the destination chain - **`MessageTransmitter`** - handles generic message passing, sending messages from the source chain and receiving them on the destination chain - **`TokenMinter`** - responsible for the actual minting and burning of USDC, utilizing chain-specific settings for both the burners and minters across different networks The following sections will examine these contracts in-depth, focusing on the methods invoked indirectly through function calls in the Wormhole Circle Integration contract. !!! note When using Wormhole's CCTP integration, you will not directly interact with these contracts. You will indirectly interact with them through the Wormhole Circle Integration contract. These contracts can be found in [Circle's `evm-cctp-contracts` repository](https://github.com/circlefin/evm-cctp-contracts/){target=\_blank} on GitHub. ### Token Messenger Contract The Token Messenger contract enables cross-chain USDC transfers by coordinating message exchanges between blockchains. It works alongside the Message Transmitter contract to relay messages for burning USDC on a source chain and minting it on a destination chain. The contract emits events to track both the burning of tokens and their subsequent minting on the destination chain. To ensure secure communication, the Token Messenger restricts message handling to registered remote Token Messenger contracts only. It verifies the proper conditions for token burning and manages local and remote minters using chain-specific settings. Additionally, the contract provides methods for updating or replacing previously sent burn messages, adding or removing remote Token Messenger contracts, and managing the minting process for cross-chain transfers. ??? code "Token Messenger contract" ```solidity /* * Copyright (c) 2022, Circle Internet Financial Limited. * * Licensed under the Apache License, Version 2.0 (the "License"); * you may not use this file except in compliance with the License. * You may obtain a copy of the License at * * http://www.apache.org/licenses/LICENSE-2.0 * * Unless required by applicable law or agreed to in writing, software * distributed under the License is distributed on an "AS IS" BASIS, * WITHOUT WARRANTIES OR CONDITIONS OF ANY KIND, either express or implied. * See the License for the specific language governing permissions and * limitations under the License. */ pragma solidity 0.7.6; import "./interfaces/IMessageHandler.sol"; import "./interfaces/ITokenMinter.sol"; import "./interfaces/IMintBurnToken.sol"; import "./interfaces/IMessageTransmitter.sol"; import "./messages/BurnMessage.sol"; import "./messages/Message.sol"; import "./roles/Rescuable.sol"; /** * @title TokenMessenger * @notice Sends messages and receives messages to/from MessageTransmitters * and to/from TokenMinters */ contract TokenMessenger is IMessageHandler, Rescuable { // ============ Events ============ /** * @notice Emitted when a DepositForBurn message is sent * @param nonce unique nonce reserved by message * @param burnToken address of token burnt on source domain * @param amount deposit amount * @param depositor address where deposit is transferred from * @param mintRecipient address receiving minted tokens on destination domain as bytes32 * @param destinationDomain destination domain * @param destinationTokenMessenger address of TokenMessenger on destination domain as bytes32 * @param destinationCaller authorized caller as bytes32 of receiveMessage() on destination domain, if not equal to bytes32(0). * If equal to bytes32(0), any address can call receiveMessage(). */ event DepositForBurn( uint64 indexed nonce, address indexed burnToken, uint256 amount, address indexed depositor, bytes32 mintRecipient, uint32 destinationDomain, bytes32 destinationTokenMessenger, bytes32 destinationCaller ); /** * @notice Emitted when tokens are minted * @param mintRecipient recipient address of minted tokens * @param amount amount of minted tokens * @param mintToken contract address of minted token */ event MintAndWithdraw( address indexed mintRecipient, uint256 amount, address indexed mintToken ); /** * @notice Emitted when a remote TokenMessenger is added * @param domain remote domain * @param tokenMessenger TokenMessenger on remote domain */ event RemoteTokenMessengerAdded(uint32 domain, bytes32 tokenMessenger); /** * @notice Emitted when a remote TokenMessenger is removed * @param domain remote domain * @param tokenMessenger TokenMessenger on remote domain */ event RemoteTokenMessengerRemoved(uint32 domain, bytes32 tokenMessenger); /** * @notice Emitted when the local minter is added * @param localMinter address of local minter * @notice Emitted when the local minter is added */ event LocalMinterAdded(address localMinter); /** * @notice Emitted when the local minter is removed * @param localMinter address of local minter * @notice Emitted when the local minter is removed */ event LocalMinterRemoved(address localMinter); // ============ Libraries ============ using TypedMemView for bytes; using TypedMemView for bytes29; using BurnMessage for bytes29; using Message for bytes29; // ============ State Variables ============ // Local Message Transmitter responsible for sending and receiving messages to/from remote domains IMessageTransmitter public immutable localMessageTransmitter; // Version of message body format uint32 public immutable messageBodyVersion; // Minter responsible for minting and burning tokens on the local domain ITokenMinter public localMinter; // Valid TokenMessengers on remote domains mapping(uint32 => bytes32) public remoteTokenMessengers; // ============ Modifiers ============ /** * @notice Only accept messages from a registered TokenMessenger contract on given remote domain * @param domain The remote domain * @param tokenMessenger The address of the TokenMessenger contract for the given remote domain */ modifier onlyRemoteTokenMessenger(uint32 domain, bytes32 tokenMessenger) { require( _isRemoteTokenMessenger(domain, tokenMessenger), "Remote TokenMessenger unsupported" ); _; } /** * @notice Only accept messages from the registered message transmitter on local domain */ modifier onlyLocalMessageTransmitter() { // Caller must be the registered message transmitter for this domain require(_isLocalMessageTransmitter(), "Invalid message transmitter"); _; } // ============ Constructor ============ /** * @param _messageTransmitter Message transmitter address * @param _messageBodyVersion Message body version */ constructor(address _messageTransmitter, uint32 _messageBodyVersion) { require( _messageTransmitter != address(0), "MessageTransmitter not set" ); localMessageTransmitter = IMessageTransmitter(_messageTransmitter); messageBodyVersion = _messageBodyVersion; } // ============ External Functions ============ /** * @notice Deposits and burns tokens from sender to be minted on destination domain. * Emits a `DepositForBurn` event. * @dev reverts if: * - given burnToken is not supported * - given destinationDomain has no TokenMessenger registered * - transferFrom() reverts. For example, if sender's burnToken balance or approved allowance * to this contract is less than `amount`. * - burn() reverts. For example, if `amount` is 0. * - MessageTransmitter returns false or reverts. * @param amount amount of tokens to burn * @param destinationDomain destination domain * @param mintRecipient address of mint recipient on destination domain * @param burnToken address of contract to burn deposited tokens, on local domain * @return _nonce unique nonce reserved by message */ function depositForBurn( uint256 amount, uint32 destinationDomain, bytes32 mintRecipient, address burnToken ) external returns (uint64 _nonce) { return _depositForBurn( amount, destinationDomain, mintRecipient, burnToken, // (bytes32(0) here indicates that any address can call receiveMessage() // on the destination domain, triggering mint to specified `mintRecipient`) bytes32(0) ); } /** * @notice Deposits and burns tokens from sender to be minted on destination domain. The mint * on the destination domain must be called by `destinationCaller`. * WARNING: if the `destinationCaller` does not represent a valid address as bytes32, then it will not be possible * to broadcast the message on the destination domain. This is an advanced feature, and the standard * depositForBurn() should be preferred for use cases where a specific destination caller is not required. * Emits a `DepositForBurn` event. * @dev reverts if: * - given destinationCaller is zero address * - given burnToken is not supported * - given destinationDomain has no TokenMessenger registered * - transferFrom() reverts. For example, if sender's burnToken balance or approved allowance * to this contract is less than `amount`. * - burn() reverts. For example, if `amount` is 0. * - MessageTransmitter returns false or reverts. * @param amount amount of tokens to burn * @param destinationDomain destination domain * @param mintRecipient address of mint recipient on destination domain * @param burnToken address of contract to burn deposited tokens, on local domain * @param destinationCaller caller on the destination domain, as bytes32 * @return nonce unique nonce reserved by message */ function depositForBurnWithCaller( uint256 amount, uint32 destinationDomain, bytes32 mintRecipient, address burnToken, bytes32 destinationCaller ) external returns (uint64 nonce) { // Destination caller must be nonzero. To allow any destination caller, use depositForBurn(). require(destinationCaller != bytes32(0), "Invalid destination caller"); return _depositForBurn( amount, destinationDomain, mintRecipient, burnToken, destinationCaller ); } /** * @notice Replace a BurnMessage to change the mint recipient and/or * destination caller. Allows the sender of a previous BurnMessage * (created by depositForBurn or depositForBurnWithCaller) * to send a new BurnMessage to replace the original. * The new BurnMessage will reuse the amount and burn token of the original, * without requiring a new deposit. * @dev The new message will reuse the original message's nonce. For a * given nonce, all replacement message(s) and the original message are * valid to broadcast on the destination domain, until the first message * at the nonce confirms, at which point all others are invalidated. * Note: The msg.sender of the replaced message must be the same as the * msg.sender of the original message. * @param originalMessage original message bytes (to replace) * @param originalAttestation original attestation bytes * @param newDestinationCaller the new destination caller, which may be the * same as the original destination caller, a new destination caller, or an empty * destination caller (bytes32(0), indicating that any destination caller is valid.) * @param newMintRecipient the new mint recipient, which may be the same as the * original mint recipient, or different. */ function replaceDepositForBurn( bytes calldata originalMessage, bytes calldata originalAttestation, bytes32 newDestinationCaller, bytes32 newMintRecipient ) external { bytes29 _originalMsg = originalMessage.ref(0); _originalMsg._validateMessageFormat(); bytes29 _originalMsgBody = _originalMsg._messageBody(); _originalMsgBody._validateBurnMessageFormat(); bytes32 _originalMsgSender = _originalMsgBody._getMessageSender(); // _originalMsgSender must match msg.sender of original message require( msg.sender == Message.bytes32ToAddress(_originalMsgSender), "Invalid sender for message" ); require( newMintRecipient != bytes32(0), "Mint recipient must be nonzero" ); bytes32 _burnToken = _originalMsgBody._getBurnToken(); uint256 _amount = _originalMsgBody._getAmount(); bytes memory _newMessageBody = BurnMessage._formatMessage( messageBodyVersion, _burnToken, newMintRecipient, _amount, _originalMsgSender ); localMessageTransmitter.replaceMessage( originalMessage, originalAttestation, _newMessageBody, newDestinationCaller ); emit DepositForBurn( _originalMsg._nonce(), Message.bytes32ToAddress(_burnToken), _amount, msg.sender, newMintRecipient, _originalMsg._destinationDomain(), _originalMsg._recipient(), newDestinationCaller ); } /** * @notice Handles an incoming message received by the local MessageTransmitter, * and takes the appropriate action. For a burn message, mints the * associated token to the requested recipient on the local domain. * @dev Validates the local sender is the local MessageTransmitter, and the * remote sender is a registered remote TokenMessenger for `remoteDomain`. * @param remoteDomain The domain where the message originated from. * @param sender The sender of the message (remote TokenMessenger). * @param messageBody The message body bytes. * @return success Bool, true if successful. */ function handleReceiveMessage( uint32 remoteDomain, bytes32 sender, bytes calldata messageBody ) external override onlyLocalMessageTransmitter onlyRemoteTokenMessenger(remoteDomain, sender) returns (bool) { bytes29 _msg = messageBody.ref(0); _msg._validateBurnMessageFormat(); require( _msg._getVersion() == messageBodyVersion, "Invalid message body version" ); bytes32 _mintRecipient = _msg._getMintRecipient(); bytes32 _burnToken = _msg._getBurnToken(); uint256 _amount = _msg._getAmount(); ITokenMinter _localMinter = _getLocalMinter(); _mintAndWithdraw( address(_localMinter), remoteDomain, _burnToken, Message.bytes32ToAddress(_mintRecipient), _amount ); return true; } /** * @notice Add the TokenMessenger for a remote domain. * @dev Reverts if there is already a TokenMessenger set for domain. * @param domain Domain of remote TokenMessenger. * @param tokenMessenger Address of remote TokenMessenger as bytes32. */ function addRemoteTokenMessenger(uint32 domain, bytes32 tokenMessenger) external onlyOwner { require(tokenMessenger != bytes32(0), "bytes32(0) not allowed"); require( remoteTokenMessengers[domain] == bytes32(0), "TokenMessenger already set" ); remoteTokenMessengers[domain] = tokenMessenger; emit RemoteTokenMessengerAdded(domain, tokenMessenger); } /** * @notice Remove the TokenMessenger for a remote domain. * @dev Reverts if there is no TokenMessenger set for `domain`. * @param domain Domain of remote TokenMessenger */ function removeRemoteTokenMessenger(uint32 domain) external onlyOwner { // No TokenMessenger set for given remote domain. require( remoteTokenMessengers[domain] != bytes32(0), "No TokenMessenger set" ); bytes32 _removedTokenMessenger = remoteTokenMessengers[domain]; delete remoteTokenMessengers[domain]; emit RemoteTokenMessengerRemoved(domain, _removedTokenMessenger); } /** * @notice Add minter for the local domain. * @dev Reverts if a minter is already set for the local domain. * @param newLocalMinter The address of the minter on the local domain. */ function addLocalMinter(address newLocalMinter) external onlyOwner { require(newLocalMinter != address(0), "Zero address not allowed"); require( address(localMinter) == address(0), "Local minter is already set." ); localMinter = ITokenMinter(newLocalMinter); emit LocalMinterAdded(newLocalMinter); } /** * @notice Remove the minter for the local domain. * @dev Reverts if the minter of the local domain is not set. */ function removeLocalMinter() external onlyOwner { address _localMinterAddress = address(localMinter); require(_localMinterAddress != address(0), "No local minter is set."); delete localMinter; emit LocalMinterRemoved(_localMinterAddress); } // ============ Internal Utils ============ /** * @notice Deposits and burns tokens from sender to be minted on destination domain. * Emits a `DepositForBurn` event. * @param _amount amount of tokens to burn (must be non-zero) * @param _destinationDomain destination domain * @param _mintRecipient address of mint recipient on destination domain * @param _burnToken address of contract to burn deposited tokens, on local domain * @param _destinationCaller caller on the destination domain, as bytes32 * @return nonce unique nonce reserved by message */ function _depositForBurn( uint256 _amount, uint32 _destinationDomain, bytes32 _mintRecipient, address _burnToken, bytes32 _destinationCaller ) internal returns (uint64 nonce) { require(_amount > 0, "Amount must be nonzero"); require(_mintRecipient != bytes32(0), "Mint recipient must be nonzero"); bytes32 _destinationTokenMessenger = _getRemoteTokenMessenger( _destinationDomain ); ITokenMinter _localMinter = _getLocalMinter(); IMintBurnToken _mintBurnToken = IMintBurnToken(_burnToken); require( _mintBurnToken.transferFrom( msg.sender, address(_localMinter), _amount ), "Transfer operation failed" ); _localMinter.burn(_burnToken, _amount); // Format message body bytes memory _burnMessage = BurnMessage._formatMessage( messageBodyVersion, Message.addressToBytes32(_burnToken), _mintRecipient, _amount, Message.addressToBytes32(msg.sender) ); uint64 _nonceReserved = _sendDepositForBurnMessage( _destinationDomain, _destinationTokenMessenger, _destinationCaller, _burnMessage ); emit DepositForBurn( _nonceReserved, _burnToken, _amount, msg.sender, _mintRecipient, _destinationDomain, _destinationTokenMessenger, _destinationCaller ); return _nonceReserved; } /** * @notice Sends a BurnMessage through the local message transmitter * @dev calls local message transmitter's sendMessage() function if `_destinationCaller` == bytes32(0), * or else calls sendMessageWithCaller(). * @param _destinationDomain destination domain * @param _destinationTokenMessenger address of registered TokenMessenger contract on destination domain, as bytes32 * @param _destinationCaller caller on the destination domain, as bytes32. If `_destinationCaller` == bytes32(0), * any address can call receiveMessage() on destination domain. * @param _burnMessage formatted BurnMessage bytes (message body) * @return nonce unique nonce reserved by message */ function _sendDepositForBurnMessage( uint32 _destinationDomain, bytes32 _destinationTokenMessenger, bytes32 _destinationCaller, bytes memory _burnMessage ) internal returns (uint64 nonce) { if (_destinationCaller == bytes32(0)) { return localMessageTransmitter.sendMessage( _destinationDomain, _destinationTokenMessenger, _burnMessage ); } else { return localMessageTransmitter.sendMessageWithCaller( _destinationDomain, _destinationTokenMessenger, _destinationCaller, _burnMessage ); } } /** * @notice Mints tokens to a recipient * @param _tokenMinter address of TokenMinter contract * @param _remoteDomain domain where burned tokens originate from * @param _burnToken address of token burned * @param _mintRecipient recipient address of minted tokens * @param _amount amount of minted tokens */ function _mintAndWithdraw( address _tokenMinter, uint32 _remoteDomain, bytes32 _burnToken, address _mintRecipient, uint256 _amount ) internal { ITokenMinter _minter = ITokenMinter(_tokenMinter); address _mintToken = _minter.mint( _remoteDomain, _burnToken, _mintRecipient, _amount ); emit MintAndWithdraw(_mintRecipient, _amount, _mintToken); } /** * @notice return the remote TokenMessenger for the given `_domain` if one exists, else revert. * @param _domain The domain for which to get the remote TokenMessenger * @return _tokenMessenger The address of the TokenMessenger on `_domain` as bytes32 */ function _getRemoteTokenMessenger(uint32 _domain) internal view returns (bytes32) { bytes32 _tokenMessenger = remoteTokenMessengers[_domain]; require(_tokenMessenger != bytes32(0), "No TokenMessenger for domain"); return _tokenMessenger; } /** * @notice return the local minter address if it is set, else revert. * @return local minter as ITokenMinter. */ function _getLocalMinter() internal view returns (ITokenMinter) { require(address(localMinter) != address(0), "Local minter is not set"); return localMinter; } /** * @notice Return true if the given remote domain and TokenMessenger is registered * on this TokenMessenger. * @param _domain The remote domain of the message. * @param _tokenMessenger The address of the TokenMessenger on remote domain. * @return true if a remote TokenMessenger is registered for `_domain` and `_tokenMessenger`, * on this TokenMessenger. */ function _isRemoteTokenMessenger(uint32 _domain, bytes32 _tokenMessenger) internal view returns (bool) { return _tokenMessenger != bytes32(0) && remoteTokenMessengers[_domain] == _tokenMessenger; } /** * @notice Returns true if the message sender is the local registered MessageTransmitter * @return true if message sender is the registered local message transmitter */ function _isLocalMessageTransmitter() internal view returns (bool) { return address(localMessageTransmitter) != address(0) && msg.sender == address(localMessageTransmitter); } } ``` This contract and the interfaces, contracts, and libraries it relies on are stored in [Circle's `evm-cctp-contracts` repository](https://github.com/circlefin/evm-cctp-contracts/blob/master/src/TokenMessenger.sol){target=\_blank} on GitHub. The functions provided by the Token Messenger contract are as follows: - **`depositForBurn`** - deposits and burns tokens from the sender to be minted on the destination domain. Minted tokens will be transferred to `mintRecipient` ??? interface "Parameters" `amount` ++"uint256"++ The amount of tokens to burn. --- `destinationDomain` ++"uint32"++ The network where the token will be minted after burn. --- `mintRecipient` ++"bytes32"++ Address of mint recipient on destination domain. --- `burnToken` ++"address"++ Address of contract to burn deposited tokens, on local domain. ??? interface "Returns" `_nonce` ++"uint64"++ Unique nonce reserved by message. ??? interface "Emits" `DepositForBurn` - event emitted when `depositForBurn` is called. The `destinationCaller` is set to `bytes32(0)` to allow any address to call `receiveMessage` on the destination domain ??? child "Event Arguments" `nonce` ++"uint64"++ Unique nonce reserved by message (indexed). --- `burnToken` ++"address"++ Address of token burnt on source domain. --- `amount` ++"uint256"++ The deposit amount. --- `depositor` ++"address"++ Address where deposit is transferred from. --- `mintRecipient` ++"bytes32"++ Address receiving minted tokens on destination domain. --- `destinationDomain` ++"uint32"++ - Destination domain. --- `destinationTokenMessenger` ++"bytes32"++ Address of `TokenMessenger` on destination domain. --- `destinationCaller` ++"bytes32"++ Authorized caller of the `receiveMessage` function on the destination domain, if not equal to `bytes32(0)`. If equal to `bytes32(0)`, any address can call `receiveMessage`. - **`depositForBurnWithCaller`** - deposits and burns tokens from the sender to be minted on the destination domain. This method differs from `depositForBurn` in that the mint on the destination domain can only be called by the designated `destinationCaller` address ??? interface "Parameters" `amount` ++"uint256"++ The amount of tokens to burn. --- `destinationDomain` ++"uint32"++ The network where the token will be minted after burn. --- `mintRecipient` ++"bytes32"++ Address of mint recipient on destination domain. --- `burnToken` ++"address"++ Address of contract to burn deposited tokens, on local domain. --- `destinationCaller` ++"bytes32"++ Address of the caller on the destination domain who will trigger the mint. ??? interface "Returns" `_nonce` ++"uint64"++ Unique nonce reserved by message. ??? interface "Emits" `DepositForBurn` - event emitted when `depositForBurnWithCaller` is called ??? child "Event Arguments" `nonce` ++"uint64"++ Unique nonce reserved by message (indexed). --- `burnToken` ++"address"++ Address of token burnt on source domain. --- `amount` ++"uint256"++ The deposit amount. --- `depositor` ++"address"++ Address where deposit is transferred from. --- `mintRecipient` ++"bytes32"++ Address receiving minted tokens on destination domain. --- `destinationDomain` ++"uint32"++ - Destination domain. --- `destinationTokenMessenger` ++"bytes32"++ Address of `TokenMessenger` on destination domain. --- `destinationCaller` ++"bytes32"++ Authorized caller of the `receiveMessage` function on the destination domain, if not equal to `bytes32(0)`. If equal to `bytes32(0)`, any address can call `receiveMessage`. - **`replaceDepositForBurn`** — replaces a previous `BurnMessage` to modify the mint recipient and/or the destination caller. The replacement message reuses the `_nonce` created by the original message, which allows the original message's sender to update the details without requiring a new deposit ??? interface "Parameters" `originalMessage` ++"bytes"++ The original burn message to be replaced. --- `originalAttestation` ++"bytes"++ The attestation of the original message. --- `newDestinationCaller` ++"bytes32"++ The new caller on the destination domain, can be the same or updated. --- `newMintRecipient` ++"bytes32"++ The new recipient for the minted tokens, can be the same or updated. ??? interface "Returns" None. ??? interface "Emits" `DepositForBurn` - event emitted when `replaceDepositForBurn` is called. Note that the `destinationCaller` will reflect the new destination caller, which may be the same as the original destination caller, a new destination caller, or an empty destination caller (`bytes32(0)`), indicating that any destination caller is valid ??? child "Event Arguments" `nonce` ++"uint64"++ Unique nonce reserved by message (indexed). --- `burnToken` ++"address"++ Address of token burnt on source domain. --- `amount` ++"uint256"++ The deposit amount. --- `depositor` ++"address"++ Address where deposit is transferred from. --- `mintRecipient` ++"bytes32"++ Address receiving minted tokens on destination domain. --- `destinationDomain` ++"uint32"++ - Destination domain. --- `destinationTokenMessenger` ++"bytes32"++ Address of `TokenMessenger` on destination domain. --- `destinationCaller` ++"bytes32"++ Authorized caller of the `receiveMessage` function on the destination domain, if not equal to `bytes32(0)`. If equal to `bytes32(0)`, any address can call `receiveMessage`. - **`handleReceiveMessage`** - handles an incoming message received by the local `MessageTransmitter` and takes the appropriate action. For a burn message, it mints the associated token to the requested recipient on the local domain. ???+ note Though this function can only be called by the local `MessageTransmitter`, it is included here as it emits the essential event for minting tokens and withdrawing to send to the recipient. ??? interface "Parameters" `remoteDomain` ++"uint32"++ The domain where the message originated. --- `sender` ++"bytes32"++ The address of the sender of the message. --- `messageBody` ++"bytes"++ The bytes making up the body of the message. ??? interface "Returns" `success` ++"boolean"++ Returns `true` if successful, otherwise, it returns `false`. ??? interface "Emits" `MintAndWithdraw` - event emitted when tokens are minted ??? child "Event arguments" `localMinter` ++"address"++ Minter responsible for minting and burning tokens on the local domain. --- `remoteDomain` ++"uint32"++ The domain where the message originated from. --- `burnToken` ++"address"++ Address of contract to burn deposited tokens, on local domain. --- `mintRecipient` ++"address"++ Recipient address of minted tokens (indexed). --- `amount` ++"uint256"++ Amount of minted tokens. ### Message Transmitter Contract The Message Transmitter contract ensures secure messaging across blockchain domains by managing message dispatch and tracking communication with events like `MessageSent` and `MessageReceived`. It uses a unique nonce for each message, which ensures proper validation, verifies attestation signatures, and prevents replay attacks. The contract supports flexible delivery options, allowing messages to be sent to a specific `destinationCaller` or broadcast more generally. It also includes domain-specific configurations to manage communication between chains. Additional features include replacing previously sent messages, setting maximum message body sizes, and verifying that messages are received only once per nonce to maintain network integrity. ??? code "Message Transmitter contract" ```solidity /* * Copyright (c) 2022, Circle Internet Financial Limited. * * Licensed under the Apache License, Version 2.0 (the "License"); * you may not use this file except in compliance with the License. * You may obtain a copy of the License at * * http://www.apache.org/licenses/LICENSE-2.0 * * Unless required by applicable law or agreed to in writing, software * distributed under the License is distributed on an "AS IS" BASIS, * WITHOUT WARRANTIES OR CONDITIONS OF ANY KIND, either express or implied. * See the License for the specific language governing permissions and * limitations under the License. */ pragma solidity 0.7.6; import "@memview-sol/contracts/TypedMemView.sol"; import "./interfaces/IMessageTransmitter.sol"; import "./interfaces/IMessageHandler.sol"; import "./messages/Message.sol"; import "./roles/Pausable.sol"; import "./roles/Rescuable.sol"; import "./roles/Attestable.sol"; /** * @title MessageTransmitter * @notice Contract responsible for sending and receiving messages across chains. */ contract MessageTransmitter is IMessageTransmitter, Pausable, Rescuable, Attestable { // ============ Events ============ /** * @notice Emitted when a new message is dispatched * @param message Raw bytes of message */ event MessageSent(bytes message); /** * @notice Emitted when a new message is received * @param caller Caller (msg.sender) on destination domain * @param sourceDomain The source domain this message originated from * @param nonce The nonce unique to this message * @param sender The sender of this message * @param messageBody message body bytes */ event MessageReceived( address indexed caller, uint32 sourceDomain, uint64 indexed nonce, bytes32 sender, bytes messageBody ); /** * @notice Emitted when max message body size is updated * @param newMaxMessageBodySize new maximum message body size, in bytes */ event MaxMessageBodySizeUpdated(uint256 newMaxMessageBodySize); // ============ Libraries ============ using TypedMemView for bytes; using TypedMemView for bytes29; using Message for bytes29; // ============ State Variables ============ // Domain of chain on which the contract is deployed uint32 public immutable localDomain; // Message Format version uint32 public immutable version; // Maximum size of message body, in bytes. // This value is set by owner. uint256 public maxMessageBodySize; // Next available nonce from this source domain uint64 public nextAvailableNonce; // Maps a bytes32 hash of (sourceDomain, nonce) -> uint256 (0 if unused, 1 if used) mapping(bytes32 => uint256) public usedNonces; // ============ Constructor ============ constructor( uint32 _localDomain, address _attester, uint32 _maxMessageBodySize, uint32 _version ) Attestable(_attester) { localDomain = _localDomain; maxMessageBodySize = _maxMessageBodySize; version = _version; } // ============ External Functions ============ /** * @notice Send the message to the destination domain and recipient * @dev Increment nonce, format the message, and emit `MessageSent` event with message information. * @param destinationDomain Domain of destination chain * @param recipient Address of message recipient on destination chain as bytes32 * @param messageBody Raw bytes content of message * @return nonce reserved by message */ function sendMessage( uint32 destinationDomain, bytes32 recipient, bytes calldata messageBody ) external override whenNotPaused returns (uint64) { bytes32 _emptyDestinationCaller = bytes32(0); uint64 _nonce = _reserveAndIncrementNonce(); bytes32 _messageSender = Message.addressToBytes32(msg.sender); _sendMessage( destinationDomain, recipient, _emptyDestinationCaller, _messageSender, _nonce, messageBody ); return _nonce; } /** * @notice Replace a message with a new message body and/or destination caller. * @dev The `originalAttestation` must be a valid attestation of `originalMessage`. * Reverts if msg.sender does not match sender of original message, or if the source domain of the original message * does not match this MessageTransmitter's local domain. * @param originalMessage original message to replace * @param originalAttestation attestation of `originalMessage` * @param newMessageBody new message body of replaced message * @param newDestinationCaller the new destination caller, which may be the * same as the original destination caller, a new destination caller, or an empty * destination caller (bytes32(0), indicating that any destination caller is valid.) */ function replaceMessage( bytes calldata originalMessage, bytes calldata originalAttestation, bytes calldata newMessageBody, bytes32 newDestinationCaller ) external override whenNotPaused { // Validate each signature in the attestation _verifyAttestationSignatures(originalMessage, originalAttestation); bytes29 _originalMsg = originalMessage.ref(0); // Validate message format _originalMsg._validateMessageFormat(); // Validate message sender bytes32 _sender = _originalMsg._sender(); require( msg.sender == Message.bytes32ToAddress(_sender), "Sender not permitted to use nonce" ); // Validate source domain uint32 _sourceDomain = _originalMsg._sourceDomain(); require( _sourceDomain == localDomain, "Message not originally sent from this domain" ); uint32 _destinationDomain = _originalMsg._destinationDomain(); bytes32 _recipient = _originalMsg._recipient(); uint64 _nonce = _originalMsg._nonce(); _sendMessage( _destinationDomain, _recipient, newDestinationCaller, _sender, _nonce, newMessageBody ); } /** * @notice Send the message to the destination domain and recipient, for a specified `destinationCaller` on the * destination domain. * @dev Increment nonce, format the message, and emit `MessageSent` event with message information. * WARNING: if the `destinationCaller` does not represent a valid address, then it will not be possible * to broadcast the message on the destination domain. This is an advanced feature, and the standard * sendMessage() should be preferred for use cases where a specific destination caller is not required. * @param destinationDomain Domain of destination chain * @param recipient Address of message recipient on destination domain as bytes32 * @param destinationCaller caller on the destination domain, as bytes32 * @param messageBody Raw bytes content of message * @return nonce reserved by message */ function sendMessageWithCaller( uint32 destinationDomain, bytes32 recipient, bytes32 destinationCaller, bytes calldata messageBody ) external override whenNotPaused returns (uint64) { require( destinationCaller != bytes32(0), "Destination caller must be nonzero" ); uint64 _nonce = _reserveAndIncrementNonce(); bytes32 _messageSender = Message.addressToBytes32(msg.sender); _sendMessage( destinationDomain, recipient, destinationCaller, _messageSender, _nonce, messageBody ); return _nonce; } /** * @notice Receive a message. Messages with a given nonce * can only be broadcast once for a (sourceDomain, destinationDomain) * pair. The message body of a valid message is passed to the * specified recipient for further processing. * * @dev Attestation format: * A valid attestation is the concatenated 65-byte signature(s) of exactly * `thresholdSignature` signatures, in increasing order of attester address. * ***If the attester addresses recovered from signatures are not in * increasing order, signature verification will fail.*** * If incorrect number of signatures or duplicate signatures are supplied, * signature verification will fail. * * Message format: * Field Bytes Type Index * version 4 uint32 0 * sourceDomain 4 uint32 4 * destinationDomain 4 uint32 8 * nonce 8 uint64 12 * sender 32 bytes32 20 * recipient 32 bytes32 52 * messageBody dynamic bytes 84 * @param message Message bytes * @param attestation Concatenated 65-byte signature(s) of `message`, in increasing order * of the attester address recovered from signatures. * @return success bool, true if successful */ function receiveMessage(bytes calldata message, bytes calldata attestation) external override whenNotPaused returns (bool success) { // Validate each signature in the attestation _verifyAttestationSignatures(message, attestation); bytes29 _msg = message.ref(0); // Validate message format _msg._validateMessageFormat(); // Validate domain require( _msg._destinationDomain() == localDomain, "Invalid destination domain" ); // Validate destination caller if (_msg._destinationCaller() != bytes32(0)) { require( _msg._destinationCaller() == Message.addressToBytes32(msg.sender), "Invalid caller for message" ); } // Validate version require(_msg._version() == version, "Invalid message version"); // Validate nonce is available uint32 _sourceDomain = _msg._sourceDomain(); uint64 _nonce = _msg._nonce(); bytes32 _sourceAndNonce = _hashSourceAndNonce(_sourceDomain, _nonce); require(usedNonces[_sourceAndNonce] == 0, "Nonce already used"); // Mark nonce used usedNonces[_sourceAndNonce] = 1; // Handle receive message bytes32 _sender = _msg._sender(); bytes memory _messageBody = _msg._messageBody().clone(); require( IMessageHandler(Message.bytes32ToAddress(_msg._recipient())) .handleReceiveMessage(_sourceDomain, _sender, _messageBody), "handleReceiveMessage() failed" ); // Emit MessageReceived event emit MessageReceived( msg.sender, _sourceDomain, _nonce, _sender, _messageBody ); return true; } /** * @notice Sets the max message body size * @dev This value should not be reduced without good reason, * to avoid impacting users who rely on large messages. * @param newMaxMessageBodySize new max message body size, in bytes */ function setMaxMessageBodySize(uint256 newMaxMessageBodySize) external onlyOwner { maxMessageBodySize = newMaxMessageBodySize; emit MaxMessageBodySizeUpdated(maxMessageBodySize); } // ============ Internal Utils ============ /** * @notice Send the message to the destination domain and recipient. If `_destinationCaller` is not equal to bytes32(0), * the message can only be received on the destination chain when called by `_destinationCaller`. * @dev Format the message and emit `MessageSent` event with message information. * @param _destinationDomain Domain of destination chain * @param _recipient Address of message recipient on destination domain as bytes32 * @param _destinationCaller caller on the destination domain, as bytes32 * @param _sender message sender, as bytes32 * @param _nonce nonce reserved for message * @param _messageBody Raw bytes content of message */ function _sendMessage( uint32 _destinationDomain, bytes32 _recipient, bytes32 _destinationCaller, bytes32 _sender, uint64 _nonce, bytes calldata _messageBody ) internal { // Validate message body length require( _messageBody.length <= maxMessageBodySize, "Message body exceeds max size" ); require(_recipient != bytes32(0), "Recipient must be nonzero"); // serialize message bytes memory _message = Message._formatMessage( version, localDomain, _destinationDomain, _nonce, _sender, _recipient, _destinationCaller, _messageBody ); // Emit MessageSent event emit MessageSent(_message); } /** * @notice hashes `_source` and `_nonce`. * @param _source Domain of chain where the transfer originated * @param _nonce The unique identifier for the message from source to destination * @return hash of source and nonce */ function _hashSourceAndNonce(uint32 _source, uint64 _nonce) internal pure returns (bytes32) { return keccak256(abi.encodePacked(_source, _nonce)); } /** * Reserve and increment next available nonce * @return nonce reserved */ function _reserveAndIncrementNonce() internal returns (uint64) { uint64 _nonceReserved = nextAvailableNonce; nextAvailableNonce = nextAvailableNonce + 1; return _nonceReserved; } } ``` This contract and the interfaces, contracts, and libraries it relies on are stored in [Circle's `evm-cctp-contracts` repository](https://github.com/circlefin/evm-cctp-contracts/blob/master/src/MessageTransmitter.sol){target=\_blank} on GitHub. The functions provided by the Message Transmitter contract are as follows: - **`receiveMessage`** — processes and validates an incoming message and its attestation. If valid, it triggers further action based on the message body ??? interface "Parameters" `message` ++"bytes"++ The message to be processed, including details such as sender, recipient, and message body. --- `attestation` ++"bytes"++ Concatenated 65-byte signature(s) that attest to the validity of the `message`. ??? interface "Returns" `success` ++"boolean"++ Returns `true` if successful, otherwise, returns `false`. ??? interface "Emits" `MessageReceived` - event emitted when a new message is received ??? child "Event arguments" `caller` ++"address"++ Caller on destination domain. --- `sourceDomain` ++"uint32"++ The source domain this message originated from. --- `nonce` ++"uint64"++ Nonce unique to this message (indexed). --- `sender` ++"bytes32"++ Sender of this message. --- `messageBody` ++"bytes"++ The body of the message. - **`sendMessage`** — sends a message to the destination domain and recipient. It increments the `nonce`, assigns a unique `nonce` to the message, and emits a `MessageSent` event ??? interface "Parameters" `destinationDomain` ++"uint32"++ The target blockchain network where the message is to be sent. --- `recipient` ++"bytes32"++ The recipient's address on the destination domain. --- `messageBody` ++"bytes"++ The raw bytes content of the message. ??? interface "Returns" `nonce` ++"uint64"++ Nonce unique to this message. ??? interface "Emits" `MessageSent` - event emitted when a new message is dispatched ??? child "Event arguments" `message` ++"bytes"++ The raw bytes of the message. - **`sendMessageWithCaller`** — sends a message to the destination domain and recipient, requiring a specific caller to trigger the message on the target chain. It increments the `nonce`, assigns a unique `nonce` to the message, and emits a `MessageSent` event ??? interface "Parameters" `destinationDomain` ++"uint32"++ The target blockchain network where the message is to be sent. --- `recipient` ++"bytes32"++ The recipient's address on the destination domain. --- `destinationCaller` ++"bytes32"++ The caller on the destination domain. --- `messageBody` ++"bytes"++ The raw bytes content of the message. ??? interface "Returns" `nonce` ++"uint64"++ Nonce unique to this message. ??? interface "Emits" `MessageSent` - event emitted when a new message is dispatched ??? child "Event arguments" `message` ++"bytes"++ The raw bytes of the message. - **`replaceMessage`** — replaces an original message with a new message body and/or updates the destination caller. The replacement message reuses the `_nonce` created by the original message ??? interface "Parameters" `originalMessage` ++"bytes"++ The original message to be replaced. --- `originalAttestation` ++"bytes"++ Attestation verifying the original message. --- `newMessageBody` ++"bytes"++ The new content for the replaced message. --- `newDestinationCaller` ++"bytes32"++ The new destination caller, which may be the same as the original destination caller, a new destination caller, or an empty destination caller (`bytes32(0)`), indicating that any destination caller is valid. ??? interface "Returns" None. ??? interface "Emits" `MessageSent` - event emitted when a new message is dispatched ??? child "Event arguments" `message` ++"bytes"++ The raw bytes of the message. ### Token Minter Contract The Token Minter contract manages the minting and burning of tokens across different blockchain domains. It maintains a registry that links local tokens to their corresponding remote tokens, ensuring that tokens maintain a 1:1 exchange rate across domains. The contract restricts minting and burning functions to a designated Token Messenger, which ensures secure and reliable cross-chain operations. When tokens are burned on a remote domain, an equivalent amount is minted on the local domain for a specified recipient, and vice versa. To enhance control and flexibility, the contract includes mechanisms to pause operations, set burn limits, and update the Token Controller, which governs token minting permissions. Additionally, it provides functionality to add or remove the local Token Messenger and retrieve the local token address associated with a remote token. ??? code "Token Minter contract" ```solidity /* * Copyright (c) 2022, Circle Internet Financial Limited. * * Licensed under the Apache License, Version 2.0 (the "License"); * you may not use this file except in compliance with the License. * You may obtain a copy of the License at * * http://www.apache.org/licenses/LICENSE-2.0 * * Unless required by applicable law or agreed to in writing, software * distributed under the License is distributed on an "AS IS" BASIS, * WITHOUT WARRANTIES OR CONDITIONS OF ANY KIND, either express or implied. * See the License for the specific language governing permissions and * limitations under the License. */ pragma solidity 0.7.6; import "./interfaces/ITokenMinter.sol"; import "./interfaces/IMintBurnToken.sol"; import "./roles/Pausable.sol"; import "./roles/Rescuable.sol"; import "./roles/TokenController.sol"; import "./TokenMessenger.sol"; /** * @title TokenMinter * @notice Token Minter and Burner * @dev Maintains registry of local mintable tokens and corresponding tokens on remote domains. * This registry can be used by caller to determine which token on local domain to mint for a * burned token on a remote domain, and vice versa. * It is assumed that local and remote tokens are fungible at a constant 1:1 exchange rate. */ contract TokenMinter is ITokenMinter, TokenController, Pausable, Rescuable { // ============ Events ============ /** * @notice Emitted when a local TokenMessenger is added * @param localTokenMessenger address of local TokenMessenger * @notice Emitted when a local TokenMessenger is added */ event LocalTokenMessengerAdded(address localTokenMessenger); /** * @notice Emitted when a local TokenMessenger is removed * @param localTokenMessenger address of local TokenMessenger * @notice Emitted when a local TokenMessenger is removed */ event LocalTokenMessengerRemoved(address localTokenMessenger); // ============ State Variables ============ // Local TokenMessenger with permission to call mint and burn on this TokenMinter address public localTokenMessenger; // ============ Modifiers ============ /** * @notice Only accept messages from the registered message transmitter on local domain */ modifier onlyLocalTokenMessenger() { require(_isLocalTokenMessenger(), "Caller not local TokenMessenger"); _; } // ============ Constructor ============ /** * @param _tokenController Token controller address */ constructor(address _tokenController) { _setTokenController(_tokenController); } // ============ External Functions ============ /** * @notice Mints `amount` of local tokens corresponding to the * given (`sourceDomain`, `burnToken`) pair, to `to` address. * @dev reverts if the (`sourceDomain`, `burnToken`) pair does not * map to a nonzero local token address. This mapping can be queried using * getLocalToken(). * @param sourceDomain Source domain where `burnToken` was burned. * @param burnToken Burned token address as bytes32. * @param to Address to receive minted tokens, corresponding to `burnToken`, * on this domain. * @param amount Amount of tokens to mint. Must be less than or equal * to the minterAllowance of this TokenMinter for given `_mintToken`. * @return mintToken token minted. */ function mint( uint32 sourceDomain, bytes32 burnToken, address to, uint256 amount ) external override whenNotPaused onlyLocalTokenMessenger returns (address mintToken) { address _mintToken = _getLocalToken(sourceDomain, burnToken); require(_mintToken != address(0), "Mint token not supported"); IMintBurnToken _token = IMintBurnToken(_mintToken); require(_token.mint(to, amount), "Mint operation failed"); return _mintToken; } /** * @notice Burn tokens owned by this TokenMinter. * @param burnToken burnable token address. * @param burnAmount amount of tokens to burn. Must be * > 0, and <= maximum burn amount per message. */ function burn(address burnToken, uint256 burnAmount) external override whenNotPaused onlyLocalTokenMessenger onlyWithinBurnLimit(burnToken, burnAmount) { IMintBurnToken _token = IMintBurnToken(burnToken); _token.burn(burnAmount); } /** * @notice Add TokenMessenger for the local domain. Only this TokenMessenger * has permission to call mint() and burn() on this TokenMinter. * @dev Reverts if a TokenMessenger is already set for the local domain. * @param newLocalTokenMessenger The address of the new TokenMessenger on the local domain. */ function addLocalTokenMessenger(address newLocalTokenMessenger) external onlyOwner { require( newLocalTokenMessenger != address(0), "Invalid TokenMessenger address" ); require( localTokenMessenger == address(0), "Local TokenMessenger already set" ); localTokenMessenger = newLocalTokenMessenger; emit LocalTokenMessengerAdded(localTokenMessenger); } /** * @notice Remove the TokenMessenger for the local domain. * @dev Reverts if the TokenMessenger of the local domain is not set. */ function removeLocalTokenMessenger() external onlyOwner { address _localTokenMessengerBeforeRemoval = localTokenMessenger; require( _localTokenMessengerBeforeRemoval != address(0), "No local TokenMessenger is set" ); delete localTokenMessenger; emit LocalTokenMessengerRemoved(_localTokenMessengerBeforeRemoval); } /** * @notice Set tokenController to `newTokenController`, and * emit `SetTokenController` event. * @dev newTokenController must be nonzero. * @param newTokenController address of new token controller */ function setTokenController(address newTokenController) external override onlyOwner { _setTokenController(newTokenController); } /** * @notice Get the local token address associated with the given * remote domain and token. * @param remoteDomain Remote domain * @param remoteToken Remote token * @return local token address */ function getLocalToken(uint32 remoteDomain, bytes32 remoteToken) external view override returns (address) { return _getLocalToken(remoteDomain, remoteToken); } // ============ Internal Utils ============ /** * @notice Returns true if the message sender is the registered local TokenMessenger * @return True if the message sender is the registered local TokenMessenger */ function _isLocalTokenMessenger() internal view returns (bool) { return address(localTokenMessenger) != address(0) && msg.sender == address(localTokenMessenger); } } ``` This contract and the interfaces and contracts it relies on are stored in [Circle's `evm-cctp-contracts` repository](https://github.com/circlefin/evm-cctp-contracts/blob/master/src/TokenMinter.sol){target=\_blank} on GitHub. Most of the methods of the Token Minter contract can be called only by the registered Token Messenger. However, there is one publicly accessible method, a public view function that allows anyone to query the local token associated with a remote domain and token. - **`getLocalToken`** — a read-only function that returns the local token address associated with a given remote domain and token ??? interface "Parameters" `remoteDomain` ++"uint32"++ The remote blockchain domain where the token resides. --- `remoteToken` ++"bytes32"++ The address of the token on the remote domain. ??? interface "Returns" ++"address"++ The local token address. ## How to Interact with CCTP Contracts Before writing your own contracts, it's essential to understand the key functions and events of the Wormhole CCTP contracts. The primary functionality revolves around the following: - **Sending tokens with a message payload** - initiating a cross-chain transfer of Circle-supported assets along with a message payload to a specific target address on the target chain - **Receiving tokens with a message payload** - validating messages received from other chains via Wormhole and then minting the tokens for the recipient ### Sending Tokens and Messages To initiate a cross-chain transfer, you must call the `transferTokensWithPayload` method of Wormhole's Circle Integration (CCTP) contract. Once you have initiated a transfer, you must fetch the attested Wormhole message and parse the transaction logs to locate a transfer message emitted by the Circle Bridge contract. Then, a request must be sent to Circle's off-chain process with the transfer message to grab the attestation from the process's response, which validates the token mint on the target chain. To streamline this process, you can use the [Wormhole Solidity SDK](https://github.com/wormhole-foundation/wormhole-solidity-sdk/tree/main){target=\_blank}, which exposes the `WormholeRelayerSDK.sol` contract, including the `CCTPSender` abstract contract. By inheriting this contract, you can transfer USDC while automatically relaying the message payload to the destination chain via a Wormhole-deployed relayer. ??? code "CCTP Sender contract" ```solidity abstract contract CCTPSender is CCTPBase { uint8 internal constant CONSISTENCY_LEVEL_FINALIZED = 15; using CCTPMessageLib for *; mapping(uint16 => uint32) public chainIdToCCTPDomain; /** * Sets the CCTP Domain corresponding to chain 'chain' to be 'cctpDomain' * So that transfers of USDC to chain 'chain' use the target CCTP domain 'cctpDomain' * * This action can only be performed by 'cctpConfigurationOwner', who is set to be the deployer * * Currently, cctp domains are: * Ethereum: Wormhole chain id 2, cctp domain 0 * Avalanche: Wormhole chain id 6, cctp domain 1 * Optimism: Wormhole chain id 24, cctp domain 2 * Arbitrum: Wormhole chain id 23, cctp domain 3 * Base: Wormhole chain id 30, cctp domain 6 * * These can be set via: * setCCTPDomain(2, 0); * setCCTPDomain(6, 1); * setCCTPDomain(24, 2); * setCCTPDomain(23, 3); * setCCTPDomain(30, 6); */ function setCCTPDomain(uint16 chain, uint32 cctpDomain) public { require( msg.sender == cctpConfigurationOwner, "Not allowed to set CCTP Domain" ); chainIdToCCTPDomain[chain] = cctpDomain; } function getCCTPDomain(uint16 chain) internal view returns (uint32) { return chainIdToCCTPDomain[chain]; } /** * transferUSDC wraps common boilerplate for sending tokens to another chain using IWormholeRelayer * - approves the Circle TokenMessenger contract to spend 'amount' of USDC * - calls Circle's 'depositForBurnWithCaller' * - returns key for inclusion in WormholeRelayer `additionalVaas` argument * * Note: this requires that only the targetAddress can redeem transfers. * */ function transferUSDC( uint256 amount, uint16 targetChain, address targetAddress ) internal returns (MessageKey memory) { IERC20(USDC).approve(address(circleTokenMessenger), amount); bytes32 targetAddressBytes32 = addressToBytes32CCTP(targetAddress); uint64 nonce = circleTokenMessenger.depositForBurnWithCaller( amount, getCCTPDomain(targetChain), targetAddressBytes32, USDC, targetAddressBytes32 ); return MessageKey( CCTPMessageLib.CCTP_KEY_TYPE, abi.encodePacked(getCCTPDomain(wormhole.chainId()), nonce) ); } // Publishes a CCTP transfer of 'amount' of USDC // and requests a delivery of the transfer along with 'payload' to 'targetAddress' on 'targetChain' // // The second step is done by publishing a wormhole message representing a request // to call 'receiveWormholeMessages' on the address 'targetAddress' on chain 'targetChain' // with the payload 'abi.encode(amount, payload)' // (and we encode the amount so it can be checked on the target chain) function sendUSDCWithPayloadToEvm( uint16 targetChain, address targetAddress, bytes memory payload, uint256 receiverValue, uint256 gasLimit, uint256 amount ) internal returns (uint64 sequence) { MessageKey[] memory messageKeys = new MessageKey[](1); messageKeys[0] = transferUSDC(amount, targetChain, targetAddress); bytes memory userPayload = abi.encode(amount, payload); address defaultDeliveryProvider = wormholeRelayer .getDefaultDeliveryProvider(); (uint256 cost, ) = wormholeRelayer.quoteEVMDeliveryPrice( targetChain, receiverValue, gasLimit ); sequence = wormholeRelayer.sendToEvm{value: cost}( targetChain, targetAddress, userPayload, receiverValue, 0, gasLimit, targetChain, address(0x0), defaultDeliveryProvider, messageKeys, CONSISTENCY_LEVEL_FINALIZED ); } function addressToBytes32CCTP(address addr) private pure returns (bytes32) { return bytes32(uint256(uint160(addr))); } } ``` The `CCTPSender` abstract contract exposes the `sendUSDCWithPayloadToEvm` function. This function publishes a CCTP transfer of the provided `amount` of USDC and requests that the transfer be delivered along with a `payload` to the specified `targetAddress` on the `targetChain`. ```solidity function sendUSDCWithPayloadToEvm( uint16 targetChain, address targetAddress, bytes memory payload, uint256 receiverValue, uint256 gasLimit, uint256 amount ) internal returns (uint64 sequence) ``` ??? interface "Parameters" `targetChain` ++"uint16"++ The target chain for the transfer. --- `targetAddress` ++"address"++ The target address for the transfer. --- `payload` ++"bytes"++ Arbitrary payload to be delivered to the target chain via Wormhole. --- `gasLimit` ++"uint256"++ The gas limit with which to call `targetAddress`. --- `amount` ++"uint256"++ The amount of USDC to transfer. --- ??? interface "Returns" `sequence` ++"uint64"++ Sequence number of the published VAA containing the delivery instructions. When the `sendUSDCWithPayloadToEvm` function is called, the following series of actions are executed: 1. **USDC transfer initiation**: - The Circle Token Messenger contract is approved to spend the specified amount of USDC. - The `depositForBurnWithCaller` function of the Token Messenger contract is invoked - A key is returned, which is to be provided to the Wormhole relayer for message delivery 2. **Message encoding** - the message `payload` is encoded for transmission via the Wormhole relayer. The encoded value also includes the `amount` so that it can be checked on the target chain 3. **Retrieving delivery provider** - the current default delivery provider's address is retrieved 4. **Cost calculation** - the transfer cost is calculated using the Wormhole relayer's `quoteEVMDeliveryPrice` function 5. **Message dispatch**: - The `sendToEvm` function of the Wormhole relayer is called with the encoded payload, the delivery provider's address, and the arguments passed to `sendUSDCWithPayloadToEvm` - The function must be called with `msg.value` set to the previously calculated cost (from step 4) - This function publishes an instruction for the delivery provider to relay the payload and VAAs specified by the key (from step 1) to the target address on the target chain A simple example implementation is as follows: ```solidity function sendCrossChainDeposit( uint16 targetChain, address targetAddress, address recipient, uint256 amount, uint256, gasLimit ) public payable { uint256 cost = quoteCrossChainDeposit(targetChain); require( msg.value == cost, "msg.value must be quoteCrossChainDeposit(targetChain)" ); IERC20(USDC).transferFrom(msg.sender, address(this), amount); bytes memory payload = abi.encode(recipient); sendUSDCWithPayloadToEvm( targetChain, targetAddress, // address (on targetChain) to send token and payload to payload, 0, // receiver value gasLimit, amount ); } ``` The above example sends a specified amount of USDC and the recipient's address as a payload to a target contract on another chain, ensuring that the correct cost is provided for the cross-chain transfer. ### Receiving Tokens and Messages To complete the cross-chain transfer, you must invoke the `redeemTokensWithPayload` function on the target Wormhole Circle Integration contract. This function verifies the message's authenticity, decodes the payload, confirms the recipient and sender, checks message delivery, and then calls the `receiveMessage` function of the [Message Transmitter](#message-transmitter-contract) contract. Using the Wormhole-deployed relayer automatically triggers the `receiveWormholeMessages` function. This function is defined in the `WormholeRelayerSDK.sol` contract from the [Wormhole Solidity SDK](https://github.com/wormhole-foundation/wormhole-solidity-sdk/tree/main){target=\_blank} and is implemented within the `CCTPReceiver` abstract contract. ??? code "CCTP Receiver contract" ```solidity abstract contract CCTPReceiver is CCTPBase { function redeemUSDC( bytes memory cctpMessage ) internal returns (uint256 amount) { (bytes memory message, bytes memory signature) = abi.decode( cctpMessage, (bytes, bytes) ); uint256 beforeBalance = IERC20(USDC).balanceOf(address(this)); circleMessageTransmitter.receiveMessage(message, signature); return IERC20(USDC).balanceOf(address(this)) - beforeBalance; } function receiveWormholeMessages( bytes memory payload, bytes[] memory additionalMessages, bytes32 sourceAddress, uint16 sourceChain, bytes32 deliveryHash ) external payable { // Currently, 'sendUSDCWithPayloadToEVM' only sends one CCTP transfer // That can be modified if the integrator desires to send multiple CCTP transfers // in which case the following code would have to be modified to support // redeeming these multiple transfers and checking that their 'amount's are accurate require( additionalMessages.length <= 1, "CCTP: At most one Message is supported" ); uint256 amountUSDCReceived; if (additionalMessages.length == 1) amountUSDCReceived = redeemUSDC(additionalMessages[0]); (uint256 amount, bytes memory userPayload) = abi.decode( payload, (uint256, bytes) ); // Check that the correct amount was received // It is important to verify that the 'USDC' sent in by the relayer is the same amount // that the sender sent in on the source chain require(amount == amountUSDCReceived, "Wrong amount received"); receivePayloadAndUSDC( userPayload, amountUSDCReceived, sourceAddress, sourceChain, deliveryHash ); } // Implement this function to handle in-bound deliveries that include a CCTP transfer function receivePayloadAndUSDC( bytes memory payload, uint256 amountUSDCReceived, bytes32 sourceAddress, uint16 sourceChain, bytes32 deliveryHash ) internal virtual {} } ``` Although you do not need to interact with the `receiveWormholeMessages` function directly, it's important to understand what it does. This function processes cross-chain messages and USDC transfers via Wormhole's Circle (CCTP) Bridge. Here's a summary of what it does: 1. **Validate additional messages** - the function checks that there is at most one CCTP transfer message in the `additionalMessages` array, as it currently only supports processing a single CCTP transfer 2. **Redeem USDC**: - If there is a CCTP message, it calls the `redeemUSDC` function of the `CCTPReceiver` contract to decode and redeem the USDC - This results in the call of the `receiveMessage` function of Circle's Message Transmitter contract to redeem the USDC based on the provided message and signature - The amount of USDC received is calculated by subtracting the contract's previous balance from the current balance after redeeming the USDC 3. **Decode payload** - the incoming payload is decoded, extracting both the expected amount of USDC and a `userPayload` (which could be any additional data) 4. **Verify the amount** - it ensures that the amount of USDC received matches the amount encoded in the payload. If the amounts don't match, the transaction is reverted 5. **Handle the payload and USDC** - after verifying the amounts, `receivePayloadAndUSDC` is called, which is meant to handle the actual logic for processing the received payload and USDC transfer You'll need to implement the `receivePayloadAndUSDC` function to transfer the USDC and handle the payload as your application needs. A simple example implementation is as follows: ```solidity function receivePayloadAndUSDC( bytes memory payload, uint256 amountUSDCReceived, bytes32, // sourceAddress uint16, // sourceChain bytes32 // deliveryHash ) internal override onlyWormholeRelayer { address recipient = abi.decode(payload, (address)); IERC20(USDC).transfer(recipient, amountUSDCReceived); } ``` ## Complete Example To view a complete example of creating a contract that integrates with Wormhole's CCTP contracts to send and receive USDC cross-chain, check out the [Hello USDC](https://github.com/wormhole-foundation/hello-usdc){target=\_blank} repository on GitHub. --- END CONTENT --- Doc-Content: https://raw.githubusercontent.com/wormhole-foundation/wormhole-docs/refs/heads/main/products/cctp-bridge/tutorials/complete-usdc-transfer.md --- BEGIN CONTENT --- --- title: Complete USDC Transfer Flow description: Learn how to perform USDC cross-chain transfers using Wormhole SDK and Circle's CCTP. Supports manual, automatic, and partial transfer recovery. categories: Transfer, CCTP --- # Complete USDC Transfer Flow :simple-github: [Source code on GitHub](https://github.com/wormhole-foundation/demo-cctp-transfer){target=\_blank} In this guide, we will show you how to bridge native USDC across different blockchain networks using [Circle's Cross-Chain Transfer Protocol](/docs/products/cctp-bridge/overview/){target=\_blank} (CCTP) and [Wormhole’s TypeScript SDK](https://github.com/wormhole-foundation/wormhole-sdk-ts/tree/main){target=\_blank}. Traditionally, cross-chain transfers using CCTP involve multiple manual steps, such as initiating the transfer on the source chain, relaying messages between chains, and covering gas fees on both the source and destination chains. Without the TypeScript SDK, developers must handle these operations independently, adding complexity and increasing the chance for errors, mainly when dealing with gas payments on the destination chain and native gas token management. Wormhole’s TypeScript SDK simplifies this process by offering automated transfer relaying and handling gas payments on the destination chain. It also offers an option to include native gas tokens for seamless execution. This reduces developer overhead, makes transfers faster and more reliable, and enhances the user experience. In this guide, we’ll first explore the theory behind CCTP and then provide a step-by-step tutorial for integrating Wormhole’s TypeScript SDK into your application to streamline USDC transfers across multiple chains. ## Core Concepts When bridging assets across chains, there are two primary approaches to handling the transfer process: manual and automated. Below, you may find the differences between these approaches and how they impact the user experience: - **Manual transfers** - manual transfers involve three key steps: initiating the transfer on the source chain, fetching the Circle attestation to verify the transfer, and completing the transfer on the destination chain - **Automated transfers** - automatic transfers simplify the process by handling Circle attestations and finalization for you. With Wormhole's automated relaying, you only need to initiate the transfer, and the rest is managed for you ## Prerequisites Before you begin, ensure you have the following: - [Node.js and npm](https://docs.npmjs.com/downloading-and-installing-node-js-and-npm){target=\_blank} installed on your machine - [TypeScript](https://www.typescriptlang.org/download/){target=\_blank} installed globally - [USDC tokens](https://faucet.circle.com/){target=\_blank} on supported chains. This tutorial uses Avalanche and Sepolia as examples - A wallet with a private key, funded with native tokens (Testnet or Mainnet) for gas fees ## Supported Chains The Wormhole SDK supports a wide range of EVM and non-EVM chains, allowing you to facilitate cross-chain transfers efficiently. You can find a complete list of supported chains in the Wormhole SDK [GitHub repository](https://github.com/wormhole-foundation/wormhole-sdk-ts/blob/5810ebbd3635aaf1b5ab675da3f99f62aec2210f/core/base/src/constants/circle.ts#L14-L30){target=_blank}, which covers both Testnet and Mainnet environments. ## Project Setup In this section, you'll set up your project for transferring USDC across chains using Wormhole's SDK and Circle's CCTP. We’ll guide you through initializing the project, installing dependencies, and preparing your environment for cross-chain transfers. 1. **Initialize the project** - start by creating a new directory for your project and initializing it with `npm`, which will create the `package.json` file for your project ```bash mkdir cctp-circle cd cctp-circle npm init -y ``` 2. **Create a `.gitignore` file** - ensure your private key isn't accidentally exposed or committed to version control ```bash echo ".env" >> .gitignore ``` 3. **Install dependencies** - install the required dependencies, including the Wormhole SDK and helper libraries ```bash npm install @wormhole-foundation/sdk dotenv ``` 4. **Set up environment variables** - to securely store your private key, create a `.env` file in the root of your project ```bash touch .env ``` Inside the `.env` file, add your private key ```env ETH_PRIVATE_KEY="INSERT_YOUR_PRIVATE_KEY" SOL_PRIVATE_KEY="INSERT_YOUR_PRIVATE_KEY" ``` !!! note Ensure your private key contains USDC funds and native tokens for gas on both the source and destination chains. 5. **Create a `helpers.ts` file** - to simplify the interaction between chains, create a file to store utility functions for fetching your private key, setting up signers for different chains, and managing transaction relays 1. Create the helpers file ```bash mkdir helpers touch helpers/helpers.ts ``` 2. Open the `helpers.ts` file and add the following code ```typescript import { ChainAddress, ChainContext, Network, Signer, Wormhole, Chain, } from '@wormhole-foundation/sdk'; import evm from '@wormhole-foundation/sdk/evm'; import solana from '@wormhole-foundation/sdk/solana'; import { config } from 'dotenv'; config(); export interface SignerStuff { chain: ChainContext; signer: Signer; address: ChainAddress; } // Function to fetch environment variables (like your private key) function getEnv(key: string): string { const val = process.env[key]; if (!val) throw new Error(`Missing environment variable: ${key}`); return val; } // Signer setup function for different blockchain platforms export async function getSigner( chain: ChainContext ): Promise<{ chain: ChainContext; signer: Signer; address: ChainAddress; }> { let signer: Signer; const platform = chain.platform.utils()._platform; switch (platform) { case 'Solana': signer = await ( await solana() ).getSigner(await chain.getRpc(), getEnv('SOL_PRIVATE_KEY')); break; case 'Evm': signer = await ( await evm() ).getSigner(await chain.getRpc(), getEnv('ETH_PRIVATE_KEY')); break; default: throw new Error('Unsupported platform: ' + platform); } return { chain, signer: signer as Signer, address: Wormhole.chainAddress(chain.chain, signer.address()), }; } ``` - **`getEnv`** - this function fetches environment variables like your private key from the `.env` file - **`getSigner`** - based on the chain you're working with (EVM, Solana, etc.), this function retrieves a signer for that specific platform. The signer is responsible for signing transactions and interacting with the blockchain. It securely uses the private key stored in your `.env` file 6. **Create the main script** - create a new file named `manual-transfer.ts` to hold your script for transferring USDC across chains 1. Create the `manual-transfer.ts` file in the `src` directory ```bash touch src/manual-transfer.ts ``` 2. Open the `manual-transfer.ts` file and begin by importing the necessary modules from the SDK and helper files ```typescript import evm from '@wormhole-foundation/sdk/evm'; import solana from '@wormhole-foundation/sdk/solana'; import { getSigner } from './helpers/helpers'; ``` - **`evm`** - this import is for working with EVM-compatible chains, like Avalanche, Ethereum, Base Sepolia, and more - **`solana`** - this adds support for Solana, a non-EVM chain - **`getSigner`** - utility function from the helper file that retrieves the signer to sign transactions ## Manual Transfers In a manual USDC transfer, you perform each step of the cross-chain transfer process individually. This approach allows for greater control and flexibility over how the transfer is executed, which can be helpful in scenarios where you need to customize certain aspects of the transfer, such as gas management, specific chain selection, or signing transactions manually. This section will guide you through performing a manual USDC transfer across chains using the Wormhole SDK and Circle’s CCTP. ### Set Up the Transfer Environment #### Configure Transfer Details Before initiating a cross-chain transfer, you must set up the chain context and signers for both the source and destination chains. 1. **Initialize the Wormhole SDK** - initialize the `wormhole` function for the `Testnet` environment and specify the platforms (EVM and Solana) to support. This allows us to interact with both EVM-compatible chains like Avalanche and non-EVM chains like Solana if needed ```typescript const wh = await wormhole('Testnet', [evm, solana]); ``` !!! note You can replace `'Testnet'` with `'Mainnet'` if you want to perform transfers on Mainnet. 2. **Set up source and destination chains** - specify the source chain (Avalanche) and the destination chain (Sepolia) using the `getChain` method. This allows us to define where to send the USDC and where to receive them ```typescript const rcvChain = wh.getChain('Sepolia'); ``` 3. **Configure the signers** - use the `getSigner` function to retrieve the signers responsible for signing transactions on the respective chains. This ensures that transactions are correctly authorized on both the source and destination chains ```typescript const destination = await getSigner(rcvChain); ``` 4. **Define the transfer amount** - the amount of USDC to transfer is specified. In this case, we're transferring 0.1 USDC, which is parsed and converted into the base units expected by the Wormhole SDK ```typescript ``` 5. **Set transfer mode** - we specify that the transfer should be manual by setting `automatic = false`. This means you will need to handle the attestation and finalization steps yourself ```typescript ``` #### Initiate the Transfer To begin the manual transfer process, you first need to create the transfer object and then manually initiate the transfer on the source chain. 1. **Create the Circle transfer object** - the `wh.circleTransfer()` function creates an object with the transfer details, such as the amount of USDC, the source and destination addresses, and the mode. However, this does not initiate the transfer itself ```typescript amt, source.address, destination.address, automatic ); ``` 2. **Start the transfer** - the `initiateTransfer` function sends the transaction on the source chain. It involves signing and sending the transaction using the source signer. This will return a list of transaction IDs (`srcTxIds`) that you can use to track the transfer ```typescript console.log(`Started Transfer: `, srcTxids); ``` #### Fetch the Circle Attestation (VAA) Once you initialize the transfer on the source chain, you must fetch the VAA from Circle. The VAA serves as cryptographic proof that CCTP has successfully recognized the transfer. The transfer cannot be completed on the destination chain until this attestation is fetched. 1. **Set a timeout** - fetching the attestation can take some time, so setting a timeout is common. In this example, we set the timeout to 60 seconds ```typescript ``` 2. **Fetch the attestation** - after initiating the transfer, you can use the `fetchAttestation()` function to retrieve the VAA. This function will wait until the attestation is available or you reach the specified timeout ```typescript console.log(`Got Attestation: `, attestIds); ``` The `attestIds` will contain the details of the fetched attestation, which Wormhole uses to complete the transfer on the destination chain #### Complete the Transfer on the Destination Chain Once you fetch the VAA correctly, the final step is to complete the transfer on the destination chain (Sepolia in this example). This involves redeeming the VAA, which moves the USDC from Circle's custody onto the destination chain. Use the `completeTransfer()` function to finalize the transfer on the destination chain. This requires the destination signer to sign and submit the transaction to the destination chain ```typescript console.log(`Completed Transfer: `, dstTxids); console.log('Circle Transfer status: ', xfer); process.exit(0); ``` The `dstTxIds` will hold the transaction IDs for the transfer on the destination chain, confirming that the transfer has been completed You can find the full code for the manual USDC transfer script below: ???- code "`manual-transfer.ts`" ```typescript import { wormhole } from '@wormhole-foundation/sdk'; import evm from '@wormhole-foundation/sdk/evm'; import solana from '@wormhole-foundation/sdk/solana'; import { getSigner } from './helpers/helpers'; (async function () { const wh = await wormhole('Testnet', [evm, solana]); // Set up source and destination chains const sendChain = wh.getChain('Avalanche'); const rcvChain = wh.getChain('Sepolia'); // Configure the signers const source = await getSigner(sendChain); const destination = await getSigner(rcvChain); // Define the transfer amount (in the smallest unit, so 0.1 USDC = 100,000 units assuming 6 decimals) const amt = 100_000n; const automatic = false; // Create the Circle transfer object const xfer = await wh.circleTransfer( amt, source.address, destination.address, automatic ); console.log('Circle Transfer object created:', xfer); // Initiate the transfer on the source chain (Avalanche) console.log('Starting Transfer'); const srcTxids = await xfer.initiateTransfer(source.signer); console.log(`Started Transfer: `, srcTxids); // Wait for Circle Attestation (VAA) const timeout = 60 * 1000; // Timeout in milliseconds (60 seconds) console.log('Waiting for Attestation'); const attestIds = await xfer.fetchAttestation(timeout); console.log(`Got Attestation: `, attestIds); // Complete the transfer on the destination chain (Sepolia) console.log('Completing Transfer'); const dstTxids = await xfer.completeTransfer(destination.signer); console.log(`Completed Transfer: `, dstTxids); console.log('Circle Transfer status: ', xfer); process.exit(0); })(); ``` ### Run Manual Transfer To execute the manual transfer script, you can use `ts-node` to run the TypeScript file directly ```bash npx ts-node src/manual-transfer.ts ``` This will initiate the USDC transfer from the source chain (Avalanche) and complete it on the destination chain (Sepolia). You can monitor the status of the transaction on the [Wormhole explorer](https://wormholescan.io/){target=\_blank}. ### Complete Partial Transfer In some cases, a manual transfer might start but not finish—perhaps the user terminates their session, or there's an issue before the transfer can be completed. The Wormhole SDK allows you to reconstitute the transfer object from the transaction hash on the source chain. This feature is handy for recovering an incomplete transfer or when debugging. Here’s how you can complete a partial transfer using just the source chain and transaction hash: ```typescript wh, { chain: 'Avalanche', txid: '0x6b6d5f101a32aa6d2f7bf0bf14d72bfbf76a640e1b2fdbbeeac5b82069cda4dd', }, timeout ); const dstTxIds = await xfer.completeTransfer(destination.signer); console.log('Completed transfer: ', dstTxIds); ``` You will need to provide the below requirements to complete the partial transfer: - **Transaction ID (`txId`)** - the transaction hash from the source chain where the transfer was initiated - **Signer for the destination chain (`destination.signer`)** - the wallet or private key that can authorize and complete the transfer on the destination chain. This signer is the same as the `destination.signer` defined in the manual transfer setup This allows you to resume the transfer process by rebuilding the transfer object and completing it on the destination chain. It's especially convenient when debugging or handling interrupted transfers. You can find the full code for the manual USDC transfer script below: ??? code "`partial-transfer.ts`" ```typescript import { CircleTransfer, wormhole } from '@wormhole-foundation/sdk'; import evm from '@wormhole-foundation/sdk/evm'; import solana from '@wormhole-foundation/sdk/solana'; import { getSigner } from '../helpers/helpers'; (async function () { // Initialize the Wormhole object for the Testnet environment and add supported chains (evm and solana) const wh = await wormhole('Testnet', [evm, solana]); // Grab chain Contexts -- these hold a reference to a cached rpc client const rcvChain = wh.getChain('Sepolia'); // Get signer from local key const destination = await getSigner(rcvChain); const timeout = 60 * 1000; // Timeout in milliseconds (60 seconds) // Rebuild the transfer from the source txid const xfer = await CircleTransfer.from( wh, { chain: 'Avalanche', txid: '0x6b6d5f101a32aa6d2f7bf0bf14d72bfbf76a640e1b2fdbbeeac5b82069cda4dd', }, timeout ); const dstTxIds = await xfer.completeTransfer(destination.signer); console.log('Completed transfer: ', dstTxIds); console.log('Circle Transfer status: ', xfer); process.exit(0); })(); ``` ## Automatic Transfers The automatic transfer process simplifies the steps by automating the attestation fetching and transfer completion. All you need to do is initiate the transfer. ### Set Up the Transfer Environment #### Configure Transfer Details The setup for automatic transfers is similar to manual transfers, with the key difference being that the `automatic` flag is `true`. This indicates that Wormhole will handle the attestation and finalization steps for you ```typescript ``` #### Initiate the Transfer The transfer process is the same as that for manual transfers. You create the transfer object and then start the transfer on the source chain ```typescript amt, source.address, destination.address, automatic ); ``` #### Log Transfer Details After initiating the transfer, you can log the transaction IDs for both the source and destination chains. This will help you track the progress of the transfer ```typescript console.log(`Started Transfer: `, srcTxids); process.exit(0); ``` You can find the full code for the automatic USDC transfer script below: ??? code "`automatic-transfer.ts`" ```typescript import { wormhole } from '@wormhole-foundation/sdk'; import evm from '@wormhole-foundation/sdk/evm'; import solana from '@wormhole-foundation/sdk/solana'; import { getSigner } from '../helpers/helpers'; (async function () { // Initialize the Wormhole object for the Testnet environment and add supported chains (evm and solana) const wh = await wormhole('Testnet', [evm, solana]); // Set up source and destination chains const sendChain = wh.getChain('Avalanche'); const rcvChain = wh.getChain('Sepolia'); // Configure the signers const source = await getSigner(sendChain); const destination = await getSigner(rcvChain); // Define the transfer amount (in the smallest unit, so 0.1 USDC = 100,000 units assuming 6 decimals) const amt = 100_000_001n; const automatic = true; // Create the Circle transfer object (USDC-only) const xfer = await wh.circleTransfer( amt, source.address, destination.address, automatic ); console.log('Circle Transfer object created:', xfer); // Initiate the transfer on the source chain (Avalanche) console.log('Starting Transfer'); const srcTxids = await xfer.initiateTransfer(source.signer); console.log(`Started Transfer: `, srcTxids); process.exit(0); })(); ``` ### Run Automatic Transfer Assuming you have created a new `automatic-transfer.ts` file for automatic transfers under the `src` directory, use the following command to run it with `ts-node`: ```bash npx ts-node src/automatic-transfer.ts ``` The automatic relayer will take care of fetching the attestation and completing the transfer for you. ## Resources If you'd like to explore the complete project or need a reference while following this tutorial, you can find the complete codebase in [Wormhole's demo GitHub repository](https://github.com/wormhole-foundation/demo-cctp-transfer){target=\_blank}. The repository includes all the example scripts and configurations needed to perform USDC cross-chain transfers, including manual, automatic, and partial transfers using the Wormhole SDK and Circle's CCTP. ## Conclusion In this tutorial, you’ve gained hands-on experience with Circle’s CCTP and the Wormhole SDK. You’ve learned to perform manual and automatic USDC transfers across multiple chains and recover partial transfers if needed. By following these steps, you've learned how to: - Set up cross-chain transfers for native USDC between supported chains - Handle both manual and automatic relaying of transactions - Recover and complete incomplete transfers using the transaction hash and the destination chain’s signer Looking for more? Check out the [Wormhole Tutorial Demo repository](https://github.com/wormhole-foundation/demo-tutorials){target=\_blank} for additional examples. --- END CONTENT --- Doc-Content: https://raw.githubusercontent.com/wormhole-foundation/wormhole-docs/refs/heads/main/products/connect/concepts/routes.md --- BEGIN CONTENT --- --- title: Routes description: Explore Wormhole Connect's routing capabilities for asset transfers, featuring Token Bridge, CCTP, NTT, and various blockchain-specific routes for optimal UX. categories: Connect, Transfer --- ## Routes Overview {: #routes-overview} This page explains the concept of routes in Wormhole Connect. To configure routes for your widget, check the [Wormhole Connect Configuration](/docs/products/connect/configuration/data/){target=\_blank}. Routes are methods by which the widget will transfer the assets. Wormhole Connect supports Token Bridge transfers for any arbitrary token, and for specific tokens, it also supports more advanced transfer methods that provide superior UX. When you select the source chain, source token, and destination chain, Wormhole Connect will display the best routes available for that particular combination. In practice, if routes other than the Token Bridge are available, only those will be displayed. Check the [feature matrix](/docs/products/connect/reference/support-matrix/){target=\_blank} to see under which exact conditions the routes appear. ## Token Bridge Routes {: #token-bridge-routes} The Token Bridge is Wormhole's best-known transfer method. It locks assets on the source chain and mints Wormhole-wrapped "IOU" tokens on the destination chain. To transfer the assets back, the Wormhole-wrapped tokens are burned, unlocking the tokens on their original chain. #### Manual Route {: #manual-route} The manual route transfer method requires two transactions: one on the origin chain to lock the tokens (or burn the Wormhole-wrapped tokens) and one on the destination chain to mint the Wormhole-wrapped tokens (or unlock the original tokens). To offer this option, enable the `bridge` route in the configuration. #### Automatic Route {: #automatic-route} Trustless relayers can execute the second transaction on the user's behalf, so the user only needs to perform one transaction on the origin chain to have the tokens delivered to the destination automatically - for a small fee. Wormhole Connect automatically detects whether the relayer supports a token and will display the option if the `relay` route is enabled in the configuration. ## CCTP Routes (USDC) {: #cctp-routes-usdc} [Circle](https://www.circle.com/){target=\_blank}, the issuer of USDC, provides a native way for native USDC to be transferred between [CCTP-enabled](https://www.circle.com/cross-chain-transfer-protocol){target=\_blank} chains. Wormhole Connect can facilitate such transfers. Note that if native USDC is transferred from the CCTP-enabled chains to any other outside of this list, the transfer will be routed through the Token Bridge, and the resulting asset will be a Wormhole-wrapped token instead of native USDC. #### Manual Route {: #manual-route-cctp} This transfer method requires two transactions: one on the origin chain to burn the USDC and one on the destination chain to mint the USDC. The manual CCTP route relies on CCTP only and doesn't use Wormhole messaging in the background. Enable the `cctpManual` route in the configuration to offer this option. #### Automatic Route {: #automatic-route-cctp} Trustless relayers can execute the second transaction on the user's behalf. Therefore, the user only needs to perform one transaction on the origin chain to have the tokens delivered to the destination automatically—for a small fee. To offer this option, enable the `cctpRelay` route in the configuration. ## Native Token Transfers (NTT) Routes {: #native-token-transfers-ntt-routes} [Wormhole's Native Token Transfer (NTT) framework](https://github.com/wormhole-foundation/native-token-transfers/){target=\_blank} enables token issuers to retain full ownership of their tokens across any number of chains, unlike the Token Bridge. The token issuer must deploy NTT contracts, and Wormhole Connect needs to be [configured](/docs/products/connect/configuration/data/){target=\_blank} with the appropriate `nttGroups` before such tokens are recognized as transferrable via NTT. Refer to the [documentation in the NTT repository](https://github.com/wormhole-foundation/native-token-transfers?tab=readme-ov-file#overview){target=\_blank} for more information about the contracts needed and the framework in general. #### Manual Route {: #manual-route-ntt} This transfer method requires two transactions: one on the origin chain to burn or lock the tokens and one on the destination chain to mint them. To offer this option, enable the `nttManual` route in the configuration. #### Automatic Route {: #automatic-route-ntt} Trustless relayers can execute the second transaction on the user's behalf, so the user only needs to perform one transaction on the origin chain to have the tokens delivered to the destination automatically—for a small fee. Wormhole Connect automatically detects whether the relayer supports a token and will display the option if the `nttRelay` route is enabled in the configuration. ## ETH Bridge Route for Native ETH and wstETH {: #eth-bridge-route-for-native-eth-and-wsteth} [Powered by Uniswap liquidity pools](https://github.com/wormhole-foundation/example-uniswap-liquidity-layer){target=\_blank}, this route can transfer native ETH or wstETH between certain EVMs without going through the native bridges. For example, you can transfer native ETH from Arbitrum to Optimism and end up with Optimism ETH all in one go. Supported chains are Ethereum, Arbitrum, Optimism, Base, Polygon (canonical wETH), BSC (canonical wETH), and Avalanche (canonical wETH). #### Automatic Route {: #automatic-route-eth} Only the relayed route is available due to the complexity of the transaction that needs to be executed at the destination. To offer this option, enable the `ethBridge` and/or `wstETHBridge` route in the configuration to provide this option. ## USDT Bridge Route {: #usdt-bridge-route} Operating on the same technology as the ETH Bridge, this route can transfer USDT between certain EVMs without going through the native bridges. The resulting token will be the canonical USDT token on the destination instead of the Wormhole-wrapped variant. Supported chains are Ethereum, Polygon, Avalanche, Arbitrum, Optimism, BSC, and Base. #### Automatic Route {: #automatic-route-usdt} Only the relayed route is available due to the complexity of the transaction that needs to be executed on the destination. Enable the `usdtBridge` route in the configuration to offer this option. ## tBTC Route {: #tbtc-route} You can bridge [Threshold's Bitcoin](https://threshold.network/){target=\_blank} via this hybrid solution that combines the Token Bridge and Threshold's contracts. Native tBTC is first locked in the Wormhole Token Bridge, transferred to the destination in the form of Wormhole-wrapped tBTC, which is then immediately locked in Threshold's contract that mints native tBTC for it. The net result is that the user ends up with native tBTC on chains where this Threshold contract is deployed (e.g., Solana, Polygon, Arbitrum, Optimism, or Base). Note that if native tBTC is transferred out of these chains to any other outside of this list, the transfer will be routed through the Token Bridge, and the resulting asset will be a Wormhole-wrapped token instead of native tBTC. #### Manual Route {: #manual-route-tbtc} This transfer method requires two transactions: one on the origin chain to burn or lock the tokens and one on the destination chain to mint them. To provide this option, enable the `tbtc` route in the configuration. --- END CONTENT --- Doc-Content: https://raw.githubusercontent.com/wormhole-foundation/wormhole-docs/refs/heads/main/products/connect/configuration/data.md --- BEGIN CONTENT --- --- title: Connect Data Configuration description: Configure Wormhole Connect v1 (latest) with custom chains, tokens, routes, and more for enhanced blockchain interoperability. categories: Connect, Transfer --- ## Data Configuration This page explains how to configure Wormhole Connect's core functionality, from choosing supported chains and tokens to bridging routes to setting up wallets and enabling price lookups. By the end, you'll know how to specify custom networks and RPC endpoints, integrate different bridging protocols, add new tokens, and more. ## Get Started Configure Wormhole Connect by passing a `WormholeConnectConfig` object as the `config` prop. === "React integration" ```ts import WormholeConnect, { type config, } from '@wormhole-foundation/wormhole-connect'; const config: config.WormholeConnectConfig = { chains: ['Ethereum', 'Polygon', 'Solana'], tokens: ['ETH', 'WETH', 'MATIC', 'WMATIC'], rpcs: { Ethereum: 'https://rpc.ankr.com/eth', Solana: 'https://rpc.ankr.com/solana', } } ``` === "Hosted integration" ```ts import WormholeConnect, { wormholeConnectHosted, type config } from '@wormhole-foundation/wormhole-connect'; const config: config.WormholeConnectConfig = { chains: ['Ethereum', 'Polygon', 'Solana'], tokens: ['ETH', 'WETH', 'MATIC', 'WMATIC'], rpcs: { Ethereum: 'https://rpc.ankr.com/eth', Solana: 'https://rpc.ankr.com/solana', }, }; const container = document.getElementById('bridge-container'); wormholeConnectHosted(container, { config, }); ``` !!! note The complete type definition of `WormholeConnectConfig` is available in the [Wormhole Connect repository](https://github.com/wormhole-foundation/wormhole-connect/blob/production%403.0.0/wormhole-connect/src/config/types.ts#L96){target=\_blank}. ## Examples {: #examples } ### Configuring Chains and RPC Endpoints {: #chains-and-rpc-endpoints } Connect lets you customize the available chains to match your project's needs. You should provide your own RPC endpoints, as the default public ones may not support essential functions like balance fetching. === "Mainnet" ```js import WormholeConnect, { type config } from '@wormhole-foundation/wormhole-connect'; const config: config.WormholeConnectConfig = { chains: ['Ethereum', 'Polygon', 'Solana'], rpcs: { Ethereum: 'https://rpc.ankr.com/eth', Solana: 'https://rpc.ankr.com/solana', }, }; function App() { return ; } ``` === "Testnet" ```js import WormholeConnect, { type config } from '@wormhole-foundation/wormhole-connect'; const config: config.WormholeConnectConfig = { // You can use Connect with testnet chains by specifying "network": network: 'Testnet', chains: ['Sepolia', 'ArbitrumSepolia', 'BaseSepolia', 'Avalanche'], rpcs: { Avalanche: 'https://rpc.ankr.com/avalanche_fuji', BaseSepolia: 'https://base-sepolia-rpc.publicnode.com', }, }; function App() { return ; } ``` !!! note For a complete list of available chain names, see the [Wormhole TypeScript SDK](https://github.com/wormhole-foundation/wormhole-sdk-ts/blob/main/core/base/src/constants/chains.ts){target=\_blank}. ### Configuring Routes By default, Connect offers two bridging protocols: Token Bridge (for Wormhole-wrapped tokens) and Circle's CCTP (for native USDC). For most use cases, integrators require more than these default routes. The `routes` property allows you to specify which protocols to include and exclude any routes unnecessary for your application, including default and third-party routes. #### Available Route Plugins The `@wormhole-foundation/wormhole-connect` package offers a variety of `route` plugins to give you flexibility in handling different protocols. You can choose from the following `route` exports for your integration: - [**`TokenBridgeRoute`**](https://github.com/wormhole-foundation/wormhole-sdk-ts/blob/main/connect/src/routes/tokenBridge/manual.ts){target=\_blank}: Manually redeemed Wormhole Token Bridge route. - [**`AutomaticTokenBridgeRoute`**](https://github.com/wormhole-foundation/wormhole-sdk-ts/blob/main/connect/src/routes/tokenBridge/automatic.ts){target=\_blank}: Automatically redeemed (relayed) Token Bridge route. - [**`CCTPRoute`**](https://github.com/wormhole-foundation/wormhole-sdk-ts/blob/main/connect/src/routes/cctp/manual.ts){target=\_blank}: Manually redeemed CCTP route. - [**`AutomaticCCTPRoute`**](https://github.com/wormhole-foundation/wormhole-sdk-ts/blob/main/connect/src/routes/cctp/automatic.ts){target=\_blank}: Automatically redeemed (relayed) CCTP route. - **`DEFAULT_ROUTES`**: Array containing the four preceding routes (`TokenBridgeRoute`, `AutomaticTokenBridgeRoute`, `CCTPRoute`, `AutomaticCCTPRoute`). - [**`nttAutomaticRoute(nttConfig)`**](https://github.com/wormhole-foundation/native-token-transfers/blob/main/sdk/route/src/automatic.ts){target=\_blank}: Function that returns the automatically-redeemed (relayed) Native Token Transfer (NTT) route. - [**`nttManualRoute(nttConfig)`**](https://github.com/wormhole-foundation/native-token-transfers/blob/main/sdk/route/src/manual.ts){target=\_blank}: Function that returns the manually-redeemed NTT route. - **`nttRoutes(nttConfig)`**: Function that returns both NTT routes as an array. - [**`MayanRoute`**](https://github.com/mayan-finance/wormhole-sdk-route/blob/main/src/index.ts#L57){target=\_blank}: Route that offers multiple Mayan protocols. - [**`MayanRouteSWIFT`**](https://github.com/mayan-finance/wormhole-sdk-route/blob/main/src/index.ts#L528){target=\_blank}: Route for Mayan's Swift protocol only. - [**`MayanRouteMCTP`**](https://github.com/mayan-finance/wormhole-sdk-route/blob/main/src/index.ts#L539){target=\_blank}: Route for Mayan's MCTP protocol only. - [**`MayanRouteWH`**](https://github.com/mayan-finance/wormhole-sdk-route/blob/main/src/index.ts#L550){target=\_blank}: Route for Mayan's original Wormhole transfer protocol. In addition to these routes, developers can create custom routes for their Wormhole-based protocols. For examples, refer to the [NTT](https://github.com/wormhole-foundation/native-token-transfers/tree/main/sdk/route){target=\_blank} and the [Mayan](https://github.com/mayan-finance/wormhole-sdk-route){target=\_blank} example GitHub repositories. For further details on the `route` plugin interface, refer to the [Wormhole TypeScript SDK route code](https://github.com/wormhole-foundation/wormhole-sdk-ts/blob/main/connect/src/routes/route.ts){target=\_blank}. #### Example: Offer Only CCTP Transfers To configure Wormhole Connect to offer only USDC transfers via the CCTP route, use the following configuration: ```typescript import WormholeConnect, { AutomaticCCTPRoute, type config, } from '@wormhole-foundation/wormhole-connect'; const config: config.WormholeConnectConfig = { routes: [AutomaticCCTPRoute], }; ; ``` #### Example: Offer All Default Routes and Third-Party Plugins In this example, Wormhole Connect is configured with routes for both default protocols (Token Bridge and CCTP), as well as third-party protocols like [Native Token Transfers (NTT)](/docs/products/native-token-transfers/overview/){target=\_blank} and [Mayan Swap](https://swap.mayan.finance/){target=\_blank}. ```typescript import WormholeConnect, { DEFAULT_ROUTES, nttRoutes, MayanRouteSWIFT, type config, } from '@wormhole-foundation/wormhole-connect'; import { myNttConfig } from './consts'; // Custom NTT configuration const config: config.WormholeConnectConfig = { routes: [...DEFAULT_ROUTES, ...nttRoutes(myNttConfig), MayanRouteSWIFT], }; ; ``` This flexible plugin allows you to combine default routes (such as Token Bridge and CCTP) with third-party protocols, offering complete control over which routes are available in your application. ### Adding Custom Tokens {: #custom-tokens } The following section shows how to add an arbitrary token to your deployment of Connect. !!! note You will need to [register](https://portalbridge.com/advanced-tools/#/register){target=\_blank} your token with the Token Bridge to get the contract addresses necessary for it to work with that protocol. This example configuration adds the BONK token to Connect. Note the `wrappedTokens` property, which is required for use with the Token Bridge. See the [Connect source code](https://github.com/wormhole-foundation/wormhole-connect/blob/production%403.0.0/wormhole-connect/src/config/types.ts#L182){target=\_blank} for the type definition of `TokensConfig`. ```typescript import WormholeConnect, { type config } from '@wormhole-foundation/wormhole-connect'; const config: config.WormholeConnectConfig = { tokensConfig: { BONK: { key: 'BONK', symbol: 'BONK', nativeChain: 'Ethereum', icon: Icon.ETH, tokenId: { chain: 'Ethereum', address: '0x1151CB3d861920e07a38e03eEAd12C32178567F6', }, coinGeckoId: 'bonk', decimals: 18, }, }, wrappedTokens: { BONK: { Solana: 'DezXAZ8z7PnrnRJjz3wXBoRgixCa6xjnB7YaB1pPB263', }, }, }; ``` ### Configuring Native Token Transfers (NTT) Connect supports [NTT](/docs/products/native-token-transfers/overview/){target=\_blank}, which allows native tokens to move between supported chains using NTT-deployed contracts, such as managers and transceivers. To enable NTT in your app, follow these steps: 1. Add NTT routes to the `routes` array by calling `nttRoutes(...)` with your token deployment config using the spread operator. This sets up the route logic for native token transfers. 2. Provide token metadata for each of the tokens listed in `nttRoutes` in the [`tokensConfig`](#custom-tokens) object. These entries must include `symbol`, `decimals`, and the `tokenId`. ```typescript import WormholeConnect, { type config } from '@wormhole-foundation/wormhole-connect'; import { nttRoutes } from '@wormhole-foundation/wormhole-connect/ntt'; const wormholeConfig: config.WormholeConnectConfig = { network: 'Testnet', chains: ['Solana', 'BaseSepolia'], tokens: ['WSV'], ui: { title: 'Wormhole NTT UI', defaultInputs: { fromChain: 'Solana', toChain: 'BaseSepolia', }, }, routes: [ ...nttRoutes({ tokens: { WSV_NTT: [ { chain: 'Solana', manager: 'nMxHx1o8GUg2pv99y8JAQb5RyWNqDWixbxWCaBcurQx', token: '2vLDzr7hUpLFHQotmR8EPcMTWczZUwCK31aefAzumkmv', transceiver: [ { address: 'AjL3f9FMHJ8VkNUHZqLYxa5aFy3aTN6LUWMv4qmdf5PN', type: 'wormhole', }, ], }, { chain: 'BaseSepolia', manager: '0xaE02Ff9C3781C5BA295c522fB469B87Dc5EE9205', token: '0xb8dccDA8C166172159F029eb003d5479687452bD', transceiver: [ { address: '0xF4Af1Eac8995766b54210b179A837E3D59a9F146', type: 'wormhole', }, ], }, ], }, }), ], tokensConfig: { WSVsol: { symbol: 'WSV', tokenId: { chain: 'Solana', address: '2vLDzr7hUpLFHQotmR8EPcMTWczZUwCK31aefAzumkmv', }, icon: 'https://wormhole.com/token.png', decimals: 9, }, WSVbase: { symbol: 'WSV', tokenId: { chain: 'BaseSepolia', address: '0xb8dccDA8C166172159F029eb003d5479687452bD', }, icon: 'https://wormhole.com/token.png', decimals: 9, }, }, }; ``` For a complete working example of NTT configuration in Wormhole Connect, see the [ntt-connect demo repository](https://github.com/wormhole-foundation/demo-ntt-connect){target=\_blank}. ### Whitelisting Tokens {: #whitelisting-tokens } Connect offers a list of built-in tokens by default. You can see it below: - [Mainnet tokens](https://github.com/wormhole-foundation/wormhole-connect/blob/production%403.0.0/wormhole-connect/src/config/mainnet/tokens.ts){target=\_blank} - [Testnet tokens](https://github.com/wormhole-foundation/wormhole-connect/blob/production%403.0.0/wormhole-connect/src/config/testnet/tokens.ts){target=\_blank} You can customize the tokens shown in the UI using the `tokens` property. The following example adds a custom token and limits Connect to showing only that token, along with the native gas tokens ETH and SOL. ```jsx import WormholeConnect, { type config } from '@wormhole-foundation/wormhole-connect'; const config: config.WormholeConnectConfig = { chains: ['Ethereum', 'Solana'], tokens: ['ETH', 'SOL', 'BONK'], rpcs: { Ethereum: 'https://rpc.ankr.com/eth', Solana: 'https://rpc.ankr.com/solana', }, tokensConfig: { BONK: { key: 'BONK', symbol: 'BONK', icon: 'https://assets.coingecko.com/coins/images/28600/large/bonk.jpg?1696527587', tokenId: { chain: 'Ethereum', address: '0x1151CB3d861920e07a38e03eEAd12C32178567F6', }, decimals: 18, }, }, wrappedTokens: { BONK: { Solana: 'DezXAZ8z7PnrnRJjz3wXBoRgixCa6xjnB7YaB1pPB263', }, }, }; function App() { return ; } ``` You can whitelist tokens by symbol or by specifying tuples of [chain, address]. For example, this would show only BONK token (on all chains you've whitelisted) as well as [`EPjFW...TDt1v`](https://solscan.io/token/EPjFWdd5AufqSSqeM2qN1xzybapC8G4wEGGkZwyTDt1v){target=\_blank} on Solana, which is USDC. ```jsx import WormholeConnect, { type config, } from '@wormhole-foundation/wormhole-connect'; const config: config.WormholeConnectConfig = { chains: ['Ethereum', 'Solana'], tokens: [ // Whitelist BONK on every whitelisted chain 'BONK', // Also whitelist USDC, specifically on Solana ['Solana', 'EPjFWdd5AufqSSqeM2qN1xzybapC8G4wEGGkZwyTDt1v'] ], ... }; function App() { return ; } ``` ### User-Inputted Tokens {: #user-inputted-tokens } As of version 2.0, Connect allows users to paste token addresses to bridge any token they want. As an integrator, you may want to disable this feature if you are deploying Connect for use only with a specific token(s). If you provide a token whitelist (see above), this is turned off automatically. However, you can also disable it explicitly like this: ```jsx import WormholeConnect, { type config } from '@wormhole-foundation/wormhole-connect'; const config: config.WormholeConnectConfig = { ui: { disableUserInputtedTokens: true, }, }; function App() { return ; } ``` Setting `ui.disableUserInputtedTokens` to `true` will disable the ability to paste in token addresses. ### Transaction Settings {: #transaction-settings } Landing transactions on Solana can require finely tuned priority fees when there is congestion. You can tweak how Connect determines these with `transactionSettings`. All of the parameters in this configuration are optional; you can provide any combination of them. ```jsx import WormholeConnect, { type config } from '@wormhole-foundation/wormhole-connect'; const config: config.WormholeConnectConfig = { transactionSettings: { Solana: { priorityFee: { // Number between 0-1, defaults to 0.9. Higher percentile yields higher fees. // For example, you can set percentile to 0.95 to make Connect compute the // 95th percentile priority fee amount based on recent transactions percentile: 0.95, // Any number, defaults to 1.0. The fee amount is multiplied by this number. // This can be used to further raise or lower the fees Connect is using. // For example, percentile=0.95 and percentileMultiple=1.1 would use // the 95th percentile fee, with a 10% increase percentileMultiple: 1.1, // Minimum fee you want to use in microlamports, regardless of recent transactions // Defaults to 1 min: 200_000, // Maximum fee you want to use in microlamports, regardless of recent transactions // Defaults to 100,000,000 max: 5_000_000, }, }, }, }; function App() { return ; } ``` !!! note Connect can calculate fees more accurately if you are using a [Triton](https://triton.one){target=\_blank} RPC endpoint. ### Wallet Set Up {: #reown-cloud-project-id } Your selected blockchain network determines the available wallet options when using Wormhole Connect. - For EVM chains, wallets like [MetaMask](https://metamask.io/){target=\_blank} and [Reown Cloud](https://reown.com/home){target=\_blank} (formerly WalletConnect) are supported - For Solana, you'll see options such as [Phantom](https://phantom.com/){target=\_blank}, [Web3Auth](https://wallet.web3auth.io/){target=\_blank}, and [Coin98](https://coin98.com/){target=\_blank} The wallet options automatically adjust based on the selected chain, providing a seamless user experience without additional configuration. To add Reown Cloud (formerly known as WalletConnect) as a supported wallet option, you need to obtain a project ID from the [Reown Cloud dashboard](https://cloud.reown.com/){target=\_blank}. Once you have the project ID, set it in your `WormholeConnectConfig` under the `walletConnectProjectId` property. ```typescript import WormholeConnect, { type config } from '@wormhole-foundation/wormhole-connect'; const wormholeConfig: config.WormholeConnectConfig = { ... walletConnectProjectId: 'INSERT_PROJECT_ID', }; ``` !!! note If the `walletConnectProjectId` is not set, Reown Cloud (WalletConnect) will be disabled from the available wallet list in the Connect UI. --- END CONTENT --- Doc-Content: https://raw.githubusercontent.com/wormhole-foundation/wormhole-docs/refs/heads/main/products/connect/configuration/theme.md --- BEGIN CONTENT --- --- title: Connect Theme & UI Customization description: Learn how to style Wormhole Connect with custom color schemes, fonts, layouts, and menus for a streamlined user experience. categories: Connect, Transfer --- ## Theme & UI Customization This page focuses on how to style the Connect widget, covering color schemes, fonts, layout changes (like toggling the hamburger menu), and adding extra menu entries. You'll learn how to customize Connect's look and feel to match your application's branding. ### Changing the Color Scheme You can customize Connect's color scheme by providing a `theme` prop. === "React integration" ```ts import WormholeConnect, { type config, WormholeConnectTheme } from '@wormhole-foundation/wormhole-connect'; const config: config.WormholeConnectConfig = { /* Your config... */ }; const theme: WormholeConnectTheme = { mode: 'dark', primary: '#78c4b6', font: 'Comic Sans; sans-serif', }; function App() { return ; } ``` === "Hosted integration" ```ts import WormholeConnect, { type config, WormholeConnectTheme, wormholeConnectHosted } from '@wormhole-foundation/wormhole-connect'; const config: config.WormholeConnectConfig = { /* Your config... */ }; const theme: WormholeConnectTheme = { mode: 'dark', primary: '#78c4b6', font: 'Comic Sans; sans-serif', }; const container = document.getElementById('bridge-container'); wormholeConnectHosted(container, { config, theme, }); ``` The `WormholeConnectTheme` type supports the following properties: |
Property
| Description | Example | |:--------------------------------------:|:---------------------------------------------------------------------:|:---------------------:| | `mode` | Dark mode or light mode. **Required** | `"dark"` or `"light"` | | `input` | Color used for input fields, dropdowns | `"#AABBCC"` | | `primary` | Primary color used for buttons | `"#AABBCC"` | | `secondary` | Secondary color used for some UI elements | `"#AABBCC"` | | `text` | Primary color used for text | `"#AABBCC"` | | `textSecondary` | Secondary color used for dimmer text | `"#AABBCC"` | | `error` | Color to display errors in, usually some shade of red | `"#AABBCC"` | | `success` | Color to display success messages in | `"#AABBCC"` | | `font` | Font used in the UI, can be custom font available in your application | `"Arial; sans-serif"` | ### Toggle Hamburger Menu {: #toggle-hamburger-menu } By setting the `showHamburgerMenu` option to **false**, you can deactivate the hamburger menu, which will position the links at the bottom. #### Add Extra Menu Entry {: #add-extra-menu-entry } By setting the `showHamburgerMenu` option to `false,` you can add extra links. The following properties are accessed through the `menu[]` property (e.g., `menu[].label`): | Property | Description | |:--------:|:-------------------------------------------:| | `label` | Link name to show up | | `href` | Target URL or URN | | `target` | Anchor standard target, by default `_blank` | | `order` | Order where the new item should be injected | ```jsx import WormholeConnect, { type config } from '@wormhole-foundation/wormhole-connect'; const config: config.WormholeConnectConfig = { ui: { showHamburgerMenu: false, menu: [ { label: 'Advance Tools', href: 'https://portalbridge.com', target: '_self', order: 1, }, ], }, }; function App() { return ; } ``` --- END CONTENT --- Doc-Content: https://raw.githubusercontent.com/wormhole-foundation/wormhole-docs/refs/heads/main/products/connect/faqs.md --- BEGIN CONTENT --- --- title: Connect FAQs description: Common questions and detailed answers about using Wormhole Connect, including supported assets, chains, customization, and integration options. categories: Connect, Transfer, CCTP --- # Connect FAQs ## What types of assets does Connect support? Connect supports both native and wrapped assets across all Wormhole-supported blockchains. This includes: - Major stablecoins like USDT and USDC (via CCTP) - Native gas tokens such as ETH, SOL, etc. - Cross-chain asset swaps through integrators like Mayan When bridging assets through the Wormhole Token Bridge, depending on the chain and token, assets may arrive as Wormhole-wrapped tokens on the destination chain. ## What chains does Connect support? Connect supports around 30 chains, spanning various blockchain runtimes: - EVM-based chains (Ethereum, Base, Arbitrum, BSC, etc.) - Solana - Move-based chains (Sui, Aptos) For a complete list of supported chains, see the [Connect-supported chains list](/docs/products/connect/reference/support-matrix/){target=\_blank}. ## What is gas dropoff? Gas dropoff allows users to receive gas for transaction fees on the destination chain, eliminating the need to acquire the native gas token from a centralized exchange. The relayer automatically swaps part of the transferred assets into the native gas token, enabling seamless entry into new ecosystems. ## Can I customize Connect inside my application? Connect can be [fully customized](https://connect-in-style.wormhole.com/){target=\_blank} to choose the chains and assets you wish to support. You may also select different themes and colors to tailor Connect for your decentralized application. For details, see the [GitHub readme](https://github.com/wormhole-foundation/wormhole-connect){target=\_blank}. ## Which functions or events does Connect rely on for NTT integration? Connect relies on the NTT SDK for integration, with platform-specific implementations for Solana and EVM. The critical methods involved include initiate and redeem functions and rate capacity methods. These functions ensure Connect can handle token transfers and manage chain-rate limits. ## Do integrators need to enable wallets like Phantom or Backpack in Connect? Integrators don’t need to explicitly enable wallets like Phantom or Backpack in Connect. However, the wallet must be installed and enabled in the user's browser to appear as an option in the interface. ## Which function should be modified to set priority fees for Solana transactions? In [Wormhole Connect](https://github.com/wormhole-foundation/wormhole-connect){target=\_blank}, you can modify the priority fees for Solana transactions by updating the `computeBudget/index.ts` file. This file contains the logic for adjusting the compute unit limit and priority fees associated with Solana transactions. To control the priority fee applied to your transactions, you can modify the `feePercentile` and `minPriorityFee` parameters in the `addComputeBudget` and `determineComputeBudget` functions. The relevant file can be found in the Connect codebase: [`computeBudget/index.ts`](https://github.com/wormhole-foundation/wormhole-connect/blob/62f1ba8ee5502ac6fd405680e6b3816c9aa54325/sdk/src/contexts/solana/utils/computeBudget/index.ts){target=\_blank}. ## Is there a minimum amount for bridging with CCTP or the Connect SDK? There is no minimum amount for bridging via CCTP if the user covers the gas fees on both the source and destination chains. However, if the transfer is automatically relayed, a minimum amount is required to cover relay fees on the destination chain. The relay provider charges these fees at cost. Current relay fees: - Ethereum L1: ~4.2 USDC - Base, Optimism, Arbitrum, Avalanche: 0.3 USDC Additional notes: - **USDC to Solana** - Wormhole's native CCTP route does not currently support automatic relaying of USDC to Solana. However, you can transfer USDC to Solana using the [Mayan plugin](https://github.com/mayan-finance/wormhole-sdk-route){target=\_blank} for the SDK. Mayan is a protocol that integrates Wormhole and CCTP to enable this functionality - **Frontend integrations** - **Connect** - A pre-built UI available via [@wormhole-foundation/wormhole-connect](https://www.npmjs.com/package/@wormhole-foundation/wormhole-connect){target=\_blank} - **TypeScript SDK** - A lower-level integration option, available via [@wormhole-foundation/sdk](https://www.npmjs.com/package/@wormhole-foundation/sdk){target=\_blank}, allowing developers to build custom UIs !!!note The TypeScript SDK was previously referred to as the "Connect SDK," but this naming has since been discontinued. --- END CONTENT --- Doc-Content: https://raw.githubusercontent.com/wormhole-foundation/wormhole-docs/refs/heads/main/products/connect/guides/hosted-version.md --- BEGIN CONTENT --- --- title: Integrate Connect via CDN description: Learn how to use Wormhole Connect via CDN in any JavaScript project using just a script tag with no React or backend setup required. categories: Connect, Transfer --- # Integrate Connect via CDN [Wormhole Connect](/docs/products/connect/overview/){target=\_blank} is a prebuilt UI component that makes it easy to transfer tokens across chains. You can integrate it into any website using either React or a hosted version served via [jsDelivr](https://www.jsdelivr.com/){target=\_blank}. This guide focuses on using the hosted version—ideal for simpler setups or non-React environments. It includes everything you need to get started with just a few lines of code. If you're using React, refer to the [Get Started with Connect](/docs/products/connect/get-started/){target=\_blank} guide. ## Install Connect To install the [Connect npm package](https://www.npmjs.com/package/@wormhole-foundation/wormhole-connect){target=\_blank}, run the following command: ```bash npm i @wormhole-foundation/wormhole-connect ``` ## Add Connect to Your Project Using the Hosted Version The hosted version uses pre-built packages (including React) served via jsDelivr from npm. To integrate it without using React directly, add the following to your JavaScript project: ```js import { wormholeConnectHosted } from '@wormhole-foundation/wormhole-connect'; // Existing DOM element where you want to mount Connect const container = document.getElementById('bridge-container'); if (!container) { throw new Error("Element with id 'bridge-container' not found"); } wormholeConnectHosted(container); ``` You can provide config and theme parameters in a second function argument: ```js import { wormholeConnectHosted } from '@wormhole-foundation/wormhole-connect'; // Existing DOM element where you want to mount Connect const container = document.getElementById('bridge-container'); if (!container) { throw new Error("Element with id 'connect' not found"); } wormholeConnectHosted(container, { config: { rpcs: { // ... }, }, theme: { background: { default: '#004547', }, }, }); ``` ## Next Steps Use the following guides to configure your Connect instance: - **[Data Configuration](/docs/products/connect/configuration/data/)**: Learn how to specify custom networks and RPC endpoints, integrate different bridging protocols, add new tokens, and more. - **[Theme Configuration](/docs/products/connect/configuration/theme/)**: Learn how to customize Connect's look and feel to match your application's branding. --- END CONTENT --- Doc-Content: https://raw.githubusercontent.com/wormhole-foundation/wormhole-docs/refs/heads/main/products/connect/guides/upgrade.md --- BEGIN CONTENT --- --- title: Wormhole Connect Migration Guide description: Learn how to migrate to Wormhole Connect ^v1.0, with step-by-step guidance on updating your package and configuration. categories: Connect, Transfer --- # Wormhole Connect Migration Guide The Wormhole Connect feature has been updated to **version 3.0**, introducing a modernized design and improved routing for faster native-to-native token transfers. This stable release comes with several breaking changes in how to configure the application, requiring minor updates to your integration. This guide will help you migrate to the new version in just a few simple steps. By following this migration guide, you'll learn how to: - Update to the latest Connect package - Apply configuration changes to the **`WormholeConnectConfig`** object - Understand new routing capabilities and plugin options These updates ensure better performance and a smoother integration experience. !!! tip "Note" Connect versions v1.x and v2.x share the same configuration structure. This guide outlines a unified upgrade process to v3.x, regardless of whether you're using v0.x, v1.x, or v2.x. ## Update the Connect Package To begin the migration process, update the Connect [**npm package**](https://www.npmjs.com/package/@wormhole-foundation/wormhole-connect){target=\_blank} to the latest version 3.0. Updating to the latest version provides access to the newest features and improvements, including the modernized design and enhanced routing capabilities. Run the following command in your terminal: ```bash npm install @wormhole-foundation/wormhole-connect@^3.0 ``` This command installs the latest stable version of Wormhole Connect and prepares your environment for the new configuration changes. ## Update the `WormholeConnectConfig` Object In version 3.0, the `config.WormholeConnectConfig` object underwent several breaking changes. Most of these changes are minor and can be applied quickly. Below is a summary of the key changes, followed by detailed examples. ### Summary of Breaking Changes - Chain names are now capitalized: `solana` → `Solana` - `env` renamed to `network` and is now capitalized: `mainnet` → `Mainnet` - `networks` renamed to `chains`, with capitalized names - `routes` updated to use route plugins - `nttGroups` removed in favor of route plugin configuration - `tokensConfig` updated, with a new key `wrappedTokens` added - Many UI-related properties consolidated under a top-level `ui` key - `customTheme` and `mode` were removed, replaced by a top-level `theme` property These changes are explained in more detail below, with examples for easy reference. ### Capitalize Chain Names In version 3.0, chain names are now consistent with the `Chain` type from the [Wormhole TypeScript SDK](https://github.com/wormhole-foundation/wormhole-sdk-ts){target=\_blank}, and must be capitalized. This affects all config properties where a chain is referenced, including `rpcs`, `rest`, `graphql`, and `chains`. === "v0.x" ```typescript import { WormholeConnectConfig } from '@wormhole-foundation/wormhole-connect'; const config: WormholeConnectConfig = { rpcs: { ethereum: 'INSERT_ETH_RPC_URL', solana: 'INSERT_SOLANA_RPC_URL', }, }; ``` === "v1.x" ```typescript import { WormholeConnectConfig } from '@wormhole-foundation/wormhole-connect'; const config: WormholeConnectConfig = { rpcs: { Ethereum: 'INSERT_ETH_RPC_URL', Solana: 'INSERT_SOLANA_RPC_URL', }, }; ``` === "v3.x" ```typescript import { type config } from '@wormhole-foundation/wormhole-connect'; const config: config.WormholeConnectConfig = { rpcs: { Ethereum: 'INSERT_ETH_RPC_URL', Solana: 'INSERT_SOLANA_RPC_URL', }, }; ``` You can find the complete list of supported chain names in the [Wormhole TypeScript SDK](https://github.com/wormhole-foundation/wormhole-sdk-ts/blob/main/core/base/src/constants/chains.ts#L6-L71){target=\_blank}. ### Rename `env` to `network` The `env` property has been renamed to `network`, with capitalized values. This change affects how you configure Testnet and Mainnet environments. === "v0.x" ```typescript import { WormholeConnectConfig } from '@wormhole-foundation/wormhole-connect'; const config: WormholeConnectConfig = { env: 'testnet', }; ``` === "v1.x" ```typescript import { WormholeConnectConfig } from '@wormhole-foundation/wormhole-connect'; const config: WormholeConnectConfig = { network: 'Testnet', }; ``` === "v3.x" ```typescript import { type config } from '@wormhole-foundation/wormhole-connect'; const config: config.WormholeConnectConfig = { network: 'Testnet', }; ``` If you don’t explicitly set the `network` value, Connect will default to `Mainnet`. ```typescript // Defaults to Mainnet const config: config.WormholeConnectConfig = {}; ``` For more information, refer to the [network constants list](https://github.com/wormhole-foundation/wormhole-sdk-ts/blob/main/core/base/src/constants/networks.ts){target=\_blank}. ### Rename `networks` to `chains` The `networks` property, which allowed whitelisting chains, is now renamed `chains`, and the chain names are capitalized. === "v0.x" ```typescript import { WormholeConnectConfig } from '@wormhole-foundation/wormhole-connect'; const config: WormholeConnectConfig = { networks: ['solana', 'ethereum'], }; ``` === "v1.x" ```typescript import { WormholeConnectConfig } from '@wormhole-foundation/wormhole-connect'; const config: WormholeConnectConfig = { chains: ['Solana', 'Ethereum'], }; ``` === "v3.x" ```typescript import { type config } from '@wormhole-foundation/wormhole-connect'; const config: config.WormholeConnectConfig = { chains: ['Solana', 'Ethereum'], }; ``` ### Update `routes` to Use Route Plugins The `routes` property in Connect version 3.0 has significantly improved. Previously, `routes` was a simple array of strings. The latest version has been transformed into a flexible plugin system, allowing you to include specific routes for various protocols. By default, if no `routes` property is set, Connect will provide routes for two core protocols: - [Token Bridge](/docs/products/token-bridge/overview/){target=\_blank} - [CCTP](/docs/products/cctp-bridge/overview/){target=\_blank} For most use cases, integrators require more than the default routes. The new `routes` property allows you to specify which protocols to include and exclude any routes unnecessary for your application, including both default and third-party routes. #### Available `route` Plugins The `@wormhole-foundation/wormhole-connect` package offers a variety of `route` plugins to give you flexibility in handling different protocols. You can choose from the following `route` exports for your integration: ???- tip "`route` Plugins" - **`TokenBridgeRoute`** - manually redeemed Token Bridge route - **`AutomaticTokenBridgeRoute`** - automatically redeemed (relayed) Token Bridge route - **`CCTPRoute`** - manually redeemed CCTP route - **`AutomaticCCTPRoute`** - automatically redeemed (relayed) CCTP route - **`DEFAULT_ROUTES`** - array containing the four preceding routes (TokenBridgeRoute, AutomaticTokenBridgeRoute, CCTPRoute, AutomaticCCTPRoute) - **`nttAutomaticRoute(nttConfig)`** - function that returns the automatically-redeemed (relayed) Native Token Transfer (NTT) route - **`nttManualRoute(nttConfig)`** - function that returns the manually-redeemed NTT route - **`nttRoutes(nttConfig)`** - function that returns both NTT routes as an array - **`MayanRoute`** - route that offers multiple Mayan protocols - **`MayanRouteSWIFT`** - route for Mayan’s Swift protocol only - **`MayanRouteMCTP`** - route for Mayan’s MCTP protocol only - **`MayanRouteWH`** - route for Mayan’s original Wormhole transfer protocol In addition to these routes, developers can create custom routes for their own Wormhole-based protocols. For examples, refer to the [NTT](https://github.com/wormhole-foundation/native-token-transfers/tree/main/sdk/route){target=\_blank} and the [Mayan](https://github.com/mayan-finance/wormhole-sdk-route){target=\_blank} example GitHub repositories. For further details on the Route plugin interface, refer to the [Wormhole TypeScript SDK route code](https://github.com/wormhole-foundation/wormhole-sdk-ts/blob/main/connect/src/routes/route.ts){target=\_blank}. Now that you know the available `route` plugins, let's explore some examples of configuring them. #### Example: Offer Only CCTP Transfers To configure Connect to offer only USDC transfers via the CCTP route, use the following configuration: ```typescript import WormholeConnect, { AutomaticCCTPRoute, type config, } from '@wormhole-foundation/wormhole-connect'; const config: config.WormholeConnectConfig = { routes: [AutomaticCCTPRoute], }; ; ``` #### Example: Offer All Default Routes and Third-Party Plugins In this example, Connect is configured with routes for both default protocols (Token Bridge & CCTP), as well as third-party protocols like [Native Token Transfers (NTT)](/docs/products/native-token-transfers/overview/){target=\_blank} and [Mayan Swap](https://swap.mayan.finance/){target=\_blank}. ```typescript import WormholeConnect, { DEFAULT_ROUTES, nttRoutes, MayanRouteSWIFT, type config, } from '@wormhole-foundation/wormhole-connect'; import { myNttConfig } from './consts'; // Custom NTT configuration const config: config.WormholeConnectConfig = { routes: [...DEFAULT_ROUTES, ...nttRoutes(myNttConfig), MayanRouteSWIFT], }; ; ``` This flexible plugin allows you to combine default routes (such as Token Bridge and CCTP) with third-party protocols, offering complete control over which routes are available in your application. ### Update the `tokensConfig` Structure In Connect version 3.0, the `tokensConfig` property has been updated to simplify the structure and improve flexibility for token handling across chains. The previous configuration has been streamlined, and a new key, `wrappedTokens,` has been introduced to handle foreign assets more effectively. Key Changes to `tokensConfig`: - **Capitalized chain names** - all chain names, like `ethereum`, must now be capitalized, such as `Ethereum`, to maintain consistency with the rest of the Wormhole SDK - **`wrappedTokens`** - this new key replaces `foreignAssets` and defines the wrapped token addresses on foreign chains, making it easier to manage cross-chain transfers. It consolidates the wrapped token addresses into a cleaner structure. These addresses must be specified to enable token transfers to and from the foreign chain via token bridge routes - **Simplified decimals** - instead of using a map of decimal values for different chains, you now only need to provide a single decimals value for the token's native chain === "v0.x" In the old structure, the `foreignAssets` field defined the token’s presence on other chains, and `decimals` were mapped across multiple chains. ```typescript import WormholeConnect, { WormholeConnectConfig, } from '@wormhole-foundation/wormhole-connect'; const config: WormholeConnectConfig = { tokensConfig: { WETH: { key: 'WETH', symbol: 'WETH', nativeChain: 'ethereum', icon: Icon.ETH, tokenId: { chain: 'ethereum', address: '0xC02aaA39b223FE8D0A0e5C4F27eAD9083C756Cc2', }, coinGeckoId: 'ethereum', color: '#62688F', decimals: { Ethereum: 18, default: 8 }, foreignAssets: { Solana: { address: '7vfCXTUXx5WJV5JADk17DUJ4ksgau7utNKj4b963voxs', decimals: 8, }, }, }, }, }; ``` === "v1.x" In v1.0, `foreignAssets` has been replaced with `wrappedTokens`, simplifying token transfers across chains by directly mapping wrapped token addresses. The `decimals` value is now a simple number representing the token’s decimals on its native chain. ```typescript import WormholeConnect, { WormholeConnectConfig, } from '@wormhole-foundation/wormhole-connect'; const config: WormholeConnectConfig = { tokensConfig: { WETH: { key: 'WETH', symbol: 'WETH', nativeChain: 'Ethereum', // Chain name now capitalized icon: Icon.ETH, tokenId: { chain: 'Ethereum', address: '0xC02aaA39b223FE8D0A0e5C4F27eAD9083C756Cc2', }, coinGeckoId: 'ethereum', color: '#62688F', decimals: 18, // Simplified decimals field }, }, wrappedTokens: { WETH: { Solana: '7vfCXTUXx5WJV5JADk17DUJ4ksgau7utNKj4b963voxs', /* additional chains */ }, }, }; ``` === "v3.x" In v3.0, `foreignAssets` has been replaced with `wrappedTokens`, simplifying token transfers across chains by directly mapping wrapped token addresses. The `decimals` value is now a simple number representing the token’s decimals on its native chain. ```typescript import WormholeConnect, { type config, } from '@wormhole-foundation/wormhole-connect'; const config: config.WormholeConnectConfig = { tokensConfig: { WETH: { key: 'WETH', symbol: 'WETH', nativeChain: 'Ethereum', // Chain name now capitalized icon: Icon.ETH, tokenId: { chain: 'Ethereum', address: '0xC02aaA39b223FE8D0A0e5C4F27eAD9083C756Cc2', }, coinGeckoId: 'ethereum', color: '#62688F', decimals: 18, // Simplified decimals field }, }, wrappedTokens: { WETH: { Solana: '7vfCXTUXx5WJV5JADk17DUJ4ksgau7utNKj4b963voxs', /* additional chains */ }, }, }; ``` ### Update NTT Configuration In Connect version 3.0, the `nttGroups` property, which was used to configure Native Token Transfers (NTT), has been removed. Instead, the NTT configuration is passed directly to the NTT route constructor. This update simplifies the setup and provides more flexibility for defining NTT routes. Key changes: - **Removed `nttGroups`** - the `nttGroups` property has been removed from the configuration and is now passed as an argument to the `nttRoutes` function - **Direct NTT route configuration** - NTT routes are now defined more explicitly, allowing for a more organized structure when specifying tokens, chains, and managers This change simplifies the configuration process by providing a cleaner, more flexible way to handle NTT routes across different chains. === "v0.x" In the previous version, `nttGroups` defined the NTT managers and transceivers for different tokens across multiple chains. ```typescript import WormholeConnect, { nttRoutes, WormholeConnectConfig, } from '@wormhole-foundation/wormhole-connect'; const config: WormholeConnectConfig = { nttGroups: { Lido_wstETH: { nttManagers: [ { chainName: 'ethereum', address: '0xb948a93827d68a82F6513Ad178964Da487fe2BD9', tokenKey: 'wstETH', transceivers: [ { address: '0xA1ACC1e6edaB281Febd91E3515093F1DE81F25c0', type: 'wormhole', }, ], }, { chainName: 'bsc', address: '0x6981F5621691CBfE3DdD524dE71076b79F0A0278', tokenKey: 'wstETH', transceivers: [ { address: '0xbe3F7e06872E0dF6CD7FF35B7aa4Bb1446DC9986', type: 'wormhole', }, ], }, ], }, }, }; ``` === "v1.x" In v1.0, `nttGroups` has been removed, and the configuration is passed to the NTT route constructor as an argument. The tokens and corresponding transceivers are now clearly defined within the `nttRoutes` configuration. ```typescript import WormholeConnect, { nttRoutes, WormholeConnectConfig, } from '@wormhole-foundation/wormhole-connect'; const config: WormholeConnectConfig = { routes: [ ...nttRoutes({ tokens: { Lido_wstETH: [ { chain: 'Ethereum', manager: '0xb948a93827d68a82F6513Ad178964Da487fe2BD9', token: '0x7f39C581F595B53c5cb19bD0b3f8dA6c935E2Ca0', transceiver: [ { address: '0xA1ACC1e6edaB281Febd91E3515093F1DE81F25c0', type: 'wormhole', }, ], }, { chain: 'Bsc', manager: '0x6981F5621691CBfE3DdD524dE71076b79F0A0278', token: '0x26c5e01524d2E6280A48F2c50fF6De7e52E9611C', transceiver: [ { address: '0xbe3F7e06872E0dF6CD7FF35B7aa4Bb1446DC9986', type: 'wormhole', }, ], }, ], }, }), /* other routes */ ], }; ``` === "v3.x" In v3.0, `nttGroups` has been removed, and the configuration is passed to the NTT route constructor as an argument. The tokens and corresponding transceivers are now clearly defined within the `nttRoutes` configuration. ```typescript import WormholeConnect, { nttRoutes, type config, } from '@wormhole-foundation/wormhole-connect'; const config: config.WormholeConnectConfig = { routes: [ ...nttRoutes({ tokens: { Lido_wstETH: [ { chain: 'Ethereum', manager: '0xb948a93827d68a82F6513Ad178964Da487fe2BD9', token: '0x7f39C581F595B53c5cb19bD0b3f8dA6c935E2Ca0', transceiver: [ { address: '0xA1ACC1e6edaB281Febd91E3515093F1DE81F25c0', type: 'wormhole', }, ], }, { chain: 'Bsc', manager: '0x6981F5621691CBfE3DdD524dE71076b79F0A0278', token: '0x26c5e01524d2E6280A48F2c50fF6De7e52E9611C', transceiver: [ { address: '0xbe3F7e06872E0dF6CD7FF35B7aa4Bb1446DC9986', type: 'wormhole', }, ], }, ], }, }), /* other routes */ ], }; ``` In this new structure, NTT routes are passed directly through the `nttRoutes` function, with the `token`, `chain`, `manager` and `transceiver` clearly defined for each supported asset. ### Update UI Configuration In Connect version 3.0, the user interface configuration has been significantly updated. Several previously scattered UI properties have now been consolidated under a new `ui` key, making the UI configuration cleaner and easier to manage. Key UI changes: - **Consolidated UI properties** - many UI-related properties moved under a new top-level ui key for better organization - **Removed `customTheme` and `mode`** - these properties have been removed in favor of a new top-level prop called `theme`, which simplifies theming and allows dynamic switching between themes #### UI Properties The following properties that were previously defined at the root level of the configuration are now part of the `ui` key: - `explorer` → `ui.explorer` - specifies the explorer to use for viewing transactions - `bridgeDefaults` → `ui.defaultInputs` - sets default input values for the bridge, such as the source and destination chains and token - `pageHeader` → `ui.pageHeader` - sets the title and header for the page - `menu` → `ui.menu` - defines the menu items displayed in the interface - `searchTx` → `ui.searchTx` - configures the transaction search functionality - `partnerLogo` → `ui.partnerLogo` - displays a partner's logo on the interface - `walletConnectProjectId` → `ui.walletConnectProjectId` - integrates WalletConnect into the UI - `showHamburgerMenu` → `ui.showHamburgerMenu` - enables or disables the hamburger menu for navigation Additionally, there are two new properties under `ui`: - **`ui.title`** - sets the title rendered in the top left corner of the UI. The default is "Wormhole Connect" - **`ui.getHelpUrl`** - URL that Connect will render when an unknown error occurs, allowing users to seek help. This can link to a Discord server or any other support channel ```typescript import WormholeConnect, { type config, } from '@wormhole-foundation/wormhole-connect'; const config: config.WormholeConnectConfig = { ui: { title: 'My Custom Bridge Example', getHelpUrl: 'https://examplehelp.com/', menu: [ { label: 'Support', href: 'https://examplehelp.com/support', target: '_blank', order: 1, // Order of appearance in the menu }, { label: 'About', href: 'https://examplehelp.com/about', target: '_blank', order: 2, }, ], showHamburgerMenu: false, }, }; ``` #### UI Configuration In the old structure, UI-related settings like `explorer` and `bridgeDefaults` were defined at the root level of the configuration. In version 3.0, these properties are now organized under the `ui` key, improving the configuration's readability and manageability. === "v0.x" ```typescript const config: WormholeConnectConfig = { bridgeDefaults: { fromNetwork: 'solana', toNetwork: 'ethereum', tokenKey: 'USDC', requiredNetwork: 'solana', }, showHamburgerMenu: true, }; ``` === "v1.x" ```typescript const config: WormholeConnectConfig = { ui: { defaultInputs: { fromChain: 'Solana', // Chain names now capitalized toChain: 'Ethereum', tokenKey: 'USDC', requiredChain: 'Solana', }, showHamburgerMenu: true, }, }; ``` === "v3.x" ```typescript const config: config.WormholeConnectConfig = { ui: { defaultInputs: { fromChain: 'Solana', // Chain names now capitalized toChain: 'Ethereum', tokenKey: 'USDC', requiredChain: 'Solana', }, showHamburgerMenu: true, }, }; ``` #### Remove `customTheme` and `mode` Properties In version 3.0, the `customTheme` and `mode` properties, which were previously used to set themes, have been removed. They have been replaced by a new top-level prop called `theme`, which allows for more flexibility and dynamic updates to themes. Important details: - The `theme` prop is not part of the `config` object and is passed separately to Wormhole Connect - `config` cannot be modified after Connect has mounted, but the `theme` can be updated dynamically to support changes such as switching between light and dark modes or updating color schemes === "v0.x" ```typescript import WormholeConnect, { WormholeConnectConfig, } from '@wormhole-foundation/wormhole-connect'; const config: WormholeConnectConfig = { customTheme: { primaryColor: '#4266f5', secondaryColor: '#ff5733', }, mode: 'dark', }; ; ``` === "^v1.x" ```typescript import WormholeConnect, { WormholeConnectTheme, } from '@wormhole-foundation/wormhole-connect'; const theme: WormholeConnectTheme = { mode: 'dark', // Can be dynamically changed font: 'Arial', button: { primary: '#4266f5', }, }; ; ``` ### Removed Configuration Properties Several configuration properties have been removed in Connect version 3.0. These keys no longer have any effect, and providing values for them in the configuration will not result in any changes. Removed config keys: - `cta` - `cctpWarning` - `pageSubHeader` - `moreTokens` - `moreChains` - `ethBridgeMaxAmount` - `wstETHBridgeMaxAmount` - `customTheme` - `mode` If your current setup includes any of these properties, you can safely remove them, as they are no longer supported in v3.0. ## Use the CDN-Hosted Version of Wormhole Connect For those using the CDN-hosted version of Wormhole Connect, the package's installation and integration have been updated. You must install the Connect package from npm and use the new `wormholeConnectHosted` utility function. ### Install and Integrate the Hosted Version 1. Install the Connect package via npm: ```bash npm install @wormhole-foundation/wormhole-connect@^3.0 ``` 2. After installing the package, you can embed Connect into your page by adding the following code: ```typescript import { wormholeConnectHosted } from '@wormhole-foundation/wormhole-connect'; const container = document.getElementById('connect')!; wormholeConnectHosted(container); ``` ### Example: Custom Configuration for Hosted Version The `wormholeConnectHosted` function accepts two parameters: `config` and `theme`. This allows you to customize the routes and apply a theme directly within the hosted version. Here’s an example of how you can pass a custom configuration: ```typescript import { wormholeConnectHosted, MayanRoute, } from '@wormhole-foundation/wormhole-connect'; const container = document.getElementById('connect')!; wormholeConnectHosted(container, { config: { routes: [MayanRoute], eventHandler: (e) => { console.log('Connect event', e); }, }, theme: { background: { default: '#004547', }, }, }); ``` In this example, the `config` object defines the routes (in this case, using the Mayan route), while the `theme` object allows customization of the Connect interface (e.g., background color). --- END CONTENT --- Doc-Content: https://raw.githubusercontent.com/wormhole-foundation/wormhole-docs/refs/heads/main/products/connect/tutorials/react-dapp.md --- BEGIN CONTENT --- --- title: Integrate Connect into a React DApp Tutorial description: Learn how to use Wormhole Connect to transfers tokens cross-chain seamlessly between Sui and Avalanche Fuji with this step-by-step guide. categories: Connect, Transfer --- # Integrate Connect into a React DApp :simple-github: [Source code on GitHub](https://github.com/wormhole-foundation/demo-basic-connect){target=\_blank} In this tutorial, we'll explore how to integrate [Wormhole Connect](/docs/products/connect/overview/){target=\_blank} to enable cross-chain token transfers and interactions. Connect offers a simplified interface for developers to facilitate seamless token transfers between blockchains. Using Connect, you can easily bridge assets across multiple ecosystems without diving into the complex mechanics of cross-chain communication. While this tutorial will guide you through the process using a specific blockchain as an example, the principles and steps outlined here can be applied to any [blockchain supported by Wormhole](/docs/products/connect/reference/support-matrix/){target=\_blank}. In this example, we'll work with Sui as our source blockchain and Avalanche Fuji as the destination blockchain. ## Prerequisites To get started with Connect, we'll first need to set up a basic environment that allows for cross-chain token transfers. Before starting this tutorial, ensure you have the following: - [Node.js and npm](https://docs.npmjs.com/downloading-and-installing-node-js-and-npm){target=\_blank} installed on your machine - A [Sui wallet](https://suiwallet.com/){target=\_blank} set up and ready for use - A [compatible wallet](https://support.avax.network/en/articles/5520938-what-are-the-official-avalanche-wallets){target=\_blank} for Avalanche Fuji, such as [MetaMask](https://metamask.io/){target=\_blank} - Testnet tokens for [Sui](https://docs.sui.io/guides/developer/getting-started/get-coins){target=\_blank} and [Fuji](https://core.app/tools/testnet-faucet/?subnet=c&token=c){target=\_blank} to cover gas fees ## Set Up Connect for Sui Transfers ### Create a React Project In this tutorial, we'll use [Next.js](https://nextjs.org/docs/app/getting-started){target=\_blank}, a popular framework built on top of React, to set up your app: 1. Open your terminal and run the following command to create a new React app: ```bash npx create-next-app@latest connect-tutorial ``` We recommend enabling TypeScript and creating a `src/` directory during setup. Other options can be configured based on your preferences. 2. Navigate into the project directory: ```bash cd connect-tutorial ``` ### Install Connect Next, install the Connect package as a dependency by running the following command inside your project directory: ```bash npm install @wormhole-foundation/wormhole-connect ``` ### Integrate Connect into the Application Now, we need to modify the default `page.tsx` file to integrate Connect. We are going to use [version V1.0](/docs/products/connect/guides/upgrade/){target=\_blank} or later, make sure to check which version of Connect you are using. Open `src/app/page.tsx` and replace the content with the following code: === "JavaScript" ```js 'use client'; import WormholeConnect from '@wormhole-foundation/wormhole-connect'; const config = { network: 'Testnet', chains: ['Sui', 'Avalanche'], }; const theme = { mode: 'light', primary: '#78c4b6', }; export default function Home() { return ; } ``` === "TypeScript" ```ts 'use client'; import WormholeConnect, { type config, WormholeConnectTheme, } from '@wormhole-foundation/wormhole-connect'; export default function Home() { const config: config.WormholeConnectConfig = { network: 'Testnet', chains: ['Sui', 'Avalanche'], ui: { title: 'SUI Connect TS Demo', }, }; const theme: WormholeConnectTheme = { mode: 'light', primary: '#78c4b6', }; return ; } ``` - Set `network` to `'Testnet'` - this ensures that Connect uses the testnet environment - Set `chains` to `['Sui', 'Avalanche']` - configures the app to allow transfers between Sui and Avalanche Fuji, the testnet for Avalanche ### Customize Connect To further customize Connect for your application, such as adjusting the UI, adding custom tokens, enabling Reown (formerly known as WalletConnect), or configuring specific chain settings, you can refer to the [Connect Configuration guide](/docs/products/connect/configuration/data/){target=\_blank}. ### Run the Application Make sure you're in the root directory of your React app, and run the following command to start the application: ```bash npm run dev ``` Now your React app should be up and running, and Connect should be visible on `http://localhost:3000/`. You should see the Connect component, which will include a UI for selecting networks and tokens for cross-chain transfers. ## Transfer Tokens from Sui to Fuji Before transferring token ensure you have enough testnet SUI and Fuji tokens to cover the gas fees for the transfer. To transfer tokens from Sui to Fuji in the Connect interface: 1. Select **Sui** as the source network, connect your Sui wallet, and choose **SUI** as the asset you wish to transfer 2. Choose **Fuji** as the destination network and connect your wallet with the Fuji network 3. Enter the amount of SUI tokens you wish to transfer ![](/docs/images/products/connect/tutorials/react-dapp/connect-1.webp){.half} 4. Choose to view other routes ![](/docs/images/products/connect/tutorials/react-dapp/connect-2.webp){.half} 5. Select the manual bridge option, which will require two transactions: one on the source chain (Sui) and one on the destination chain (Fuji) !!! note It is recommended to use the manual bridge option for this tutorial. The automatic bridge feature is currently undergoing improvements, while the manual bridge ensures that transfers complete successfully. ![](/docs/images/products/connect/tutorials/react-dapp/connect-3.webp){.half} 6. Review and confirm the transfer on Sui. This will lock your tokens on the Sui chain ![](/docs/images/products/connect/tutorials/react-dapp/connect-4.webp){.half} 7. Follow the on-screen prompts to approve the transaction. You will be asked to sign with your Sui wallet ![](/docs/images/products/connect/tutorials/react-dapp/connect-5.webp){.half} Once the transaction has been submitted, Connect will display the progress of the transfer. Monitor the status until you're prompted to complete the transaction on the destination chain. You can also track your transactions on [Wormholescan](https://wormholescan.io/#/?network=Testnet){target=\_blank}. ## Claim Tokens on Fuji After the Sui transaction is complete, confirm the final transaction on Fuji by claiming the wrapped tokens. You will be asked to confirm the transaction with your Fuji wallet. ![](/docs/images/products/connect/tutorials/react-dapp/connect-6.webp){.half} Once confirmed, check your Fuji wallet to verify that the wrapped SUI tokens have been successfully received. ![](/docs/images/products/connect/tutorials/react-dapp/connect-7.webp){.half} ## Resources If you'd like to explore the complete project or need a reference while following this tutorial, you can find the entire codebase in the [Sui-Connect GitHub repository](https://github.com/wormhole-foundation/demo-basic-connect){target=\_blank}. The repository includes an integration of Connect in a React app for bridging tokens between the Sui and Fuji (Avalanche Testnet) networks. ## Conclusion In this tutorial, you've gained hands-on experience with integrating Connect to enable cross-chain token transfers. You've learned to configure a React app for seamless interactions between Sui and Avalanche Fuji, providing users with the ability to bridge assets across chains with ease. By following these steps, you've learned how to: - Set up a React project tailored for cross-chain transfers - Install and configure Connect to support multiple blockchains - Implement a streamlined UI for selecting source and destination chains, connecting wallets, and initiating transfers - Execute a token transfer from Sui to Avalanche Fuji, monitoring each step and confirming the transaction on both networks With these tools and knowledge, you're now equipped to build powerful cross-chain applications using Connect, opening up possibilities for users to move assets across ecosystems securely and efficiently. Looking for more? Check out the [Wormhole Tutorial Demo repository](https://github.com/wormhole-foundation/demo-tutorials){target=\_blank} for additional examples. --- END CONTENT --- Doc-Content: https://raw.githubusercontent.com/wormhole-foundation/wormhole-docs/refs/heads/main/products/native-token-transfers/concepts/architecture.md --- BEGIN CONTENT --- --- title: Native Token Transfers Architecture description: Explore Wormhole's Native Token Transfers architecture, which covers components, message flow, rate limiting, and custom transceivers. categories: NTT, Transfer --- # NTT Architecture The Native Token Transfers (NTT) architecture within the Wormhole ecosystem offers a robust framework for secure and efficient token transfers across multiple blockchains. This architecture relies on the manager and transceiver core components that work together to manage cross-chain communication and token operations complexities. ## System Components The NTT framework is composed of managers, which oversee the transfer process, and transceivers, which handle cross-chain messaging, ensuring smooth and reliable token transfers. ### Managers _Managers_ are responsible for handling the flow of token transfers between different blockchains and ensuring that tokens are locked or burned on the source chain before being minted or unlocked on the destination chain. The main tasks of managers include rate-limiting transactions, verifying message authenticity (message attestation), and managing the interaction between multiple transceivers, who are responsible for cross-chain communications. Each manager is assigned to a specific token but can operate across multiple chains. Their key responsibility is to ensure that tokens are securely locked or burned on the source chain before being minted or unlocked on the destination chain. This provides the integrity of token transfers and prevents double-spending. A manager is responsible for: - **Handling token transfer flow** - upon a transfer request, `NttManager` either locks or burns tokens depending on the configuration, emits a `TransferSent` event, and ensures tokens can’t be accessed on the source chain before leasing them on the destination chain. This process safeguards against double-spending and maintains a secure transfer - **Rate-limiting** - the `NttManager` contract includes rate-limiting functionality to prevent overloading the network or flooding the target chain. The `NttManager` applies rate limits to manage transfer flow and prevent network congestion. Limits apply to both outgoing and incoming transfers - **Outbound** - transfers exceeding the outbound limit are queued (if `shouldQueue` is true) or reverted - **Inbound** - similar limits apply on the destination chain, delaying transfers if capacity is exceeded Rate limit duration and queuing are customizable per chain, and events notify users when transfers hit the limit - **Message authenticity verification** - the `NttManager` ensures transfer security by verifying message authenticity through multiple attestations from transceivers. For each transfer, a threshold number of attestation signatures must be gathered from transceivers. Once verified, `NttManager` releases tokens on the destination chain, ensuring only authenticated transfers are processed - **Interaction with transceivers** - `NttManager` collaborates with transceivers, forwarding transfer messages between chains and handling message verification. Transceivers route messages with transfer details to the destination chain, coordinating with `NttManager` to verify that tokens are locked or burned before releasing them on the other side. Transceivers can be customized to work with different security protocols, adding flexibility ### Transceivers _Transceivers_ facilitate cross-chain token transfers by ensuring the accurate transmission of messages between different blockchains. They work in conjunction with managers to route token transfers from the source chain to the recipient chain. Their primary function is to ensure that messages regarding the transfer process are delivered correctly, and that tokens are safely transferred across chains. While transceivers operate closely with Wormhole's ecosystem, they can also be configured independently of Wormhole's core system, allowing for flexibility. This adaptability allows them to be integrated with various verification backends to accommodate different security needs or platform-specific requirements. Transceivers are entrusted with several responsibilities: - **Message transmission** - transceivers handle the routing of transfer messages between chains. When a transfer is initiated, the transceiver sends the message (including transfer details like recipient and amount) to the destination chain’s manager for verification and processing - **Manager coordination** - transceivers work with managers to ensure tokens are locked or burned on the source chain before issuance on the destination chain, reinforcing the security of each transfer - **Custom verification support** - transceivers can integrate with custom verification backends, allowing flexibility to adapt to different security protocols or chain requirements. This customization enables protocols to use different attestation standards as needed How it works: 1. The transceiver receives instructions from the manager to send messages across chains 2. It quotes delivery fees, handles cross-chain message relaying, and verifies delivery to ensure tokens are safely transferred 3. For each message, the transceiver coordinates with managers, ensuring only authorized transfers are processed on the destination chain ![NTT architecture diagram](/docs/images/products/native-token-transfers/concepts/architecture/architecture-1.webp) !!! note [Learn more](/docs/products/native-token-transfers/concepts/architecture/#lifecycle-of-a-message){target=\_blank} about the architecture of Native Token Transfers message lifecycles. #### Custom Transceivers The NTT framework supports advanced features such as custom transceivers for specialized message verification, enhancing security and adaptability. The architecture includes detailed processes for initiating transfers, managing rate limits, and finalizing token operations, with specific instructions and events outlined for EVM-compatible chains and Solana. NTT has the flexibility to support custom message verification in addition to Wormhole Guardian message verification. Custom verifiers are implemented as transceiver contracts and can be protocol-specific or provided by other third-party attesters. Protocols can also configure the threshold of attestations required to mark a token transfer as valid — for example, 2/2, 2/3, 3/5. ![Custom Attestation with NTT diagram](/docs/images/products/native-token-transfers/concepts/architecture/architecture-2.webp) The verifier performs checks based on predefined criteria and issues approval for transactions that meet these requirements. This approval is incorporated into the Wormhole message, ensuring that only transactions verified by both the Wormhole Guardian Network and the additional verifier are processed. The model includes an extra verifier in the bridging process, enhancing security and providing an added assurance of transaction integrity. For more details, to collaborate, or to see examples of custom transceivers, [contact](https://discord.com/invite/wormholecrypto){target=\_blank} Wormhole contributors. ## Lifecycle of a Message The lifecycle of a message in the Wormhole ecosystem for Native Token Transfers (NTT) involves multiple steps to ensure secure and accurate cross-chain token transfers. This lifecycle can vary depending on the blockchain being used, and the following explanations focus on the EVM and Solana implementations. The key stages include initiating the transfer, handling rate limits, sending and receiving messages, and finally, minting or unlocking tokens on the destination chain. ### Transfer The process begins when a client initiates a transfer. For EVM, this is done using the `transfer` function, whereas in Solana, the client uses either the `transfer_lock` or `transfer_burn` instruction, depending on whether the program is in locking or burning mode. The client specifies the transfer amount, recipient chain ID, recipient address, and a flag (`should_queue` on both EVM and Solana) to decide whether the transfer should be queued if it hits the rate limit. In both cases: - If the source chain is in locking mode, the tokens are locked on the source chain to be unlocked on the destination chain - If the source chain is in burning mode, the tokens are burned on the source chain, and new tokens are minted on the destination chain Once initiated, an event (such as `TransferSent` on EVM or a corresponding log on Solana) is emitted to signal that the transfer process has started. ### Rate Limit Both EVM and Solana implement rate-limiting for transfers to prevent abuse or network overload. Rate limits apply to both the source and destination chains. If transfers exceed the current capacity, depending on whether the `shouldQueue` flag is set to true, they can be queued. - On EVM, the transfer is added to an outbound queue if it hits the rate limit, with a delay corresponding to the configured rate limit duration. If `shouldQueue` is set to false, the transfer is reverted with an error - On Solana, the transfer is added to an **Outbox** via the `insert_into_outbox method`, and if the rate limit is hit, the transfer is queued with a `release_timestamp`. If `shouldQueue` is false, the transfer is reverted with a `TransferExceedsRateLimit` error Both chains emit events or logs when transfers are rate-limited or queued. ### Send After being forwarded to the Transceiver, the message is transmitted across the chain. Transceivers are responsible for delivering the message containing the token transfer details. Depending on the Transceiver's implementation, messages may be routed through different systems, such as Wormhole relayers or other custom relaying solutions. Once the message is transmitted, an event is emitted to signal successful transmission. - In EVM, the message is sent using the `sendMessage` function, which handles the transmission based on the Transceiver's implementation. The Transceiver may use Wormhole relayers or custom relaying solutions to forward the message - In Solana, the transfer message is placed in an Outbox and released via the `release_outbound` instruction. The Solana transceiver, such as the Wormhole Transceiver, may send the message using the `post_message` instruction, which Wormhole Guardians observe for verification In both cases, an event or log (e.g., `SendTransceiverMessage` on EVM or a similar log on Solana) is emitted to signal that the message has been transmitted. ### Receive Upon receiving the message on the destination chain, an off-chain relayer forwards the message to the destination Transceiver for verification. - In EVM, the message is received by the `NttManager` on the destination chain, which verifies the message's authenticity. Depending on the M of N threshold set for the attestation process, the message may require attestations from multiple transceivers - In Solana, the message is received via the `receive_message` instruction in the Wormhole Transceiver program. The message is verified and stored in a `VerifiedTransceiverMessage` account, after which it is placed in an Inbox for further processing In both chains, replay protection mechanisms ensure that a message cannot be executed more than once. Events or logs are emitted (e.g., `ReceivedMessage` on EVM or `ReceiveMessage` on Solana) to notify that the message has been successfully received. ### Mint or Unlock Finally, after the message is verified and attested to, the tokens can be either minted (if they were burned on the source chain) or unlocked (if they were locked). The tokens are then transferred to the recipient on the destination chain, completing the cross-chain token transfer process. - On EVM, tokens are either minted (if burned on the source chain) or unlocked (if locked on the source chain). The `TransferRedeemed` event signals that the tokens have been successfully transferred - On Solana, the tokens are unlocked or minted depending on whether the program is in locking or burning mode. The `release_inbound_unlock` or `release_inbound_mint` instruction is used to complete the transfer, and a corresponding log is produced In both cases, once the tokens have been released, the transfer process is complete, and the recipient receives the tokens. Events are emitted to indicate that the transfer has been fully redeemed. --- END CONTENT --- Doc-Content: https://raw.githubusercontent.com/wormhole-foundation/wormhole-docs/refs/heads/main/products/native-token-transfers/concepts/security.md --- BEGIN CONTENT --- --- title: Native Token Transfers Security description: Explore the security measures of Native Token Transfers, including the Global Accountant and governance strategies for seamless token safety. categories: NTT, Transfer --- # Security ## Global Accountant The Global Accountant is a defense-in-depth security feature that checks the integrity of every token transfer. It ensures that chain balances remain isolated and more tokens cannot be burned and transferred out of a chain than were ever minted. This feature ensures native asset fungibility remains in 1:1 parity. At no time will assets coming from a spoke chain exceed the number of native assets sent to that spoke chain. The Guardians, with their role in enforcing accounting transparency, provide a reassuring layer of security, attesting to a Native Token Transfer (NTT) only if it passes integrity checks. [Contact](https://discord.com/invite/wormholecrypto){target=\_blank} Wormhole contributors if you are interested in configuring the Global Accountant for your multichain deployment. ## Governance and Upgradeability Integrators should implement governance mechanisms to manage the addition and removal of transceivers and to upgrade contracts using proxy patterns, as demonstrated in the upgrade functions in the `NttManager` contracts. These processes can also set thresholds and rules for attestation and message approval. The registry component of the NTT system is crucial for maintaining a trusted list of transceivers and managing their status. Governance processes for the following actions can be submitted directly to the corresponding contract on-chain, whether it is one or multiple of the bridging contracts or one of the token contracts: - Adding or removing a transceiver address from the registry - Setting the token contract address on a bridging contract - Setting the Wormhole Core Contract address on a bridging contract - Setting the registered bridging contract address on the token contract This governance model ensures that the system remains secure while being adaptable to new requirements in any environment where it is deployed. --- END CONTENT --- Doc-Content: https://raw.githubusercontent.com/wormhole-foundation/wormhole-docs/refs/heads/main/products/native-token-transfers/configuration/access-control.md --- BEGIN CONTENT --- --- title: Native Token Transfers Access Control description: Learn about the owner and pauser access roles for the NTT manager contract, which can be used to pause and un-pause token transfers. categories: NTT, Transfer --- # Access Control ## Owner and Pauser Roles Pausing the Native Toke Transfer (NTT) Manager Contract will disallow initiating new token transfers. While the contract is paused, in-flight transfers can still be redeemed (subject to rate limits if configured). NTT can be paused on a particular chain by updating the `paused` parameter on the deployment to `true` via the NTT CLI, then performing `ntt push` to sync the local configuration with the on-chain deployment. - **Owner** - full control over NTT contracts, can perform administrative functions. Has the ability to un-pause contracts if they have been paused - **Pauser** - can pause NTT contracts to halt token transfers temporarily. This role is crucial for responding quickly to adverse events without a prolonged governance process. Cannot un-pause contracts You may verify the current owner, pauser, and paused status of the NTT Manager contract on the `deployment.json` file in your NTT project directory. ```json { "network": "Testnet", "chains": { "Sepolia": { "version": "1.1.0", "mode": "burning", "paused": true, // set to true to pause the contract "owner": "0x0088DFAC40029f266e0FF62B82E47A07467A0345", "manager": "0x5592809cf5352a882Ad5E9d435C6B7355B716357", //... "pauser": "0x0088DFAC40029f266e0FF62B82E47A07467A0345" } } } ``` !!! note While the `Pauser` can pause contracts, the ability to un-pause contracts is callable only by the `Owner`. The `Owner` and the `Pauser` addresses can each pause the contract. Since the contract `Owner` address is typically a multisig or a more complex DAO governance contract, and pausing the contract only affects the availability of token transfers, protocols can choose to set the `Pauser` address to be a different address. Creating a separate `Pauser` helps protocols respond quickly to potential risks without going through a drawn-out process. Consider separating `Owner` and `Pauser` roles for your multichain deployment. `Owner` and `Pauser` roles are defined directly on the `NttManager` contract. --- END CONTENT --- Doc-Content: https://raw.githubusercontent.com/wormhole-foundation/wormhole-docs/refs/heads/main/products/native-token-transfers/configuration/rate-limiting.md --- BEGIN CONTENT --- --- title: Native Token Transfers Rate Limiting description: Learn about rate limits in Wormhole NTT by configuring send/receive limits, queuing, and canceling flows to manage multichain token transfers efficiently. categories: NTT, Transfer --- # Rate Limiting The Native Token Transfer (NTT) framework provides configurable per-chain rate limits for sending and receiving token transfers. Integrators can manage these limits via their own governance processes to quickly adapt to on-chain activity. If a transfer is rate-limited on the source chain and queueing is enabled via `shouldQueue = true`, the transfer is placed into an outbound queue and can be released after the rate limit expires. You can configure the following limits on every chain where NTT is deployed directly using the manager: - **Sending limit** - a single outbound limit for sending tokens from the chain - **Per-chain receiving limits** - the maximum receiving limit, which can be configured on a per-chain basis. For example, allowing 100 tokens to be received from Ethereum but only 50 tokens to be received from Arbitrum Rate limits are replenished every second over a fixed duration. While the default duration is 24 hours, the value is configurable at contract creation. Rate-limited transfers on the destination chain are added to an inbound queue with a similar release delay. ## Update Rate Limits To configure or update the sending and receiving rate limits, follow these steps: 1. **Locate the deployment file** - open the `deployment.json` file in your NTT project directory. This file contains the configuration for your deployed contracts 2. **Modify the limits section** - for each chain, locate the limits field and update the outbound and inbound values as needed ```json "limits": { "outbound": "1000.000000000000000000", "inbound": { "Ethereum": "100.000000000000000000", "Arbitrum": "50.000000000000000000" } } ``` - **`outbound`** - sets the maximum tokens allowed to leave the chain - **`inbound`** - configures per-chain receiving limits for tokens arriving from specific chains 3. **Push the configuration** - use the NTT CLI to synchronize the updated configuration with the blockchain ```bash ntt push ``` 4. **Verify the changes** - after pushing, confirm the new rate limits by checking the deployment status ```bash ntt status ``` ???- note "`deployment.json` example" ```json { "network": "Testnet", "chains": { "Sepolia": { "version": "1.1.0", "mode": "burning", "paused": false, "owner": "0x0088DFAC40029f266e0FF62B82E47A07467A0345", "manager": "0x5592809cf5352a882Ad5E9d435C6B7355B716357", "token": "0x5CF5D6f366eEa7123BeECec1B7c44B2493569995", "transceivers": { "threshold": 1, "wormhole": { "address": "0x91D4E9629545129D427Fd416860696a9659AD6a1", "pauser": "0x0088DFAC40029f266e0FF62B82E47A07467A0345" } }, "limits": { "outbound": "184467440737.095516150000000000", "inbound": { "ArbitrumSepolia": "500.000000000000000000" } }, "pauser": "0x0088DFAC40029f266e0FF62B82E47A07467A0345" } } } ``` ## Queuing Mechanism When a transfer exceeds the rate limit, it is held in a queue and can be released after the set rate limit duration has expired. The sending and receiving queuing behavior is as follows: - **Sending** - if an outbound transfer violates rate limits, users can either revert and try again later or queue their transfer. Users must return after the queue duration has expired to complete sending their transfer - **Receiving** - if an inbound transfer violates rate limits, it is in a queue. Users or relayers must return after the queue duration has expired to complete receiving their transfer on the destination chain Queuing is configured dynamically during each transfer by passing the `shouldQueue` parameter to the [`transfer` function](https://github.com/wormhole-foundation/native-token-transfers/blob/5e7ceaef9a5e7eaa13e823a67c611dc684cc0c1d/evm/src/NttManager/NttManager.sol#L171-L182){target=\_blank} in the `NttManager` contract. ## Cancel Flows If users bridge frequently between a given source chain and destination chain, the capacity could be exhausted quickly. Loss of capacity can leave other users rate-limited, potentially delaying their transfers. The outbound transfer cancels the inbound rate limit on the source chain to avoid unintentional delays. This allows for refilling the inbound rate limit by an amount equal to the outbound transfer amount and vice-versa, with the inbound transfer canceling the outbound rate limit on the destination chain and refilling the outbound rate limit with an amount. --- END CONTENT --- Doc-Content: https://raw.githubusercontent.com/wormhole-foundation/wormhole-docs/refs/heads/main/products/native-token-transfers/faqs.md --- BEGIN CONTENT --- --- title: Native Token Transfers FAQs description: Frequently asked questions about Wormhole Native Token Transfers, including cross-chain lending, SDK usage, custom RPCs, and integration challenges. categories: NTT, Transfer --- # NTT FAQs ## Do you have an example of how cross-chain lending can be implemented using Wormhole? Yes, we have an example of cross-chain lending that leverages [Wormhole’s Token Bridge](/docs/products/token-bridge/overview/){target=\_blank}. In this example, collateral deposits (such as ETH on Ethereum) are bridged to a hub chain. Once the collateral is deposited, the borrowed assets, like wrapped BNB, are bridged to Binance Smart Chain. You can explore the full implementation in the [Wormhole Lending Examples repository](https://github.com/wormhole-foundation/example-wormhole-lending){target=\_blank} on GitHub. Alternatively, you can also implement cross-chain lending using [Wormhole’s core messaging](/docs/products/messaging/overview/){target=\_blank} instead of the Token Bridge, which avoids the limitations imposed by governor limits. ETH would be custodied on Ethereum, and BNB on the Binance spoke during this setup. When a user deposits ETH on Ethereum, a core bridge message is sent to the hub for accounting purposes. The hub then emits a message that can be redeemed on Binance to release the BNB. This approach allows for more direct asset control across chains while reducing reliance on Token Bridge limits. ## What causes the "No protocols registered for Evm" error in Wormhole SDK? This error typically occurs when the [Wormhole SDK](https://github.com/wormhole-foundation/wormhole-sdk-ts){target=\_blank} cannot recognize or register the necessary EVM protocols, which are required for interacting with Ethereum-based networks. The most common reason for this error is that the relevant EVM package for Wormhole's NTT has not been imported correctly. To resolve this issue, ensure you have imported the appropriate Wormhole SDK package for EVM environments. The necessary package for handling NTT on EVM chains is `@wormhole-foundation/sdk-evm-ntt`. Here's the correct import statement: ```rust import '@wormhole-foundation/sdk-evm-ntt'; ``` By importing this package, the Wormhole SDK can register and utilize the required protocols for EVM chains, enabling cross-chain token transfers using the NTT framework. Ensure to include this import at the start of your code, especially before attempting any interactions with EVM chains in your project. ## How can I transfer ownership of NTT to a multisig? Transferring ownership of Wormhole's NTT to a multisig is a two-step process for safety. This ensures that ownership is not transferred to an address that cannot claim it. Refer to the `transfer_ownership` method in the [NTT Manager Contract](https://github.com/wormhole-foundation/native-token-transfers/blob/main/solana/programs/example-native-token-transfers/src/instructions/admin/transfer_ownership.rs#L55){target=\_blank} to initiate the transfer. 1. **Initiate transfer** - use the `transfer_ownership` method on the NTT Manager contract to set the new owner (the multisig) 2. **Claim ownership** - the multisig must then claim ownership via the `claim_ownership` instruction. If not claimed, the current owner can cancel the transfer 3. **Single-step transfer (Riskier)** - you can also use the `transfer_ownership_one_step_unchecked` method to transfer ownership in a single step, but if the new owner cannot sign, the contract may become locked. Be cautious and ensure the new owner is a Program Derived Address (PDA) For a practical demonstration of transferring ownership of Wormhole's NTT to a multisig on Solana, visit the [GitHub demo](https://github.com/wormhole-foundation/demo-ntt-solana-multisig-tools){target=\_blank} providing scripts and guidance for managing an NTT program using Squads multisig functionality, including ownership transfer procedures. ## How can I specify a custom RPC for NTT? To specify a custom RPC for Wormhole's NTT, create an `overrides.json` file in the root of your deployment directory. This file allows you to define custom RPC endpoints, which can be helpful when you need to connect to specific nodes or networks for better performance, security, or control over the RPC connection. Below’s an example of how the `overrides.json` file should be structured: ???- code "`overrides.json`" ```json { "chains": { "Bsc": { "rpc": "http://127.0.0.1:8545" }, "Sepolia": { "rpc": "http://127.0.0.1:8546" }, "Solana": { "rpc": "http://127.0.0.1:8899" } } } ``` ## How can I redeem tokens if NTT rate limits block them on the target chain? If the rate limits on Wormhole's NTT block tokens from being received on the target chain, the transaction will typically be paused until the rate limits are adjusted. Rate limits are implemented to manage congestion and prevent chain abuse, but they can occasionally delay token redemptions. To resolve this: 1. **Adjust rate limits** - the rate limits must be modified by an administrator or through the appropriate configuration tools to allow the blocked transaction to proceed 2. **Resume transaction flow** - once the rate limits are adjusted, you can resume the flow, which should be visible in the UI. The tokens will then be redeemable on the target chain In most cases, the transaction will resume automatically once the rate limits are adjusted, and the UI will guide you through the redemption process. ## What are the challenges of deploying NTT to non-EVM chains? NTT requires the same transceiver for all routes, limiting flexibility when deploying across EVM and non-EVM chains. For example, if you're deploying to Ethereum, Arbitrum, and Solana, you can't use Wormhole and Axelar as transceivers because Axelar doesn't support Solana. This constraint forces integrators to use a single transceiver (e.g., Wormhole) for all chains, reducing flexibility in optimizing cross-chain transfers. ## Does the NTT manager function as an escrow account for a hub chain? Yes, the NTT manager acts like an escrow account for non-transferable tokens on a hub chain. To manage non-transferable tokens, you would add the NTT manager to the allowlist, ensuring that only the NTT manager can hold and control the tokens as they are transferred across chains. ## Which functions or events does Connect rely on for NTT integration? Connect relies on the NTT SDK for integration, with platform-specific implementations for both [Solana](https://github.com/wormhole-foundation/native-token-transfers/blob/main/solana/ts/sdk/ntt.ts){target=\_blank} and [EVM](https://github.com/wormhole-foundation/native-token-transfers/blob/main/evm/ts/src/ntt.ts){target=\_blank}. The key methods involved include: - **Initiate and redeem functions** - these functions are essential for initiating token transfers and redeeming them on the destination chain - **Rate capacity methods** - methods for fetching inbound and outbound rate limits are also critical for controlling the flow of tokens and preventing congestion These functions ensure Connect can handle token transfers and manage chain-rate limits. ## How does the relayer contract determine which transceiver to call? The source chain's transceiver includes the destination chain's transceiver in the message via the relayer contract. The admin configures each transceiver's mapping of its peers on other chains. This mapping allows the destination transceiver to verify that the message came from a trusted source. ## How do I create a verifier or transceiver? To run your verifier, you need to implement a transceiver. This involves approximately 200 lines of code, leveraging the base functionality provided by the [abstract transceiver contract](https://github.com/wormhole-foundation/example-native-token-transfers/blob/main/evm/src/Transceiver/Transceiver.sol){target=\_blank}. For reference, you can review the [Axelar transceiver implementation](https://github.com/wormhole-foundation/example-wormhole-axelar-wsteth/blob/main/src/axelar/AxelarTransceiver.sol){target=\_blank}. ## Can I use Hetzner for the NTT deployment? No, using Hetzner servers for Solana deployments is not recommended. Hetzner has blocked Solana network activity on its servers, leading to connection issues. Hetzner nodes will return a `ConnectionRefused: Unable to connect` error for Solana deployments. Therefore, choosing alternative hosting providers that support Solana deployments is advisable to ensure seamless operation. ## How can I transfer tokens with NTT with an additional payload? You can include an extra payload in NTT messages by overriding specific methods in the [NttManager contract](https://github.com/wormhole-foundation/native-token-transfers/blob/main/evm/src/NttManager/NttManager.sol){target=\_blank}. - On the source chain, override the [`_handleMsg` function](https://github.com/wormhole-foundation/example-native-token-transfers/blob/main/evm/src/NttManager/NttManager.sol#L216-L226){target=\_blank} to query any additional data you need for the transfer. The extra payload can then be added to the message - On the destination chain override the [`_handleAdditionalPayload` function](https://github.com/wormhole-foundation/example-native-token-transfers/blob/main/evm/src/NttManager/NttManager.sol#L262-L275){target=\_blank} to process and utilize the extra payload sent in the message !!!Important You cannot pass the additional data as part of the entry point directly. Instead, the data must be queried on-chain via the `_handleMsg` method, ensuring the payload is properly included and processed. ## Why use NTT over xERC20? Shortcomings of xERC20: - **Single point of failure** - xERC20 relies on multiple bridges, but a compromise in any single bridge can jeopardize the token. It enforces a 1-of-n design rather than a more robust m-of-n approach - **No pausing** - xERC20 lacks mechanisms to pause operations during emergencies - **No access control** - there are no built-in access controls for managing token transfers securely - **Limited rate limiting** - rate limits are bridge-specific and cannot be set per chain, reducing flexibility and security - **No integration with relaying systems** - xERC20 does not natively support relayer systems, limiting its usability in automated or dynamic setups While xERC20 is an extension of the ERC20 standard, NTT is designed as a framework rather than a rigid standard. It is compatible with any token that supports `burn` and `mint` functions and allows the NTT manager to act as a minter. ## How can I start transferring tokens to a chain that is in burning mode, if no tokens are locked yet? To begin transferring tokens to a chain in burning mode when no tokens are locked, you must first send tokens to the NTT manager to back the supply. The address of the NTT manager can be found in the `deployment.json` file. ## Is there a way to use NTT tokens with chains that don't currently support NTT? Yes. NTT tokens can be used with chains that do not support NTT by leveraging the [Token Bridge](/docs/products/token-bridge/overview/){target=\_blank}. For example: - **Wrapped token scenario** - a token, such as the W token, can be bridged to non-NTT networks using the Token Bridge. When the token is bridged to a chain like Sui, a wrapped version of the token is created (e.g., Wrapped W token) - **Unwrapping requirement** - tokens bridged using the Token Bridge cannot be directly transferred to NTT-supported chains. To transfer them, they must first be unwrapped on the non-NTT chain and then transferred via the appropriate mechanism - **Messaging consistency** - the Token Bridge exclusively uses Wormhole messaging, ensuring consistent communication across all chains, whether or not they support NTT This approach ensures interoperability while maintaining the integrity of the token's cross-chain movement. ## How can I update my NTT CLI version? To update an existing NTT CLI installation, run the following command in your terminal: ```bash ntt update ``` NTT CLI installations and updates will always pick up the latest tag with name vX.Y.Z+cli and verify that the underlying commit is included in main. For local development, you can update your CLI version from a specific branch or install from a local path. To install from a specific branch, run: ```bash ntt update --branch foo ``` To install locally, run: ```bash ntt update --path path/to/ntt/repo ``` Git branch and local installations enable a fast iteration loop as changes to the CLI code will immediately be reflected in the running binary without having to run any build steps. --- END CONTENT --- Doc-Content: https://raw.githubusercontent.com/wormhole-foundation/wormhole-docs/refs/heads/main/products/native-token-transfers/guides/deploy-to-evm.md --- BEGIN CONTENT --- --- title: Native Token Transfers EVM Deployment description: Deploy and configure Wormhole’s Native Token Transfers (NTT) for EVM chains, including setup, token compatibility, mint/burn modes, and CLI usage. categories: NTT, Transfer --- # Deploy NTT to EVM Chains [Native Token Transfers (NTT)](/docs/products/native-token-transfers/overview/){target=\_blank} enable seamless multichain transfers of ERC-20 tokens on [supported EVM-compatible chains](/docs/products/reference/supported-networks/#ntt){target=\_blank} using Wormhole's messaging protocol. Instead of creating wrapped tokens, NTT allows native assets to move across chains while maintaining their original properties. This guide walks you through deploying NTT on EVM chains, including setting up dependencies, configuring token compatibility, and using the NTT CLI to deploy in hub-and-spoke or burn-and-mint mode. ## Deploy Your Token and Ensure Compatibility If you still need to do so, deploy the token contract to the destination or spoke chains. ### Requirements for Token Deployment Wormhole’s NTT framework supports two [deployment models](/docs/products/native-token-transfers/overview#deployment-models){target=\_blank}: burn-and-mint and hub-and-spoke. **Both require an ERC-20 token (new or existing).** ??? interface "Burn-and-Mint" Tokens must implement the following non-standard ERC-20 functions: - `burn(uint256 amount)` - `mint(address account, uint256 amount)` These functions aren't part of the standard ERC-20 interface. Refer to the [`INttToken` interface](https://github.com/wormhole-foundation/native-token-transfers/blob/main/evm/src/interfaces/INttToken.sol){target=\_blank} for all required functions, errors, and events. ??? interface "`INttToken` Interface" ```solidity // SPDX-License-Identifier: Apache 2 pragma solidity >=0.8.8 <0.9.0; interface INttToken { /// @notice Error when the caller is not the minter. /// @dev Selector 0x5fb5729e. /// @param caller The caller of the function. error CallerNotMinter(address caller); /// @notice Error when the minter is the zero address. /// @dev Selector 0x04a208c7. error InvalidMinterZeroAddress(); /// @notice Error when insufficient balance to burn the amount. /// @dev Selector 0xcf479181. /// @param balance The balance of the account. /// @param amount The amount to burn. error InsufficientBalance(uint256 balance, uint256 amount); /// @notice The minter has been changed. /// @dev Topic0 /// 0x0b5e7be615a67a819aff3f47c967d1535cead1b98db60fafdcbf22dcaa8fa5a9. /// @param newMinter The new minter. event NewMinter(address previousMinter, address newMinter); // NOTE: the `mint` method is not present in the standard ERC20 interface. function mint(address account, uint256 amount) external; // NOTE: the `setMinter` method is not present in the standard ERC20 interface. function setMinter(address newMinter) external; // NOTE: NttTokens in `burn` mode require the `burn` method to be present. // This method is not present in the standard ERC20 interface, but is // found in the `ERC20Burnable` interface. function burn(uint256 amount) external; } ``` You’ll also need to set mint authority to the relevant `NttManager` contract. ??? interface "Hub-and-Spoke Mode" Tokens only need to be ERC-20 compliant. The hub chain serves as the source of truth for supply consistency, while only spoke chains need to support minting and burning. For example, if Ethereum is the hub and Polygon is a spoke: - Tokens are locked on Ethereum - Tokens are minted or burned on Polygon This setup maintains a consistent total supply across all chains. Example deployment scripts for both models are available in the [`example-ntt-token` GitHub repository](https://github.com/wormhole-foundation/example-ntt-token){target=\_blank}. ## NTT Manager Deployment Parameters This table compares the configuration parameters available when deploying the NTT Manager using the CLI versus a manual deployment with a Forge script. It highlights which options are configurable via each method, whether values are auto-detected or hardcoded, and includes additional comments to help guide deployment decisions. |
Parameter
| Forge Script | CLI | Both | Comments | |-------------------------|------------------------|-------------------------------------|--------|----------------------------------------------| | `token` | Input | `--token
` | Yes | | | `mode` | Input | `--mode ` | Yes | Key decision: hub-and-spoke or mint-and-burn | | `wormhole` | Input | Auto-detected via SDK/`ChainContext` | Similar| | | `wormholeRelayer` | Input | Auto-detected via on-chain query/SDK| Similar| | | `specialRelayer` | Input | Not exposed | No | Take into consideration if using custom relaying. Not recommended | | `decimals` | Input, overridable | Auto-detected via token contract, not overridable | Similar | | | `wormholeChainId` | Queried from Wormhole contract | `--chain` (network param, mapped internally) | Yes | | | `rateLimitDuration` | Hardcoded (`86400`) | Hardcoded (`86400`) | Yes | Rate limit duration. A day is normal but worth deciding | | `shouldSkipRatelimiter` | Hardcoded (`false`) | Hardcoded (`false`) | Yes | If rate limit should be disabled (when the manager supports it) | | `consistencyLevel` | Hardcoded (`202`) | Hardcoded (`202`) | Yes | `202` (finalized) is the standard — lower is not recommended | | `gasLimit` | Hardcoded (`500000`) | Hardcoded (`500000`) | Yes | | | `outboundLimit` | Computed | Auto-detected/Hardcoded | Similar| Relative to rate limit | ## Deploy NTT Before deploying NTT contracts on EVM chains, you need to scaffold a project and initialize your deployment configuration. ???- interface "Install the NTT CLI and Scaffold a New Project" Before proceeding, make sure you have the NTT CLI installed and a project initialized. Follow these steps (or see the [Get Started guide](/docs/products/native-token-transfers/get-started/#install-ntt-cli){target=\_blank}): 1. Install the NTT CLI: ```bash curl -fsSL https://raw.githubusercontent.com/wormhole-foundation/native-token-transfers/main/cli/install.sh | bash ``` Verify installation: ```bash ntt --version ``` 2. Initialize a new NTT project: ```bash ntt new my-ntt-project cd my-ntt-project ``` 3. Create the deployment config using the following command. This will generate a `deployment.json` file where your settings are stored: === "Mainnet" ```bash ntt init Mainnet ``` === "Testnet" ```bash ntt init Testnet ``` Once you've completed those steps, return here to proceed with adding your EVM chains and deploying contracts. Ensure you have set up your environment correctly: ```bash export ETH_PRIVATE_KEY=INSERT_PRIVATE_KEY ``` Add each chain you'll be deploying to. The following example demonstrates configuring NTT in burn-and-mint mode on Ethereum Sepolia and Arbitrum Sepolia: ```bash # Set scanner API Keys as environment variables export SEPOLIA_SCAN_API_KEY=INSERT_ETHERSCAN_SEPOLIA_API_KEY export ARBITRUMSEPOLIA_SCAN_API_KEY=INSERT_ARBISCAN_SEPOLIA_API_KEY # Add each chain # The contracts will be automatically verified using the scanner API keys above ntt add-chain Sepolia --latest --mode burning --token INSERT_YOUR_TOKEN_ADDRESS ntt add-chain ArbitrumSepolia --latest --mode burning --token INSERT_YOUR_TOKEN_ADDRESS ``` While not recommended, you can pass the `-skip-verify` flag to the `ntt add-chain` command if you want to skip contract verification. The `ntt add-chain` command takes the following parameters: - Name of each chain - Version of NTT to deploy (use `--latest` for the latest contract versions) - Mode (either `burning` or `locking`) - Your token contract address The NTT CLI prints detailed logs and transaction hashes, so you can see exactly what's happening under the hood. ## Configure NTT The NTT CLI takes inspiration from [git](https://git-scm.com/){target=\_blank}. You can run: - `ntt status` - checks whether your `deployment.json` file is consistent with what is on-chain - `ntt pull` - syncs your `deployment.json` file with the on-chain configuration and set up rate limits with the appropriate number of decimals, depending on the specific chain. For example: For Solana, the limits are set with 9 decimal places: ```json "inbound": { "Sepolia": "1000.000000000" // inbound limit from Sepolia to Solana } ``` For Sepolia (Ethereum Testnet), the limits are set with 18 decimal places: ```json "inbound": { "Solana": "1000.000000000000000000" // inbound limit from Solana to Sepolia } ``` This initial configuration ensures that the rate limits are correctly represented for each chain's token precision - `ntt push` - syncs the on-chain configuration with local changes made to your `deployment.json` file After you deploy the NTT contracts, ensure that the deployment is properly configured and your local representation is consistent with the actual on-chain state by running `ntt status` and following the instructions shown on the screen. ## Set Token Minter to NTT Manager The final step in the deployment process is to set the NTT Manager as a minter of your token on all chains you have deployed to in `burning` mode. When performing a hub-and-spoke deployment, it is only necessary to set the NTT Manager as a minter of the token on each spoke chain. !!! note The required NTT Manager address can be found in the `deployment.json` file. - If you followed the [`INttToken`](https://github.com/wormhole-foundation/native-token-transfers/blob/main/evm/src/interfaces/INttToken.sol){target=\_blank} interface, you can execute the `setMinter(address newMinter)` function ```json cast send $TOKEN_ADDRESS "setMinter(address)" $NTT_MANAGER_ADDRESS --private-key $ETH_PRIVATE_KEY --rpc-url $YOUR_RPC_URL ``` - If you have a custom process to manage token minters, you should now follow that process to add the corresponding NTT Manager as a minter By default, NTT transfers to EVM blockchains support automatic relaying via the Wormhole relayer, which doesn't require the user to perform a transaction on the destination chain to complete the transfer. !!!important To proceed with testing and find integration examples, check out the [NTT Post Deployment](/docs/products/native-token-transfers/guides/post-deployment/){target=\_blank} page. --- END CONTENT --- Doc-Content: https://raw.githubusercontent.com/wormhole-foundation/wormhole-docs/refs/heads/main/products/native-token-transfers/guides/deploy-to-solana.md --- BEGIN CONTENT --- --- title: Native Token Transfers Solana Deployment description: Deploy and configure Wormhole's Native Token Transfers (NTT) for Solana, including setup, token compatibility, mint/burn modes, and CLI usage. categories: NTT, Transfer --- # Deploy NTT on Solana [Native Token Transfers (NTT)](/docs/products/native-token-transfers/overview/){target=\_blank} enable seamless multichain transfers of SPL tokens on Solana using Wormhole's messaging protocol. Instead of creating wrapped tokens, NTT allows native assets to move across chains while maintaining their original properties. This guide walks you through deploying NTT on Solana, including setting up dependencies, configuring token compatibility, and using the NTT CLI to deploy in hub-and-spoke or burn-and-mint mode. By the end, a fully deployed NTT will be set up, allowing your token to transfer between Solana and other supported chains. ## Prerequisites Before deploying NTT on Solana, ensure you have the following: - [Rust](https://www.rust-lang.org/tools/install){target=\_blank} installed. - The correct versions of the Solana CLI and Anchor installed, depending on your NTT version: === "v3" | Dependency | Version | |------------|---------| | [Solana](https://docs.solanalabs.com/cli/install){target=\_blank} | `{{ ntt.solana_cli_version }}` | | [Anchor](https://www.anchor-lang.com/docs/installation){target=\_blank} | `{{ ntt.anchor_version }}` | === "v2/v1" | Dependency | Version | |------------|---------| | [Solana](https://docs.solanalabs.com/cli/install){target=\_blank} | `v1.18.10` | | [Anchor](https://www.anchor-lang.com/docs/installation){target=\_blank} | `v0.29.0` | Use the Solana and Anchor versions listed above to avoid compatibility issues while following this guide. ## Overview of the Deployment Process Deploying NTT with the CLI on Solana follows a structured process: 1. **Choose your token setup**: - **Use an existing SPL token** - if your token is already deployed on Solana, you can skip token creation and move directly to the [Set Up NTT](#set-up-ntt) section - **Create a new SPL token** - if you don't already have an SPL token deployed, you'll need to deploy and configure it on Solana before integrating with Wormhole's NTT ???- interface "Create and Mint SPL Tokens" This section walks you through generating a Solana wallet, deploying an SPL token, creating a token account, and minting tokens. 1. **Generate a Solana key pair** - run the following command to create a new wallet: ```bash solana-keygen grind --starts-with w:1 --ignore-case ``` 2. **Set Solana configuration** - configure the Solana CLI to use the generated key pair using the following command: ```bash solana config set --keypair INSERT_PATH_TO_KEYPAIR_JSON ``` 3. **Select an RPC URL** - configure Solana to use the appropriate network using one of the following commands: === "Mainnet" ```bash solana config set -um ``` === "Testnet (Solana's Devnet)" ```bash solana config set -ud ``` !!! note Solana's official testnet cluster is not supported for token creation or deployment with NTT. You must use the Solana devnet instead. 4. **Fund your wallet** - ensure you have enough SOL to create a token. If deploying on devnet, request an airdrop with the following commands: ```bash solana airdrop 2 solana balance ``` 5. **Install SPL Token CLI** - install or update the required [CLI tool](https://www.solana-program.com/docs/token#setup){target=\_blank} ```bash cargo install spl-token-cli ``` 6. **Create a new SPL token** - initialize the token on Solana ```bash spl-token create-token ``` 7. **Create a token account** - generate an account to hold the token ```bash spl-token create-account INSERT_TOKEN_ADDRESS ``` 8. **Mint tokens** - send 1000 tokens to the created account ```bash spl-token mint INSERT_TOKEN_ADDRESS 1000 ``` !!! note NTT versions `>=v2.0.0+solana` support SPL tokens with [transfer hooks](https://www.solana-program.com/docs/transfer-hook-interface){target=\_blank}. 2. **Choose your deployment model**: - **Hub-and-spoke** - tokens are locked on a hub chain and minted on destination spoke chains. Since the token supply remains controlled by the hub chain, no changes to the minting authority are required - **Burn-and-mint** - tokens are burned on the source chain and minted on the destination chain. This requires transferring the SPL token's minting authority to the Program Derived Address (PDA) controlled by the NTT program 3. **Deploy and configure NTT** - use the NTT CLI to initialize and deploy the NTT program, specifying your SPL token and deployment mode ![Solana NTT deployment diagram](/docs/images/products/native-token-transfers/guides/solana/ntt-solana-guide-1.webp) Following this process, your token will fully integrate with NTT, enabling seamless transfers between Solana and other chains. By default, NTT transfers to Solana require manual [relaying](/docs/protocol/infrastructure/relayer/){target=\_blank}, meaning users must complete a transaction on Solana to finalize the transfer. For automatic relaying, where transactions are completed without user intervention, additional setup is required. [Contact Wormhole contributors](https://forms.clickup.com/45049775/f/1aytxf-10244/JKYWRUQ70AUI99F32Q){target=\_blank} to enable automatic relaying support for your deployment. ## Set Up NTT To integrate your token with NTT on Solana, you must initialize the deployment and configure its parameters. This process sets up the required contracts and may generate key pairs if they don't exist. These key pairs are used to sign transactions and authorize actions within the NTT deployment. The [NTT CLI](/docs/products/native-token-transfers/reference/cli-commands/){target=\_blank} manages deployments, configures settings, and interacts with the NTT system. Follow these steps to set up NTT using the CLI tool: ???- interface "Install the NTT CLI and Scaffold a New Project" Before proceeding, make sure you have the NTT CLI installed and a project initialized. Follow these steps (or see the [Get Started guide](/docs/products/native-token-transfers/get-started/#install-ntt-cli){target=\_blank}): 1. Install the NTT CLI: ```bash curl -fsSL https://raw.githubusercontent.com/wormhole-foundation/native-token-transfers/main/cli/install.sh | bash ``` Verify installation: ```bash ntt --version ``` 2. Initialize a new NTT project: ```bash ntt new my-ntt-project cd my-ntt-project ``` 3. Create the deployment config using the following command. This will generate a `deployment.json` file where your settings are stored: === "Mainnet" ```bash ntt init Mainnet ``` === "Testnet (Solana's Devnet)" ```bash ntt init Testnet ``` !!! note When deploying NTT to Solana in `Testnet` mode, you must use [**Devnet tokens**](https://faucet.solana.com/){target=\_blank}. Solana's official testnet cluster is not supported for token creation or deployment in NTT. ### Generate an NTT Program Key Pair Create a unique key pair for the NTT program: ```bash solana-keygen grind --starts-with ntt:1 --ignore-case ``` ### Set Mint Authority If you use burn-and-mint mode, follow these steps to enable the NTT program to mint tokens on Solana. This involves deriving the PDA as the token authority and updating the SPL token's minting permissions. For hub-and-spoke and Solana as the hubchain skip this section and proceed to [Deploy and Configure NTT](#deploy-and-configure-ntt), otherwise follow the burn-and-mint instructions below for Solana as a spoke. Before updating the mint authority, you must create metadata for your SPL token. You can visit this repository to see an example of [how to create metadata for your SPL token](https://github.com/wormhole-foundation/demo-metaplex-metadata/blob/main/src/token-metadata.ts){target=\_blank}. Options to set the mint authority for your SPL token: **For undeployed programs:** - **Set to token authority PDA:** ```bash ntt set-mint-authority --chain Solana --token INSERT_TOKEN_ADDRESS --manager INSERT_NTT_PROGRAM_ADDRESS --payer INSERT_KEYPAIR_JSON ``` - **Set to SPL Multisig:** 1. Create valid SPL Multisig: ```bash ntt solana create-spl-multisig INSERT_MINTER_PUBKEY_1 INSERT_MINTER_PUBKEY_2 ... --token INSERT_TOKEN_ADDRESS --manager INSERT_NTT_PROGRAM_ADDRESS --payer INSERT_KEYPAIR_JSON ``` 2. Set to created SPL Multisig: ```bash ntt set-mint-authority --chain Solana --token INSERT_TOKEN_ADDRESS --manager INSERT_NTT_PROGRAM_ADDRESS --multisig INSERT_MULTISIG_ADDRESS --payer INSERT_KEYPAIR_JSON ``` **For deployed programs:** - **Set to token authority PDA:** ```bash ntt set-mint-authority --chain Solana --payer INSERT_KEYPAIR_JSON ``` !!! note Check out [this utility script](https://github.com/wormhole-foundation/demo-ntt-token-mint-authority-transfer/tree/main){target=\_blank} for transferring token mint authority out of NTT. ## Deploy and Configure NTT !!! warning If deploying to Solana mainnet, you must use a custom RPC. See how to [set it up in your project](/docs/products/native-token-transfers/faqs/#how-can-i-specify-a-custom-rpc-for-ntt){target=\_blank} using an `overrides.json` file. For optimal performance, consider using a staked RPC connection from either Triton or Helius. After setting up your deployment, finalize the configuration and deploy the NTT program on Solana by following these steps: 1. **Deploy NTT to Solana** - run the appropriate command based on your deployment mode: === "Burn-and-Mint" ```bash ntt add-chain Solana --latest --mode burning --token INSERT_TOKEN_ADDRESS --payer INSERT_YOUR_KEYPAIR_JSON --program-key INSERT_YOUR_NTT_PROGRAM_KEYPAIR_JSON ``` === "Hub-and-Spoke" ```bash ntt add-chain Solana --latest --mode locking --token INSERT_TOKEN_ADDRESS --payer INSERT_YOUR_KEYPAIR_JSON --program-key INSERT_YOUR_NTT_PROGRAM_KEYPAIR_JSON ``` You can optionally add `--solana-priority-fee` to the script to increase the priority fee in microlamports. The default is `50000`. 2. **Verify deployment status** - after deployment, check if your `deployment.json` file matches the on-chain configuration using the following command: ```bash ntt status ``` If needed, sync your local configuration with the on-chain state: ```bash ntt pull ``` 3. **Configure inbound and outbound rate limits** - by default, the inbound and outbound limits are set to `0` and must be updated before deployment. For EVM chains, values must be set using 18 decimals, while Solana uses nine decimals. Open your `deployment.json` file and adjust the values based on your use case: ```json "inbound": { "Sepolia": "1000.000000000" // inbound limit from Sepolia to Solana }, "outbound": { "Sepolia": "1000.000000000" // outbound limit from Solana to Sepolia } ``` 4. **Push the final deployment** - once rate limits are set, push the deployment to Solana using the specified key pair to cover gas fees ```bash ntt push --payer INSERT_YOUR_KEYPAIR_JSON ``` ### Recovering Rent for Failed Solana Deployments Failed Solana deployments don't result in lost SOL. Instead, SOL may be locked in deployment buffer accounts that persist after interruptions. To recover these funds, refer to the [Solana program deployment guide](https://solana.com/docs/programs/deploying#program-buffer-accounts){target=\_blank} for instructions on identifying and closing these buffer accounts. ## Where to Go Next
- :octicons-globe-16:{ .lg .middle } **Deploy NTT on EVM Chains** --- After deploying NTT on Solana, deploy and integrate it on EVM chains to enable seamless multichain transfers. [:custom-arrow: Deploy NTT on EVM Chains](/docs/products/native-token-transfers/guides/deploy-to-evm/){target=\_blank} - :octicons-tools-16:{ .lg .middle } **Test Your Deployment** --- Follow the NTT Post Deployment Guide for integration examples and testing instructions. [:custom-arrow: Test Your NTT deployment](/docs/products/native-token-transfers/guides/post-deployment/){target=\_blank} - :octicons-tools-16:{ .lg .middle } **Add NTT to Your dApp** --- Configure Wormhole Connect, a plug-and-play bridging UI, to enable multichain transfers for your token. [:custom-arrow: Use Connect to Integrate NTT](/docs/products/connect/overview/){target=\_blank} - :octicons-question-16:{ .lg .middle } **View FAQs** --- Find answers to common questions about NTT. [:custom-arrow: View FAQs](/docs/products/native-token-transfers/faqs){target=\_blank}
--- END CONTENT --- Doc-Content: https://raw.githubusercontent.com/wormhole-foundation/wormhole-docs/refs/heads/main/products/native-token-transfers/guides/evm-launchpad.md --- BEGIN CONTENT --- --- title: Deploy Native Token Transfers with Launchpad description: Deploy a new token or extend an existing one across multiple chains with the NTT Launchpad. Manage transfers, supply, and settings—all from a single platform. categories: NTT, Transfer --- # Deploy NTT with Launchpad The [Native Token Transfers (NTT) Launchpad](https://ntt.wormhole.com/){target=\_blank} is a Wormhole-managed UI application that provides a step-by-step interface for deploying NTT across multiple blockchains. Instead of manually deploying contracts on each chain, configuring relayers, and managing cross-chain communication, you can quickly launch or expand tokens with just a few clicks. The Launchpad automates deployment, reducing complexity and saving time. This guide covers: - Launching a new cross-chain token - Expanding an existing token for NTT - Managing tokens via the dashboard and settings ## Prerequisites - An EVM-compatible wallet (e.g., [MetaMask](https://metamask.io/){target=\_blank}, [Phantom](https://phantom.com/){target=\_blank}, etc.) - Minimum ETH (or equivalent) for gas fees per deployment ## Supported Blockchains The NTT Launchpad currently supports deployments on the following mainnet chains: - Ethereum - Arbitrum One - Base - Berachain - Blast - BNB Smart Chain - Ink - Optimism Mainnet - Polygon ## Choose Your Path Once ready, choose an option to proceed: - [**Launch a Cross-Chain Token**](#launch-a-cross-chain-token): Deploy a brand-new token that is NTT-ready from day one, enabling seamless transfers across multiple blockchains. - [**Expand Your Existing Token**](#expand-your-existing-token): If you already have a token deployed on different chains, integrate it with NTT to enable NTT without modifying its original contract. ## Launch a Cross-Chain Token Deploy a new NTT-compatible token that can be transferred across multiple chains. This process sets up your token on a home network and deploys it to additional blockchains. Follow the below steps to get started: 1. Open the [NTT Launchpad](https://ntt.wormhole.com/){target=\_blank}, connect your wallet, and click **Get Started** ![](/docs/images/products/native-token-transfers/guides/evm-launchpad/ntt-launchpad-1.webp) 2. Select **Launch a Cross-Chain Token** ![](/docs/images/products/native-token-transfers/guides/evm-launchpad/ntt-launchpad-2.webp) 3. Set the token details: 1. Select the **home network** from the dropdown menu 2. Enter the **name** for the token 3. Enter the **symbol** of the token 4. Provide the **initial supply** 5. To the token details, click **Next** ![](/docs/images/products/native-token-transfers/guides/evm-launchpad/ntt-launchpad-3.webp) 4. Select the deployment chains: 1. The home network where your token will be deployed will be populated (e.g., Optimism) 2. Choose any additional chains to deploy your token to (e.g., Base) 3. To continue, click **Next** ![](/docs/images/products/native-token-transfers/guides/evm-launchpad/ntt-launchpad-4.webp) 5. To deploy on the first chain (Optimism), click on **Deploy**; if prompted, switch your wallet to the correct network and confirm the transaction ![](/docs/images/products/native-token-transfers/guides/evm-launchpad/ntt-launchpad-5.webp) 6. Once deployed, you can view the transaction in a block explorer and add the token to your wallet ![](/docs/images/products/native-token-transfers/guides/evm-launchpad/ntt-launchpad-6.webp) 7. Repeat the previous step to deploy the token on the second chain (Base). The supply of tokens on Base will be zero since the tokens were all minted on Optimism in the previous step 8. Once both deployments are completed, proceed to the [**Dashboard**](#explore-the-launchpad-dashboard) to manage your token. ## Expand Your Existing Token Expand an existing token to support NTT across multiple chains. This process integrates your deployed token with NTT without modifying its original contract. Follow the steps below to get started: 1. Open the [NTT Launchpad](https://ntt.wormhole.com/){target=\_blank}, connect your wallet, and click **Get Started** ![](/docs/images/products/native-token-transfers/guides/evm-launchpad/ntt-launchpad-1.webp) 2. Select **Expand Your Existing Token** ![](/docs/images/products/native-token-transfers/guides/evm-launchpad/ntt-launchpad-7.webp) 3. Enter the token details: 1. Choose the home network where your token is already deployed (e.g., Optimism) 2. Choose any additional chains to deploy your token to (e.g., Base) 3. To continue, click **Next** ![](/docs/images/products/native-token-transfers/guides/evm-launchpad/ntt-launchpad-8.webp) 4. Select the chains to deploy your token to: 1. The home network where your token is already deployed will be populated (e.g., Optimism) 2. Choose any additional chains to deploy your token to (e.g., Base) 1. Click **Next** ![](/docs/images/products/native-token-transfers/guides/evm-launchpad/ntt-launchpad-9.webp) 5. To deploy on the first chain (Optimism), click on **Deploy**; if prompted, switch your wallet to the correct network and confirm the transaction ![](/docs/images/products/native-token-transfers/guides/evm-launchpad/ntt-launchpad-5.webp) 6. Once deployed, you can view the transaction in a block explorer and add the token to your wallet ![](/docs/images/products/native-token-transfers/guides/evm-launchpad/ntt-launchpad-6.webp) 7. Repeat the previous step to deploy the token on the second chain (Base). The supply of tokens on Base will be zero since the tokens were all minted on Optimism in the previous step 8. Now that your token has been deployed on multiple chains click [**Dashboard**](#explore-the-launchpad-dashboard) to review its details ## Explore the Launchpad Dashboard To access the **Dashboard** from the [Launchpad home page](https://ntt.wormhole.com/){target=\_blank}, click on **Manage Deployment**. Here, you can view deployment status, monitor supply across chains, and configure transfer settings. ![](/docs/images/products/native-token-transfers/guides/evm-launchpad/ntt-launchpad-10.webp) The dashboard provides a high-level view of your token across all deployed chains, including: - Token addresses for each chain - Supply distribution visualization - List of deployed chains, including inbound and outbound transfer limits, which can be modified in [**Settings**](#settings) ![](/docs/images/products/native-token-transfers/guides/evm-launchpad/ntt-launchpad-11.webp) ## Settings The **Settings** page allows you to configure security parameters, role management, and transfer limits for your deployed token. You can switch between chains to manage these settings independently for each deployment. ### Chain Management Use the drop-down menu at the top to select the chain you want to configure. The available options correspond to the chains where your token has already been deployed. Once selected, the page displays token details specific to that chain. From this section, you can also: - **Pause the token**: Temporarily turn off transfers on the selected chain. - **Deploy to a new chain**: Expand your token by deploying it to an additional chain. ![](/docs/images/products/native-token-transfers/guides/evm-launchpad/ntt-launchpad-12.webp) ### Role Management This section displays key [roles](/docs/products/native-token-transfers/configuration/access-control/){target=\_blank} involved in token governance. You can view and modify these roles by selecting a new address and confirming the update. - **Manager’s Owner**: The owner through the `NTTOwner` proxy. - **Pauser**: The address authorized to pause transfers. ![](/docs/images/products/native-token-transfers/guides/evm-launchpad/ntt-launchpad-13.webp) ### Security Threshold Determine and update how transceivers interact with the token. [Transceivers](/docs/products/native-token-transfers/concepts/architecture/#transceivers){target=\_blank} route NTT transfers between blockchains, ensuring tokens are correctly sent and received across networks. A higher transceiver threshold increases security by requiring more approvals before processing a transfer, but it may also slow down transactions. A lower threshold allows faster transfers but reduces redundancy in message verification. - **Registered Transceivers**: Displays the number of registered transceivers and their addresses. - **Transceivers Threshold**: A configurable value that must be less than or equal to the number of transceivers. ![](/docs/images/products/native-token-transfers/guides/evm-launchpad/ntt-launchpad-14.webp) ### Peer Chains Limits Define the transfer restrictions for each connected network. You can adjust: - **Sending Limits**: The maximum amount of tokens that can be sent from the home chain. - **Receiving Limits**: The maximum amount of tokens that can be received for each of the supported peer chains. Enter a new value to adjust limits and click **Update**. The changes will take effect immediately. ![](/docs/images/products/native-token-transfers/guides/evm-launchpad/ntt-launchpad-15.webp) --- END CONTENT --- Doc-Content: https://raw.githubusercontent.com/wormhole-foundation/wormhole-docs/refs/heads/main/products/native-token-transfers/guides/post-deployment.md --- BEGIN CONTENT --- --- title: Native Token Transfers Post Deployment description: Learn post-deployment guidelines for optimizing Wormhole NTT, which include testing, security, frontend integration, ecosystem coordination, and monitoring. categories: NTT, Transfer --- # NTT Post-Deployment Steps To offer the best user experience and ensure the most robust deployment, Wormhole contributors recommend the following after you have deployed Native Token Transfers (NTT): - Implement a robust testing plan for your multichain token before launching - Ensure comprehensive, documented security measures are followed for custody of contract ownership, control of keys, and access control roles. Check the [NTT configuration](/docs/products/native-token-transfers/configuration/access-control/){target=\_blank} for more details on ownership and rate limits - Consider a streamlined, customizable frontend such as [Connect](/docs/products/connect/overview/){target=\_blank} for an optimized user experience - Alternatively, the [Wormhole TypeScript SDK](/docs/tools/typescript-sdk/get-started/){target=\_blank} allows for a direct integration into your infrastructure - Ensure ecosystem actors such as block explorers, automated security tools (such as BlockAid and Blowfish), and wallets (such as MetaMask, Backpack, and Phantom) are aware of your multichain deployment and that it is labeled appropriately - Monitor and maintain your multichain deployment ## Manual Relaying for Solana Transfers By default, NTT transfers to Solana require manual relaying, meaning that after initiating a cross-chain transfer, the recipient must submit an on-chain transaction to claim the tokens. This step ensures that tokens are properly minted or unlocked on Solana and prevents unauthorized claims. ## Post-Deployment Settings The following table outlines post-deployment settings available on the NTT Manager contract. These allow you to update roles, pause activity, and adjust transfer limits—useful for upgrades, incident response, or protocol tuning after initial deployment. | Setting | Effect | |-------------------------|------------------------------------------| | `pause` | Pauses the manager | | `unpause` | Unpauses the manager | | `setOwner` | Changes the manager owner | | `setPauser` | Changes the pauser role | | `setOutboundLimit` | Sets outbound transfer limit | | `setInboundLimit` | Sets inbound transfer limit (per chain) | | `setTransceiverPauser ` | Changes pauser for a transceiver | ## Where to Go Next
- :octicons-code-16:{ .lg .middle } **Wormhole NTT Connect Demo** --- Check out an example project that uses a Next.js TypeScript application and integrates it with Connect, a customizable widget for cross-chain asset transfers. [:custom-arrow: Explore the NTT Connect demo](https://github.com/wormhole-foundation/demo-ntt-connect) - :octicons-code-16:{ .lg .middle } **Wormhole NTT TypeScript SDK Demo** --- Reference an example project that uses the Wormhole TypeScript SDK to facilitate token transfers between different blockchain networks after deploying the NTT framework. [:custom-arrow: Explore the NTT TypeScript SDK demo](https://github.com/wormhole-foundation/demo-ntt-ts-sdk) - :octicons-eye-16:{ .lg .middle } **Query NTT Token and Transfer Data** --- Learn how to explore NTT by querying token metadata and transfer activity using the Wormholescan API in a TypeScript project. [:custom-arrow: Try the NTT Token and Transfers Guide](/docs/products/messaging/guides/wormholescan-api)
--- END CONTENT --- Doc-Content: https://raw.githubusercontent.com/wormhole-foundation/wormhole-docs/refs/heads/main/products/native-token-transfers/guides/troubleshoot.md --- BEGIN CONTENT --- --- title: Troubleshooting NTT Deployment description: Resolve common issues in NTT deployment with this troubleshooting guide covering Solana, EVM, mint authority, decimals, and rate limits. categories: NTT, Transfer --- # Troubleshoot Your NTT Deployment If you encounter issues during the NTT deployment process, check the following common points: - **Solana and Anchor versions** - ensure you are using the expected versions of Solana and Anchor as outlined in the [deployment page](/docs/products/native-token-transfers/guides/deploy-to-solana/#install-dependencies){target=\_blank} - [Solana](https://docs.solanalabs.com/cli/install){target=\_blank} **`{{ ntt.solana_cli_version }}`** - [Anchor](https://www.anchor-lang.com/docs/installation){target=\_blank} **`{{ ntt.anchor_version }}`** - **Token compliance on EVM** - verify that your token is an ERC20 token on the EVM chain - **Mint authority transfer** - **For burn or spoke tokens on Solana** - ensure the token mint authority was transferred as described in the [set SPL Token Mint Authority](/docs/products/native-token-transfers/guides/deploy-to-solana/#set-spl-token-mint-authority){target=\_blank} section - **For EVM tokens** - confirm the token minter was set to the NTT Manager. Refer to the [set Token Minter to NTT Manager](/docs/products/native-token-transfers/guides/deploy-to-evm/#set-token-minter-to-ntt-manager){target=\_blank} section for details - **Decimal configuration** - run `ntt pull` to correctly configure the decimals in your `deployment.json` file. More details in the [configure NTT](/docs/products/native-token-transfers/guides/deploy-to-solana/#configure-ntt){target=\_blank} section - **Rate limit configuration** - increase your rate limits to a value greater than zero. A rate limit of zero can cause transactions to get stuck. Learn more on how to [configure rate limits](/docs/products/native-token-transfers/guides/deploy-to-evm/#configure-ntt){target=\_blank} - **Docker environment based on Ubuntu 20.04 with all dependencies required for Wormhole NTT CLI development** - run `docker compose up -d` to start the container in your terminal from the directory containing the `docker-compose.yml` file ???- interface "Dockerfile" ```Dockerfile FROM ubuntu:20.04 # Set environment variables to prevent interactive prompts during installation ENV DEBIAN_FRONTEND=noninteractive # Update and install necessary dependencies RUN apt-get update && apt-get install -y \ curl \ wget \ git \ build-essential \ libssl-dev \ libudev-dev \ pkg-config \ python3 \ python3-pip \ software-properties-common \ ca-certificates \ unzip \ clang \ cmake \ protobuf-compiler \ && apt-get clean && rm -rf /var/lib/apt/lists/* # Install Rust RUN curl --proto '=https' --tlsv1.2 -sSf https://sh.rustup.rs | sh -s -- -y ENV PATH="/root/.cargo/bin:$PATH" # Install Solana CLI ({{ntt.solana_cli_version}}) RUN sh -c "$(curl -sSfL https://release.solana.com/{{ntt.solana_cli_version}}/install)" ENV PATH="/root/.local/share/solana/install/active_release/bin:$PATH" # Install Anchor using avm RUN cargo install --git https://github.com/coral-xyz/anchor avm --locked --force \ && avm install 0.29.0 \ && avm use 0.29.0 ENV PATH="/root/.avm/bin:$PATH" ENV NVM_DIR=/root/.nvm RUN curl -o- https://raw.githubusercontent.com/nvm-sh/nvm/v0.40.1/install.sh | bash \ && . "$NVM_DIR/nvm.sh" \ && nvm install 22 \ && nvm use 22 \ && nvm alias default 22 ENV PATH="$NVM_DIR/versions/node/v22.12.0/bin:$PATH" # Install Bun RUN curl -fsSL https://bun.sh/install | bash ENV PATH="/root/.bun/bin:$PATH" # Install Foundry RUN curl -L https://foundry.paradigm.xyz | bash ENV PATH="/root/.foundry/bin:${PATH}" RUN /bin/bash -c "source /root/.bashrc && foundryup" # Install Wormhole NTT CLI RUN curl -fsSL https://raw.githubusercontent.com/wormhole-foundation/native-token-transfers/main/cli/install.sh | bash # Add a default working directory WORKDIR /app # Expose port for development if needed EXPOSE 8899 # Entry point for the container CMD ["bash"] ``` ???- interface "docker-compose.yml" ```yml services: portal-ntt: build: context: . dockerfile: Dockerfile platform: linux/amd64 volumes: - ./src:/app working_dir: /app tty: true ``` --- END CONTENT --- Doc-Content: https://raw.githubusercontent.com/wormhole-foundation/wormhole-docs/refs/heads/main/products/settlement/concepts/architecture.md --- BEGIN CONTENT --- --- title: Settlement Protocol Architecture description: Explore Wormhole Settlement's native swap protocols—Mayan Swift and MCTP—for scalable, efficient cross-chain asset transfers. categories: Settlement, Transfer --- # Settlement Protocol Architecture This page describes the high-level mechanics of the underlying native swap protocols in the Wormhole SDK. While built on Wormhole messaging, each protocol uses a novel architecture with unique price discovery, scalability, and latency tradeoffs. These designs enable redundancy to handle highly asymmetric flows and sharp volume changes. These sections will cover the following: - **Mayan Swift** - a flexible cross-chain intent protocol that embeds a competitive on-chain price auction to determine the best possible execution for the expressed user intent - **Mayan MCTP** - a cross-chain intents protocol that leverages Circle's CCTP (Cross-Chain Transfer Protocol) mechanism and Wormhole messaging to enable secure, fee-managed asset transfers across chains ## Mayan Swift Mayan Swift is a flexible cross-chain intent protocol that embeds a competitive on-chain price auction to determine the best possible execution for the expressed user intent. ### On-Chain Competitive Price Discovery Mechanism Traditional intent-based protocols essentially function as cross-chain limit orders. If the order is profitable, solvers will compete to fulfill it, leading to MEV-like competition focused on speed. While functional, this methodology presents two clear inefficiencies and drawbacks. First, they lack a competitive price discovery mechanism as limit order prices are typically determined through centralized off-chain systems. Second, in this MEV-like market structure, only a single solver can win, while the others lose out on transaction fees. This dynamic of deadweight loss results in solvers prioritizing high-margin orders, ultimately resulting in elevated fees for end-users without commensurate benefits. Mayan Swift addresses these limitations by implementing competitive on-chain English auctions on Solana as an embedded price discovery mechanism, fundamentally shifting solver competition from speed-based to price-based execution. Through this architecture, the solver offering the best possible price secures the right to fulfill the order within pre-specified deadline parameters. ![Mayan Swift - Intent-centric design](/docs/images/products/settlement/concepts/architecture/architecture-2.webp) ### Protocol Flow: How It Works 1. **Initiation** - the user creates an order by signing a transaction that locks one of the primary assets (USDC or ETH) into the Mayan smart contract, specifying the desired outcome. !!!note If the input asset is not a primary asset, it is converted into a primary asset within the same transaction before the order is submitted. Each order includes properties such as destination chain, destination wallet address, output token address, minimum output amount, gas drop amount, deadline, and 32 bytes of random hex to prevent collisions. A Keccak-256 hash is then calculated to identify the order 2. **Auction** - solvers observe on-chain data or subscribe to the Mayan explorer web socket (solvers using the Mayan explorer verify the order's integrity by checking the data against the on-chain hash). Once the new order is verified, an on-chain auction on Solana is initiated by passing the order ID and the bid amount, which cannot be lower than the minimum amount. Other solvers can increase the bid by submitting a higher amount before the auction ends 3. **Fulfillment** - the auction ends three seconds after the initial bid. Once the auction ends, the winning solver can execute an instruction that passes their wallet address on the destination chain. This triggers a Wormhole message containing the order ID and the winner's wallet address. Wormhole Guardians then sign this message, allowing the winning solver to fulfill the order on the destination chain by submitting proof of their win and the promised amount to the Mayan contract before the deadline. The Mayan contract deducts a protocol fee (currently 3 basis points) and a referral fee (if applicable), transferring the remaining amount to the user's destination wallet. It also triggers a Wormhole message as proof of fulfillment 4. **Settlement** - after the Wormhole Guardians sign the fulfillment message, the winning solver can submit this message on the source chain to unlock the user's funds and transfer them to their own wallet. Upon fulfillment, the solver has the option to delay triggering a Wormhole message immediately. Instead, they can batch the proofs and, once the batch reaches a certain threshold, issue a batched proof to unlock all orders simultaneously, saving on gas fees ## Mayan MCTP Mayan MCTP is a cross-chain intents protocol that leverages Circle's CCTP (Cross-Chain Transfer Protocol) mechanism and Wormhole messaging to enable secure, fee-managed asset transfers across chains. ![Mayan MCTP diagram](/docs/images/products/settlement/concepts/architecture/architecture-3.webp) ### Protocol Flow: How It Works 1. **Initiation** - the user creates an order by signing a transaction that locks one USDC into the Mayan smart contract, specifying the desired outcome. !!!note If the input asset is not USDC, it is converted into a primary asset within the same transaction before the order is submitted. The contract constructs a `BridgeWithFeeMsg` structure, which includes parameters such as the action type, payload type, nonce, destination address, gas drop, redeem fee, and an optional custom payload hash 2. **Intent submission** - the contract calls the CCTP messenger to deposit the tokens for bridging. A unique nonce is generated, and a corresponding fee-lock record is created in the contract's storage. This record includes the locked fee, gas drop parameters, and destination details. The constructed message is hashed and published through Wormhole. The protocol fee is deducted during this step, and the Wormhole message is broadcast with the specified [consistency (finality) level](/docs/products/reference/consistency-levels/){target=\_blank} 3. **Fulfillment** - on the destination chain, the protocol receives a CCTP message with corresponding signatures and verifies the payload using Wormhole's verification mechanism. Once validated, the redeemed tokens are transferred to the intended recipient, deducting the redeem fee as per protocol rules The protocol provides mechanisms for unlocking the fee once the bridging process is completed. This can occur immediately upon fulfillment or be batched for efficiency. In the fee unlock flow, the contract verifies the unlock message via Wormhole and then releases the locked fee to the designated unlocker address. ## Where to Go Next - To learn how to integrate settlement routes into your application, see the [Integrate Wormhole Settlement Routes Using the SDK](https://github.com/wormhole-foundation/demo-mayanswift){target=\_blank} tutorial --- END CONTENT --- Doc-Content: https://raw.githubusercontent.com/wormhole-foundation/wormhole-docs/refs/heads/main/products/settlement/faqs.md --- BEGIN CONTENT --- --- title: Wormhole Settlement FAQs description: Frequently asked questions about Wormhole Settlement, including smart contract usage, auction fallback, and message execution. categories: Settlement, Transfer --- # Settlement FAQs ## Can I use Wormhole Settlement from a smart contract? If so, how is a message signed and relayed? Yes, Wormhole Settlement can be used from a smart contract. The composing protocol's relayer relays the message. ## What happens if no solver participates in the auction? Mayan Swift uses a refund mechanism. If an auction does not start within the specified deadline, it means no solvers placed a bid, and the user's funds will be refunded on the source chain. ## What guarantees does Wormhole Settlement provide for message execution? After the user receives the token upfront, the execution of additional contract calls depends on the relayer of the composing protocol. --- END CONTENT --- Doc-Content: https://raw.githubusercontent.com/wormhole-foundation/wormhole-docs/refs/heads/main/products/token-bridge/concepts/transfer-flow.md --- BEGIN CONTENT --- --- title: Flow of a Token Bridge Transfer description: Learn how the Wormhole Token Bridge enables secure, cross-chain token transfers by combining token-specific logic with Wormhole's core message-passing layer. categories: Token Bridge, Transfer --- # Flow of a Transfer The [Wormhole Token Bridge](/docs/products/token-bridge/overview/){target=\_blank} enables token transfers across blockchains by combining token-specific logic with [Wormhole's core messaging layer](/docs/protocol/architecture/){target=\_blank}. Each supported chain runs its own Token Bridge contract, which manages actions like locking, burning, minting, and releasing tokens. These contracts communicate directly with Wormhole's core message-passing layer to securely transmit messages between chains. This guide provides a conceptual overview of the Token Bridge and its integration with the messaging layer. It outlines each step of the transfer flow and explains how different transfer types work in practice. ## Transfer Flow Cross-chain token transfers using the Token Bridge follow these steps: 1. **Initiation on the Source Chain** The transfer begins when a user calls the Token Bridge contract on the source chain: - **Wrapped tokens**: The token is burned. - **Original tokens**: If the token is native to the source chain, the token is locked in the contract. 2. **Transfer Message Publication** The Token Bridge contract invokes the Wormhole [Core Contract](/docs/protocol/infrastructure/core-contracts/){target=\_blank}, which emits an on-chain message event describing the transfer. 3. **Message Observation and Signing** [Guardians](/docs/protocol/infrastructure/guardians/){target=\_blank}—a decentralized network of validators—monitor the source chain for these message events. A supermajority (13 out of 19) signs the event to generate a [Verified Action Approval (VAA)](/docs/protocol/infrastructure/vaas/){target=\_blank}—a cryptographically signed attestation of the transfer. The VAA is then published to the Wormhole network. 4. **VAA Submission to the Destination Chain** The VAA must be submitted to the Token Bridge contract on the destination chain to complete the transfer. The Token Bridge contract then verifies the VAA by calling the Core Contract behind the scenes. This step can be handled in two ways: - **Automatic**: A relayer service detects the VAA and submits it to the Token Bridge contract. - **Manual**: The user or dApp retrieves the VAA and submits it directly to the Token Bridge contract. 5. **Finalization of the Transfer on the Destination Chain** After the VAA is verified on the destination chain, the Token Bridge contract completes the transfer: - **Wrapped tokens**: A wrapped representation of the original token is minted. - **Original tokens**: If the token is native to the destination chain, the token is released to the recipient. Consider this example: Alice wants to send 5 ETH from Ethereum to Solana. The ETH is locked on Ethereum’s Token Bridge, and an equivalent amount of wrapped ETH is minted on Solana. The diagram below illustrates this transfer flow. ```mermaid sequenceDiagram participant Alice as Alice participant TokenBridgeEth as Token Bridge Ethereum
(Source Chain) participant CoreEth as Core Contract Ethereum
(Source Chain) participant Guardians participant TokenBridgeSol as Token Bridge Solana
(Destination Chain) participant CoreSol as Core Contract Solana
(Destination Chain) Alice->>TokenBridgeEth: Initiate ETH transfer
(lock ETH) TokenBridgeEth->>CoreEth: Publish transfer message CoreEth-->>Guardians: Emit message event Guardians->>Guardians: Sign and publish VAA alt Automatic VAA submission Guardians->>TokenBridgeSol: Relayer submits VAA else Manual VAA submission Alice->>Guardians: Retrieve VAA Alice->>TokenBridgeSol: Submit VAA end TokenBridgeSol->>CoreSol: Verify VAA CoreSol-->>TokenBridgeSol: VAA verified TokenBridgeSol-->>Alice: Mint wrapped ETH on Solana (complete transfer) ``` Maybe Alice wants to transfer her wrapped ETH on Solana back to native ETH on Ethereum. The wrapped ETH is burned on Solana’s Token Bridge, and the equivalent 5 ETH are released on Ethereum. The diagram below illustrates this transfer flow. ```mermaid sequenceDiagram participant User as Alice participant TokenBridgeSrc as Token Bridge Solana
(Source Chain) participant CoreSrc as Core Contract Solana
(Source Chain) participant Guardians participant TokenBridgeDst as Token Bridge Ethereum
(Destination Chain) participant CoreDst as Core Contract Ethereum
(Destination Chain) User->>TokenBridgeSrc: Initiate transfer
(burn wrapped ETH) TokenBridgeSrc->>CoreSrc: Publish message CoreSrc-->>Guardians: Emit message event Guardians->>Guardians: Sign and publish VAA alt Automatic VAA submission Guardians->>TokenBridgeDst: Relayer submits VAA else Manual VAA submission User->>Guardians: Retrieve VAA User->>TokenBridgeDst: User submits VAA directly end TokenBridgeDst->>CoreDst: Verify VAA CoreDst-->>TokenBridgeDst: VAA verified TokenBridgeDst-->>User: Release native ETH on Ethereum (Complete transfer) ``` ## Automatic vs. Manual Transfers The Token Bridge supports two modes of transfer, depending on whether the VAA submission step is handled automatically or manually: - **Automatic**: A relayer service listens for new VAAs and automatically submits them to the destination chain. - **Manual**: The user (or dApp) must retrieve the VAA and manually submit it to the destination chain. Here's a quick breakdown of the key differences: | Feature | Automatic Transfer | Manual Transfer | |---------------------------|-----------------------------|-------------------------------------| | Who submits the VAA? | Relayer | User or dApp | | User Experience | Seamless, one-step | Requires manual intervention | | Best for | End-users, simple UIs | Custom dApps, advanced control | | Dependency | Requires relayer support | None | ### Completing Manual Transfers The user who initiated the transfer should complete the transfer within 24 hours for manual transfers. Guardian Sets are guaranteed to be valid for at least that long. If a user waits longer, the Guardian Set may have changed between initiation and redemption, causing the VAA to be rejected. If this occurs, follow the [Replace Outdated Signatures in VAAs](){target=\_blank} tutorial to update the VAA with signatures from the current Guardian Set. ## Token Bridge Relayer (TBR) When completing an automatic transfer using the Token Bridge—either through [Connect](/docs/products/connect/overview/){target=\_blank} or programmatically via the [Wormhole TypeScript SDK](/docs/tools/typescript-sdk/get-started/){target=\_blank}—the Token Bridge Relayer (TBR) manages the interaction with the underlying Token Bridge contracts on [supported chains where the TBR is available](/docs/products/connect/reference/support-matrix/){target=\_blank}. ### Flow of an Automatic Transfer via TBR The flow of an automatic transfer using the TBR looks like this: 1. **Initiation on the Source Chain** The transfer begins when a user initiates a transfer on the source chain, which results in the TBR contract being called. 2. **Prepare and Forward the Transfer** The TBR verifies the token, encodes transfer details (relayer fee, native gas request, recipient), and forwards the transfer to the Token Bridge. 3. **Core Messaging Layer Processes the Transfer** The Token Bridge emits a message to the Core Contract. Guardians observe the message and produce a signed VAA attesting to the transfer. 4. **Off-Chain Relayer Observes the VAA** An off-chain relayer verifies the destination chain and token registration and then prepares to complete the transfer. 5. **Relayer Computes Native Drop-Off and Submits the VAA** The relayer queries the destination TBR for the native gas amount, includes it in the transaction, and submits the signed VAA. 6. **TBR Validates and Completes the Transfer** The destination TBR validates the VAA by invoking the Token Bridge contract, confirms it's from a registered TBR, verifies the token and native gas request, and then takes custody of the tokens. 6. **Asset Distribution on the Destination Chain** The TBR sends the remaining tokens and native gas to the user, pays the off-chain relayer fee, and refunds any excess native tokens. The following diagram illustrates the key steps on the source chain during a transfer: ```mermaid sequenceDiagram participant User participant SourceTBR as Source Chain TBR participant SourceTB as Source Chain Token Bridge participant Messaging as Core Messaging Layer User->>SourceTBR: Initiate transfer (token,
recipient, fees, native gas) SourceTBR->>SourceTB: Forward transfer (burn or lock tokens) SourceTB->>Messaging: Publish transfer message ``` Once the core messaging layer processes the transfer, the destination chain handles completion as shown below: ```mermaid sequenceDiagram participant Messaging as Core Messaging Layer participant Relayer as Off-chain Relayer participant DestTBR as Destination Chain TBR participant DestTB as Destination Chain
Token Bridge participant DestUser as User
(Destination Chain) Messaging->>Relayer: Emit signed VAA for transfer Relayer->>Relayer: Verifies destination chain and token registration Relayer->>DestTBR: Query native gas amount Relayer->>DestTBR: Submit signed VAA DestTBR->>DestTB: Validate VAA DestTBR->>DestTBR: Take custody of tokens DestTBR->>DestUser: Send tokens (after fees & native gas) DestTBR->>Relayer: Pay relayer fee & refund excess ``` ## Next Steps Now that you’ve seen how a transfer works try both types yourself to experience the full process: - [Get Started with Token Bridge](/docs/products/token-bridge/get-started/){target=\_blank} --- END CONTENT --- Doc-Content: https://raw.githubusercontent.com/wormhole-foundation/wormhole-docs/refs/heads/main/products/token-bridge/faqs.md --- BEGIN CONTENT --- --- title: Token Bridge FAQs description: Find answers to common questions about the Wormhole Token Bridge, including managing wrapped assets and understanding gas fees. categories: Token Bridge, Transfer --- # Token Bridge FAQs ## Can ownership of wrapped tokens be transferred from the Token Bridge? No, you cannot transfer ownership of wrapped token contracts from the [Token Bridge](/docs/products/token-bridge/overview/){target=\_blank} because the Token Bridge deploys and retains ownership of these contracts and tokens. - **On EVM chains** - when you attest a token, the Token Bridge deploys a new ERC-20 contract as a beacon proxy. The upgrade authority for these contracts is the Token Bridge contract itself - **On Solana** - the Token Bridge deploys a new SPL token, where the upgrade authority is a Program Derived Address (PDA) controlled by the Token Bridge The logic behind deploying these token contracts involves submitting an attestation VAA, which allows the Token Bridge to verify and deploy the wrapped token contract on the destination chain. Relevant contracts: - [Ethereum ERC-20](https://github.com/wormhole-foundation/wormhole/blob/main/ethereum/contracts/bridge/token/Token.sol){target=\_blank} - [Solana SPL](https://github.com/wormhole-foundation/wormhole/blob/main/solana/modules/token_bridge/program/src/api/create_wrapped.rs#L128-L145){target=\_blank} - [Attestation VAA and Token Contract Deployment Logic](https://github.com/wormhole-foundation/wormhole/blob/main/ethereum/contracts/bridge/Bridge.sol#L385-L431){target=\_blank} ## How do I update the metadata of a wrapped token? Because wrapped tokens are deployed and controlled by the Token Bridge program, which is under the authority of the Wormhole Guardians, there is no direct way for you to update their metadata. Instead, you must coordinate with the respective block explorer teams to request and apply metadata changes. ## How do I calculate the current gas costs for Ethereum Mainnet VAA verification? You can refer to the [core-bridge repository](https://github.com/nonergodic/core-bridge){target=\_blank} for guidance on how to calculate the current gas costs associated with verifying VAAs on Ethereum Mainnet. This repository provides up-to-date references and examples to help you gauge costs accurately. ## How can I update my wrapped token image on Solscan? Updating the metadata (such as the token image, name, or symbol) of a wrapped token on [Solscan](https://solscan.io/){target=\_blank} requires [contacting the Solscan team](https://solscan.io/contactus){target=\_blank} directly. Wormhole cannot make these updates for you because the wrapped token contracts are owned and controlled by the Token Bridge, not individual developers or projects. To request an update, contact Solscan via [support@solscan.io](mailto:support@solscan.io) or their [contact form](https://solscan.io/contactus){target=\_blank}. --- END CONTENT --- Doc-Content: https://raw.githubusercontent.com/wormhole-foundation/wormhole-docs/refs/heads/main/products/token-bridge/guides/attest-tokens.md --- BEGIN CONTENT --- --- title: Token Attestation description: Create and submit a token attestation to register a token for transfer with Token Bridge using the TypeScript SDK. Required before first-time transfers. categories: Token-Bridge, Transfer --- # Attest Tokens This guide demonstrates token attestation for registering a token for transfer using the [Token Bridge](/docs/products/token-bridge/overview){target=\_blank} protocol. An attestation of the token's metadata (e.g., symbol, name, decimals) ensures consistent handling by the destination chain for ease of multichain interoperability. These steps are only required the first time a token is sent to a particular destination chain. Completing this guide will help you to accomplish the following: - Verify if a wrapped version of a token exists on a destination chain. - Create and submit token attestation to register a wrapped version of a token on a destination chain. - Check for the wrapped version to become available on the destination chain and return the wrapped token address. The example will register an arbitrary ERC-20 token deployed to Moonbase Alpha for transfer to Solana but can be adapted for any [supported chains](/docs/products/reference/contract-addresses/#token-bridge){target=\_blank}. ## Prerequisites Before you begin, ensure you have the following: - [Node.js and npm](https://docs.npmjs.com/downloading-and-installing-node-js-and-npm){target=\_blank} installed on your machine. - [TypeScript](https://www.typescriptlang.org/download/){target=\_blank} installed globally. - The contract address for the token you wish to register. - A wallet setup with the following: - Private keys for your source and destination chains. - A small amount of gas tokens on your source and destination chains. ## Set Up Your Development Environment Follow these steps to initialize your project, install dependencies, and prepare your developer environment for token attestation. 1. Create a new directory and initialize a Node.js project using the following commands: ```bash mkdir attest-token cd attest-token npm init -y ``` 2. Install dependencies, including the [Wormhole TypeScript SDK]({{repositories.wormhole_sdk.repository_url}}){target=\_blank}: ```bash npm install @wormhole-foundation/sdk -D tsx typescript ``` 3. Set up secure access to your wallets. This guide assumes you are loading your private key values from a secure keystore of your choice, such as a secrets manager or a CLI-based tool like [`cast wallet`](https://book.getfoundry.sh/reference/cast/cast-wallet){target=\_blank}. !!! warning If you use a `.env` file during development, add it to your `.gitignore` to exclude it from version control. Never commit private keys or mnemonics to your repository. 4. Create a new file named `helper.ts` to hold signer functions: ```bash touch helper.ts ``` 5. Open `helper.ts` and add the following code: ```typescript title="helper.ts" import { Chain, ChainAddress, ChainContext, Wormhole, Network, Signer, } from '@wormhole-foundation/sdk'; import type { SignAndSendSigner } from '@wormhole-foundation/sdk'; import evm from '@wormhole-foundation/sdk/evm'; import solana from '@wormhole-foundation/sdk/solana'; import sui from '@wormhole-foundation/sdk/sui'; /** * Returns a signer for the given chain using locally scoped credentials. * The required values (EVM_PRIVATE_KEY, SOL_PRIVATE_KEY, SUI_MNEMONIC) must * be loaded securely beforehand, for example via a keystore, secrets * manager, or environment variables (not recommended). */ export async function getSigner( chain: ChainContext ): Promise<{ chain: ChainContext; signer: SignAndSendSigner; address: ChainAddress; }> { let signer: Signer; const platform = chain.platform.utils()._platform; // Customize the signer by adding or removing platforms as needed. Be sure // to import the necessary packages for the platforms you want to support switch (platform) { case 'Evm': signer = await ( await evm() ).getSigner(await chain.getRpc(), EVM_PRIVATE_KEY!); break; case 'Solana': signer = await ( await solana() ).getSigner(await chain.getRpc(), SOL_PRIVATE_KEY!); break; case 'Sui': signer = await ( await sui() ).getSigner(await chain.getRpc(), SUI_MNEMONIC!); break; default: throw new Error(`Unsupported platform: ${platform}`); } const typedSigner = signer as SignAndSendSigner; return { chain, signer: typedSigner, address: Wormhole.chainAddress(chain.chain, signer.address()), }; } ``` You can view the list of [supported platform constants]({{repositories.wormhole_sdk.repository_url}}/blob/{{repositories.wormhole_sdk.version}}/core/base/src/constants/platforms.ts#L6){target=_blank} in the Wormhole SDK GitHub repo. ## Check for a Wrapped Version of a Token If you are working with a newly created token that you know has never been transferred to the destination chain, you can continue to the [Create Attestation on the Source Chain](#create-attestation-on-the-source-chain) section. Since attestation is a one-time process, it is good practice when working with existing tokens to incorporate a check for wrapped versions into your Token Bridge transfer flow. Follow these steps to check for a wrapped version of a token: 1. Create a new file called `attest.ts` to hold the wrapped version check and attestation logic: ```bash touch attest.ts ``` 2. Open `attest.ts` and add the following code: ```typescript title="attest.ts" wormhole, Wormhole, TokenId, TokenAddress, } from '@wormhole-foundation/sdk'; import { signSendWait, toNative } from '@wormhole-foundation/sdk-connect'; import evm from '@wormhole-foundation/sdk/evm'; import solana from '@wormhole-foundation/sdk/solana'; import { getSigner } from './helper'; async function attestToken() { // Initialize wormhole instance, define the network, platforms, and chains const wh = await wormhole('Testnet', [evm, solana]); const sourceChain = wh.getChain('Moonbeam'); const destinationChain = wh.getChain('Solana'); // Define the token to check for a wrapped version const tokenId: TokenId = Wormhole.tokenId( sourceChain.chain, 'INSERT_TOKEN_CONTRACT_ADDRESS' ); // Check if the token is registered with the destination chain Token Bridge contract // Registered = returns the wrapped token ID // Not registered = runs the attestation flow to register the token let wrappedToken: TokenId; try { wrappedToken = await wh.getWrappedAsset(destinationChain.chain, tokenId); console.log( '✅ Token already registered on destination:', wrappedToken.address ); } catch (e) { // Attestation on the source chain flow code console.log( '⚠️ Token is NOT registered on destination. Running attestation flow...' ); } attestToken().catch((e) => { console.error('❌ Error in attestToken', e); process.exit(1); }); ``` After initializing a Wormhole instance and defining the source and destination chains, this code does the following: - **Defines the token to check**: Use the contract address on the source chain for this value. - **Calls [`getWrappedAsset`]({{repositories.wormhole_sdk.repository_url}}/blob/{{repositories.wormhole_sdk.version}}/connect/src/wormhole.ts#L205){target=\_blank}**: Part of the [`Wormhole` class]({{repositories.wormhole_sdk.repository_url}}/blob/{{repositories.wormhole_sdk.version}}/connect/src/wormhole.ts#L47){target=\_blank}, the method does the following: - Accepts a [`TokenId`]({{repositories.wormhole_sdk.repository_url}}/blob/{{repositories.wormhole_sdk.version}}/platforms/aptos/protocols/tokenBridge/src/types.ts#L12){target=\_blank} representing a token on the source chain. - Checks for a corresponding wrapped version of the destination chain's Token Bridge contract. - Returns the `TokenId` for the wrapped token on the destination chain if a wrapped version exists. 3. Run the script using the following command: ```bash npx tsx attest.ts ``` 4. If the token has a wrapped version registered with the destination chain Token Bridge contract, you will see terminal output similar to the following:
npx tsx attest.ts ✅ Token already registered on destination: SolanaAddress { type: 'Native', address: PublicKey [PublicKey(2qjSAGrpT2eTb673KuGAR5s6AJfQ1X5Sg177Qzuqt7yB)] { _bn: BN: 1b578bb9b7a04a1aab3b5b64b550d8fc4f73ab343c9cf8532d2976b77ec4a8ca } }
You can safely use Token Bridge to transfer this token to the destination chain. If a wrapped version isn't found on the destination chain, your terminal output will be similar to the following and you must attest the token before transfer:
npx tsx attest.ts ⚠️ Token is NOT registered on destination. Running attestation flow...
## Create Attestation on the Source Chain To create the attestation transaction on the source chain, open `attest.ts` and replace the `// Attestation flow code` comment with the following code: ```typescript title="attest.ts" const tb = await sourceChain.getTokenBridge(); // Get the signer for the source chain const sourceSigner = await getSigner(sourceChain); // Define the token to attest and a payer address const token: TokenAddress = toNative( sourceChain.chain, tokenId.address.toString() ); const payer = toNative(sourceChain.chain, sourceSigner.signer.address()); // Create a new attestation and sign and send the transaction for await (const tx of tb.createAttestation(token, payer)) { const txids = await signSendWait( sourceChain, tb.createAttestation(token), sourceSigner.signer ); // Attestation on the destination chain flow code console.log('✅ Attestation transaction sent:', txids); ``` This code does the following: - **Gets the source chain Token Bridge context**: This is where the transaction is sent to create the attestation. - Defines the token to attest and the payer. - **Calls `createAttestation`**: Defined in the [`TokenBridge` interface]({{repositories.wormhole_sdk.repository_url}}/blob/{{repositories.wormhole_sdk.version}}/core/definitions/src/protocols/tokenBridge/tokenBridge.ts#L123){target=\_blank}, the [`createAttestation`]({{repositories.wormhole_sdk.repository_url}}/blob/{{repositories.wormhole_sdk.version}}/core/definitions/src/protocols/tokenBridge/tokenBridge.ts#L188){target=\_blank} method does the following: - Accepts a `TokenAddress` representing the token on its native chain. - Accepts an optional `payer` address to cover the transaction fees for the attestation transaction. - Prepares an attestation for the token including metadata such as address, symbol, and decimals. - Returns an `AsyncGenerator` that yields unsigned transactions, which are then signed and sent to initiate the attestation process on the source chain. ## Submit Attestation on Destination Chain The attestation flow finishes with the following: - Using the transaction ID returned from the `createAttestation` transaction on the source chain to retrieve the associated signed `TokenBridge:AttestMeta` VAA. - Submitting the signed VAA to the destination chain to provide Guardian-backed verification of the attestation transaction on the source chain. - The destination chain uses the attested metadata to create the wrapped version of the token and register it with its Token Bridge contract. Follow these steps to complete your attestation flow logic: 1. Add the following code to `attest.ts`: ```typescript title="attest.ts" const messages = await sourceChain.parseTransaction(txids[0].txid); console.log('✅ Attestation messages:', messages); // Set a timeout for fetching the VAA, this can take several minutes // depending on the source chain network and finality const timeout = 25 * 60 * 1000; // Fetch the VAA for the attestation message const vaa = await wh.getVaa( messages[0]!, 'TokenBridge:AttestMeta', timeout ); if (!vaa) throw new Error('❌ VAA not found before timeout.'); // Get the Token Bridge context for the destination chain // and submit the attestation VAA const destTb = await destinationChain.getTokenBridge(); // Get the signer for the destination chain const destinationSigner = await getSigner(destinationChain); const payer = toNative( destinationChain.chain, destinationSigner.signer.address() ); const destTxids = await signSendWait( destinationChain, destTb.submitAttestation(vaa, payer), destinationSigner.signer ); console.log('✅ Attestation submitted on destination:', destTxids); } // Poll for the wrapped token to appear on the destination chain const maxAttempts = 50; // ~5 minutes with 6s interval const interval = 6000; let attempt = 0; let registered = false; while (attempt < maxAttempts && !registered) { attempt++; try { const wrapped = await wh.getWrappedAsset( destinationChain.chain, tokenId ); console.log( `✅ Wrapped token is now available on ${destinationChain.chain}:`, wrapped.address ); registered = true; } catch { console.log( `⏳ Waiting for wrapped token to register on ${destinationChain.chain}...` ); await new Promise((res) => setTimeout(res, interval)); } } if (!registered) { throw new Error( `❌ Token attestation did not complete in time on ${destinationChain.chain}` ); } console.log( `🚀 Token attestation complete! Token registered with ${destinationChain.chain}.` ); ``` 2. Run the script using the following command: ```bash npx tsx attest.ts ``` 3. You will see terminal output similar to the following:
npx tsx attest.ts ⚠️ Token is NOT registered on destination. Running attestation flow... ✅ Attestation transaction sent: [ { chain: 'Moonbeam', txid: '0xbaf7429e1099cac6f39ef7e3c30e38776cfb5b6be837dcd8793374c8ee491799' } ] ✅ Attestation messages: [ { chain: 'Moonbeam', emitter: UniversalAddress { address: [Uint8Array] }, sequence: 1507n } ] Retrying Wormholescan:GetVaaBytes, attempt 0/750 Retrying Wormholescan:GetVaaBytes, attempt 1/750 ..... Retrying Wormholescan:GetVaaBytes, attempt 10/750 📨 Submitting attestation VAA to Solana... ✅ Attestation submitted on destination: [ { chain: 'Solana', txid: '3R4oF5P85jK3wKgkRs5jmE8BBLoM4wo2hWSgXXL6kA8efbj2Vj9vfuFSb53xALqYZuv3FnXDwJNuJfiKKDwpDH1r' } ] ✅ Wrapped token is now available on Solana: SolanaAddress { type: 'Native', address: PublicKey [PublicKey(2qjSAGrpT2eTb673KuGAR5s6AJfQ1X5Sg177Qzuqt7yB)] { _bn: BN: 1b578bb9b7a04a1aab3b5b64b550d8fc4f73ab343c9cf8532d2976b77ec4a8ca } } 🚀 Token attestation complete!
??? example "View complete script" ```typescript title="attest.ts" import { wormhole, Wormhole, TokenId, TokenAddress, } from '@wormhole-foundation/sdk'; import { signSendWait, toNative } from '@wormhole-foundation/sdk-connect'; import evm from '@wormhole-foundation/sdk/evm'; import solana from '@wormhole-foundation/sdk/solana'; import { getSigner } from './helper'; async function attestToken() { // Initialize wormhole instance, define the network, platforms, and chains const wh = await wormhole('Testnet', [evm, solana]); const sourceChain = wh.getChain('Moonbeam'); const destinationChain = wh.getChain('Solana'); // Define the token to check for a wrapped version const tokenId: TokenId = Wormhole.tokenId( sourceChain.chain, 'INSERT_TOKEN_CONTRACT_ADDRESS' ); // Check if the token is registered with the destination chain Token Bridge contract // Registered = returns the wrapped token ID // Not registered = runs the attestation flow to register the token let wrappedToken: TokenId; try { wrappedToken = await wh.getWrappedAsset(destinationChain.chain, tokenId); console.log( '✅ Token already registered on destination:', wrappedToken.address ); } catch (e) { // Attestation on the source chain flow code console.log( '⚠️ Token is NOT registered on destination. Running attestation flow...' ); // Retrieve the Token Bridge context for the source chain const tb = await sourceChain.getTokenBridge(); // Get the signer for the source chain const sourceSigner = await getSigner(sourceChain); // Define the token to attest and a payer address const token: TokenAddress = toNative( sourceChain.chain, tokenId.address.toString() ); const payer = toNative(sourceChain.chain, sourceSigner.signer.address()); // Create a new attestation and sign and send the transaction for await (const tx of tb.createAttestation(token, payer)) { const txids = await signSendWait( sourceChain, tb.createAttestation(token), sourceSigner.signer ); // Attestation on the destination chain flow code console.log('✅ Attestation transaction sent:', txids); // Parse the transaction to get Wormhole message ID const messages = await sourceChain.parseTransaction(txids[0].txid); console.log('✅ Attestation messages:', messages); // Set a timeout for fetching the VAA, this can take several minutes // depending on the source chain network and finality const timeout = 25 * 60 * 1000; // Fetch the VAA for the attestation message const vaa = await wh.getVaa( messages[0]!, 'TokenBridge:AttestMeta', timeout ); if (!vaa) throw new Error('❌ VAA not found before timeout.'); // Get the Token Bridge context for the destination chain // and submit the attestation VAA const destTb = await destinationChain.getTokenBridge(); // Get the signer for the destination chain const destinationSigner = await getSigner(destinationChain); const payer = toNative( destinationChain.chain, destinationSigner.signer.address() ); const destTxids = await signSendWait( destinationChain, destTb.submitAttestation(vaa, payer), destinationSigner.signer ); console.log('✅ Attestation submitted on destination:', destTxids); } // Poll for the wrapped token to appear on the destination chain const maxAttempts = 50; // ~5 minutes with 6s interval const interval = 6000; let attempt = 0; let registered = false; while (attempt < maxAttempts && !registered) { attempt++; try { const wrapped = await wh.getWrappedAsset( destinationChain.chain, tokenId ); console.log( `✅ Wrapped token is now available on ${destinationChain.chain}:`, wrapped.address ); registered = true; } catch { console.log( `⏳ Waiting for wrapped token to register on ${destinationChain.chain}...` ); await new Promise((res) => setTimeout(res, interval)); } } if (!registered) { throw new Error( `❌ Token attestation did not complete in time on ${destinationChain.chain}` ); } console.log( `🚀 Token attestation complete! Token registered with ${destinationChain.chain}.` ); } } attestToken().catch((e) => { console.error('❌ Error in attestToken', e); process.exit(1); }); ``` Congratulations! You've successfully created and submitted an attestation to register a token for transfer via Token Bridge. ## Next Steps - [**Transfer Wrapped Assets**](/docs/products/token-bridge/guides/attest-tokens): Follow this guide to incorporate token attestation and registration into an end-to-end Token Bridge transfer flow. --- END CONTENT --- Doc-Content: https://raw.githubusercontent.com/wormhole-foundation/wormhole-docs/refs/heads/main/products/token-bridge/guides/fetch-signed-vaa.md --- BEGIN CONTENT --- --- title: Fetch a Signed VAA description: Learn how to fetch a signed VAA, a key step in the Token Bridge manual transfer flow. categories: Token-Bridge, Transfer --- # Fetch a Signed VAA This guide demonstrates how to fetch a signed [Verified Action Approval (VAA)](/docs/protocol/infrastructure/vaas/){target=\_blank}, first programmatically using the [TypeScript SDK](/docs/tools/typescript-sdk/get-started/){target=\_blank}, then manually using the [Wormholescan](https://wormholescan.io/){target=\_blank} explorer. VAA retrieval is a key step in manual messaging and transfer flows. Knowing how to locate a relevant VAA can also help with debugging and monitoring transactions while building out your integration. ## Prerequisites Before you begin, ensure you have the following installed: - [Node.js and npm](https://docs.npmjs.com/downloading-and-installing-node-js-and-npm){target=_blank} - [TypeScript](https://www.typescriptlang.org/download/){target=_blank} (installed globally) ## Set Up Your Developer Environment Follow these steps to initialize your project, install dependencies, and prepare your developer environment: 1. Create a new directory and initialize a Node.js project using the following commands: ```bash mkdir fetch-vaa cd fetch-vaa npm init -y ``` 2. Install dependencies, including the [Wormhole TypeScript SDK](https://github.com/wormhole-foundation/wormhole-sdk-ts){target=\_blank}: ```bash npm install @wormhole-foundation/sdk -D tsx typescript ``` ## Fetch VAA via TypeScript SDK Follow these steps to search for and retrieve a VAA using the TypeScript SDK: 1. Create a new file called `fetch-vaa.ts` using the following command: ```bash touch fetch-vaa.ts ``` 2. Open your `fetch-vaa.ts` file and add the following code: ```typescript title="fetch-vaa.ts" import { wormhole } from '@wormhole-foundation/sdk'; import evm from '@wormhole-foundation/sdk/evm'; import { serialize } from '@wormhole-foundation/sdk-definitions'; import { toChainId } from '@wormhole-foundation/sdk-base'; async function main() { // Initialize the Wormhole SDK with the network and platform // to match the source chain for the transaction ID const wh = await wormhole('Testnet', [evm]); // Source chain transaction ID for the VAA you want to fetch const txid = 'INSERT_TRANSACTION_ID'; // Call getVaa to fetch the VAA associated with the transaction ID // and decode returned data into a human-readable format const vaa = await wh.getVaa(txid, 'Uint8Array', 60000); if (!vaa) { console.error('❌ VAA not found'); process.exit(1); } const { emitterChain, emitterAddress, sequence } = vaa; const chainId = toChainId(emitterChain); const emitterHex = emitterAddress.toString(); const vaaBytes = serialize(vaa); const vaaHex = Buffer.from(vaaBytes).toString('hex'); console.log('✅ VAA Info'); console.log(`Chain: ${chainId}`); console.log(`Emitter: ${emitterHex}`); console.log(`Sequence: ${sequence}`); console.log('---'); console.log(`VAA Bytes (hex):\n${vaaHex}`); // Return the VAA object for further processing if needed return vaa; } main().catch(console.error); ``` This code does the following: - Initializes a Wormhole instance with the same `network` and `platform` as the source chain transfer transaction. - Accepts the transaction ID from the source chain transfer transaction. - Prints the associated `chain`, `emitter`, `sequence`, and VAA bytes to the terminal. - Returns the `vaa` object for any further processing. 3. Run the script with the following command: ```bash npx tsx fetch-vaa.ts ``` 4. You will see terminal output similar to the following:
npx tsx fetch-vaa.ts ✅ VAA Info Chain: 16 Emitter: 0x000000000000000000000000bc976d4b9d57e57c3ca52e1fd136c45ff7955a96 Sequence: 1512 --- VAA Bytes (hex): 010000000001004d34d189b894acf4c16b9f456f908ca8b60aa9b2fa77cfa6ebc18f864818c21a7e18b6c4f72415f441be4d2b666c5b897d354cec0e950b935b15806d002d39670168557fb6000000000010000000000000000000000000bc976d4b9d57e57c3ca52e1fd136c45ff7955a9600000000000005e8010100000000000000000000000000000000000000000000000000000000009896800000000000000000000000009b2ff7b2b5a459853224a3317b786d8e85026660001084b1e2f8a26ddff1a55eed46add73a9b556256f2afda1072f6cfdab1dcb2d53000010000000000000000000000000000000000000000000000000000000000000000
## Fetch VAA via Wormholescan You can also use [Wormholescan's](https://wormholescan.io/){target=\_blank} UI to manually search for a VAA using the source transaction ID, VAA ID, or a wallet address. This type of quick search is helpful during debugging or testing of your integration. Follow these steps to fetch a VAA using Wormholescan: 1. On [Wormholescan](https://wormholescan.io/){target=\_blank}, use the dropdown menu in the top right corner to select either **Mainnet** or **Testnet**. 2. Enter your transaction ID in the search bar and select "return" or "enter" to submit your search request. Alternatively, you can enter the wallet address of the transaction signer and return any transactions under that account. ![](/docs/images/products/token-bridge/guides/fetch-vaa/fetch-vaa-1.webp) 3. Inspect the returned search results. Note that the source transaction ID, current status, transaction details, and the VAA ID are included. ![](/docs/images/products/token-bridge/guides/fetch-vaa/fetch-vaa-2.webp) Congratulations! You've now fetched a signed VAA using both the TypeScript SDK and Wormholescan UI. These skills are valuable when developing manual transfer or messaging processes, as well as debugging and testing an integration build. --- END CONTENT --- Doc-Content: https://raw.githubusercontent.com/wormhole-foundation/wormhole-docs/refs/heads/main/products/token-bridge/guides/token-bridge-contracts.md --- BEGIN CONTENT --- --- title: Get Started with Token Bridge description: Learn how to integrate Wormhole's Token Bridge for seamless multichain token transfers with a lock-and-mint mechanism and cross-chain asset management. categories: Token Bridge, Transfer --- # Interact with Token Bridge Contracts Wormhole's Token Bridge enables seamless cross-chain token transfers using a lock-and-mint mechanism. The bridge locks tokens on the source chain and mints them as wrapped assets on the destination chain. Additionally, the Token Bridge supports [Token Transfers with Messages](/docs/protocol/infrastructure/vaas/#token-transfer-with-message){target=\_blank}, where arbitrary byte payloads can be attached to the token transfer, enabling more complex chain interactions. This page outlines the core contract methods needed to integrate Token Bridge functionality into your smart contracts. To understand the theoretical workings of the Token Bridge, refer to the [Token Bridge](/docs/products/token-bridge/overview/){target=\_blank} page in the Learn section. ## Prerequisites To interact with the Wormhole Token Bridge, you'll need the following: - [The address of the Token Bridge contract](/docs/products/reference/contract-addresses/#token-bridge){target=\_blank} on the chains you're working with - [The Wormhole chain ID](/docs/products/reference/chain-ids/){target=\_blank} of the chains you're targeting for token transfers ## How to Interact with Token Bridge Contracts The primary functions of the Token Bridge contracts revolve around: - **Attesting a token** - registering a new token for cross-chain transfers - **Transferring tokens** - locking and minting tokens across chains - **Transferring tokens with a payload** - including additional data with transfers ### Attest a Token Suppose a token has never been transferred to the target chain before transferring it cross-chain. In that case, its metadata must be registered so the Token Bridge can recognize it and create a wrapped version if necessary. The attestation process doesn't require you to manually input token details like name, symbol, or decimals. Instead, the Token Bridge contract retrieves these values from the token contract itself when you call the `attestToken()` method. ```solidity function attestToken( address tokenAddress, uint32 nonce ) external payable returns (uint64 sequence); ``` ??? interface "Parameters" `tokenAddress` ++"address"++ The contract address of the token to be attested. --- `nonce` ++"uint32"++ An arbitrary value provided by the caller to ensure uniqueness. ??? interface "Returns" `sequence` ++"uint64"++ A unique identifier for the attestation transaction. ??? interface "Example" ```solidity IWormhole wormhole = IWormhole(wormholeAddr); ITokenBridge tokenBridge = ITokenBridge(tokenBridgeAddr); uint256 wormholeFee = wormhole.messageFee(); tokenBridge.attestToken{value: wormholeFee}( address(tokenImpl), // the token contract to attest 234 // nonce for the transfer ); ``` When `attestToken()` is called, the contract emits a Verifiable Action Approval (VAA) containing the token's metadata, which the Guardians sign and publish. You must ensure the token is ERC-20 compliant. If it does not implement the standard functions, the attestation may fail or produce incomplete metadata. ### Transfer Tokens Once a token is attested, a cross-chain token transfer can be initiated following the lock-and-mint mechanism. On the source chain, tokens are locked (or burned if they're already a wrapped asset), and a VAA is emitted. On the destination chain, that VAA is used to mint or release the corresponding amount of wrapped tokens. Call `transferTokens()` to lock/burn tokens and produce a VAA with transfer details. ```solidity function transferTokens( address token, uint256 amount, uint16 recipientChain, bytes32 recipient, uint256 arbiterFee, uint32 nonce ) external payable returns (uint64 sequence); ``` ??? interface "Parameters" `token` ++"address"++ The address of the token being transferred. --- `amount` ++"uint256"++ The amount of tokens to be transferred. --- `recipientChain` ++"uint16"++ The Wormhole chain ID of the destination chain. --- `recipient` ++"bytes32"++ The recipient's address on the destination chain. --- `arbiterFee` ++"uint256"++ Optional fee to be paid to an arbiter for relaying the transfer. --- `nonce` ++"uint32"++ A unique identifier for the transaction. ??? interface "Returns" `sequence` ++"uint64"++ A unique identifier for the transfer transaction. ??? interface "Example" ```solidity IWormhole wormhole = IWormhole(wormholeAddr); ITokenBridge tokenBridge = ITokenBridge(tokenBridgeAddr); // Get the fee for publishing a message uint256 wormholeFee = wormhole.messageFee(); tokenBridge.transferTokens{value: wormholeFee}( token, // address of the ERC-20 token to transfer amount, // amount of tokens to transfer recipientChain, // Wormhole chain ID of the destination chain recipient, // recipient address on the destination chain (as bytes32) arbiterFee, // fee for relayer nonce // nonce for this transfer ); ``` Once a transfer VAA is obtained from the Wormhole Guardian network, the final step is to redeem the tokens on the destination chain. Redemption verifies the VAA's authenticity and releases (or mints) tokens to the specified recipient. To redeem the tokens, call `completeTransfer()`. ```solidity function completeTransfer(bytes memory encodedVm) external; ``` ??? interface "Parameters" `encodedVm` ++"bytes memory"++ The signed VAA containing the transfer details. !!!note - The Token Bridge normalizes token amounts to 8 decimals when passing them between chains. Make sure your application accounts for potential decimal truncation - The VAA ensures the integrity of the message. Only after the Guardians sign the VAA can it be redeemed on the destination chain ### Transfer Tokens with Payload While a standard token transfer moves tokens between chains, a transfer with a payload allows you to embed arbitrary data in the VAA. This data can be used on the destination chain to execute additional logic—such as automatically depositing tokens into a DeFi protocol, initiating a swap on a DEX, or interacting with a custom smart contract. Call `transferTokensWithPayload()` instead of `transferTokens()` to include a custom payload (arbitrary bytes) with the token transfer. ```solidity function transferTokensWithPayload( address token, uint256 amount, uint16 recipientChain, bytes32 recipient, uint32 nonce, bytes memory payload ) external payable returns (uint64 sequence); ``` ??? interface "Parameters" `token` ++"address"++ The address of the token being transferred. --- `amount` ++"uint256"++ The amount of tokens to be transferred. --- `recipientChain` ++"uint16"++ The Wormhole chain ID of the destination chain. --- `recipient` ++"bytes32"++ The recipient's address on the destination chain. --- `nonce` ++"uint32"++ A unique identifier for the transaction. --- `payload` ++"bytes memory"++ Arbitrary data payload attached to the transaction. ??? interface "Returns" `sequence` ++"uint64"++ A unique identifier for the transfer transaction. ??? interface "Example" ```solidity IWormhole wormhole = IWormhole(wormholeAddr); ITokenBridge tokenBridge = ITokenBridge(tokenBridgeAddr); // Get the fee for publishing a message uint256 wormholeFee = wormhole.messageFee(); tokenBridge.transferTokensWithPayload{value: wormholeFee}( token, // address of the ERC-20 token to transfer amount, // amount of tokens to transfer recipientChain, // Wormhole chain ID of the destination chain recipient, // recipient address on the destination chain (as bytes32) nonce, // nonce for this transfer additionalPayload // additional payload data ); ``` After initiating a transfer on the source chain, the Wormhole Guardian network observes and signs the resulting message, creating a Verifiable Action Approval (VAA). You'll need to fetch this VAA and then call `completeTransferWithPayload()`. Only the designated recipient contract can redeem tokens. This ensures that the intended contract securely handles the attached payload. On successful redemption, the tokens are minted (if foreign) or released (if native) to the recipient address on the destination chain. For payload transfers, the designated contract can execute the payload's logic at this time. ```solidity function completeTransferWithPayload(bytes memory encodedVm) external returns (bytes memory); ``` ??? interface "Parameters" `encodedVm` ++"bytes memory"++ The signed VAA containing the transfer details. ??? interface "Returns" `bytes memory` The extracted payload data. ## Source Code References For a deeper understanding of the Token Bridge implementation and to review the actual source code, please refer to the following links: - [Token Bridge contract](https://github.com/wormhole-foundation/wormhole/blob/main/ethereum/contracts/bridge/Bridge.sol){target=\_blank} - [Token Bridge interface](https://github.com/wormhole-foundation/wormhole-solidity-sdk/blob/main/src/interfaces/ITokenBridge.sol){target=\_blank} ## Portal Bridge A practical implementation of the Wormhole Token Bridge can be seen in [Portal Bridge](https://portalbridge.com/){target=\_blank}, which provides an easy-to-use interface for transferring tokens across multiple blockchain networks. It leverages the Wormhole infrastructure to handle cross-chain asset transfers seamlessly, offering users a convenient way to bridge their assets while ensuring security and maintaining token integrity. --- END CONTENT --- Doc-Content: https://raw.githubusercontent.com/wormhole-foundation/wormhole-docs/refs/heads/main/products/token-bridge/portal/faqs.md --- BEGIN CONTENT --- --- title: Portal Bridge FAQs description: Learn how to use deep-linking on Portal Bridge and send tokens to any wallet address with simple URL parameters and custom recipient fields. categories: Token Bridge, Transfer --- # FAQs ## How do I use deep-linking with Portal? You can create a direct link to pre-fill chain and asset selections on [Portal Bridge](https://portalbridge.com){target=\_blank} using URL parameters. | Parameter | Description | |---------------|------------------------------------------------------------| | `sourceChain` | A source chain that will be pre-selected | | `targetChain` | A target chain that will be pre-selected | | `asset` | The asset key on the source chain (e.g., SOL, USDC, etc.) | | `targetAsset` | The asset key on the destination chain | Example: ```bash https://portalbridge.com/?sourceChain=solana&targetChain=ethereum&asset=SOL&targetAsset=WSOL ``` This link will open Portal with: - **`sourceChain`** pre-selected as `solana` - **`targetChain`** pre-selected as `ethereum` - **`asset`** pre-selected as `SOL` - **`targetAsset`** pre-selected as `WSOL` !!! note For [**NTT tokens**](/docs/products/native-token-transfers/overview/){target=\_blank}, you can define just one asset if the same token exists across chains. Example: [https://portalbridge.com/?sourceChain=ethereum&targetChain=solana&asset=W](https://portalbridge.com/?sourceChain=ethereum&targetChain=solana&asset=W){target=\_blank} ## What does the "Send to a wallet address" field do? After selecting your tokens and connecting your source wallet on [Portal](https://portalbridge.com/){target=\_blank}, you'll be prompted to connect your destination wallet. At this step, alongside wallet options like MetaMask or Phantom, you'll also see an option labeled "Send to a wallet address". This flexibility allows you to enter any wallet address as the recipient rather than connecting a destination wallet, enabling you to send tokens to a predefined recipient, such as a team wallet, treasury address, or cold storage wallet. ![](/docs/images/products/token-bridge/portal-bridge/faqs/portal-wallet-address.webp){.half} This field is optional. If left empty, the tokens will be sent to your connected wallet. --- END CONTENT --- ## Shared Concepts from basics The following section contains foundational documentation shared across all Wormhole products. It describes the architecture and messaging infrastructure that serve as the backbone for all integrations built with Wormhole. This context is provided to help understand how the system works under the hood, but responses should stay focused on the specific product unless the user explicitly asks about the general architecture. --- ## List of Shared Concept Pages: Doc-Page: https://raw.githubusercontent.com/wormhole-foundation/wormhole-docs/refs/heads/main/products/messaging/overview.md [type: overview] Doc-Page: https://raw.githubusercontent.com/wormhole-foundation/wormhole-docs/refs/heads/main/products/overview.md [type: overview] Doc-Page: https://raw.githubusercontent.com/wormhole-foundation/wormhole-docs/refs/heads/main/products/messaging/get-started.md [type: get-started] Doc-Page: https://raw.githubusercontent.com/wormhole-foundation/wormhole-docs/refs/heads/main/products/reference/glossary.md [type: reference] Doc-Page: https://raw.githubusercontent.com/wormhole-foundation/wormhole-docs/refs/heads/main/products/messaging/guides/core-contracts.md [type: guide] Doc-Page: https://raw.githubusercontent.com/wormhole-foundation/wormhole-docs/refs/heads/main/products/messaging/guides/wormhole-relayers.md [type: guide] Doc-Page: https://raw.githubusercontent.com/wormhole-foundation/wormhole-docs/refs/heads/main/products/messaging/tutorials/cross-chain-contracts.md [type: tutorial] Doc-Page: https://raw.githubusercontent.com/wormhole-foundation/wormhole-docs/refs/heads/main/products/messaging/tutorials/cross-chain-token-contracts.md [type: tutorial] Doc-Page: https://raw.githubusercontent.com/wormhole-foundation/wormhole-docs/refs/heads/main/products/messaging/tutorials/replace-signatures.md [type: tutorial] Doc-Page: https://raw.githubusercontent.com/wormhole-foundation/wormhole-docs/refs/heads/main/protocol/architecture.md [type: other] Doc-Page: https://raw.githubusercontent.com/wormhole-foundation/wormhole-docs/refs/heads/main/protocol/ecosystem.md [type: other] Doc-Page: https://raw.githubusercontent.com/wormhole-foundation/wormhole-docs/refs/heads/main/protocol/infrastructure/core-contracts.md [type: other] Doc-Page: https://raw.githubusercontent.com/wormhole-foundation/wormhole-docs/refs/heads/main/protocol/infrastructure/guardians.md [type: other] Doc-Page: https://raw.githubusercontent.com/wormhole-foundation/wormhole-docs/refs/heads/main/protocol/infrastructure/relayer.md [type: other] Doc-Page: https://raw.githubusercontent.com/wormhole-foundation/wormhole-docs/refs/heads/main/protocol/infrastructure/spy.md [type: other] Doc-Page: https://raw.githubusercontent.com/wormhole-foundation/wormhole-docs/refs/heads/main/protocol/infrastructure/vaas.md [type: other] Doc-Page: https://raw.githubusercontent.com/wormhole-foundation/wormhole-docs/refs/heads/main/protocol/introduction.md [type: other] Doc-Page: https://raw.githubusercontent.com/wormhole-foundation/wormhole-docs/refs/heads/main/protocol/security.md [type: other] ## Full content for shared concepts: Doc-Content: https://raw.githubusercontent.com/wormhole-foundation/wormhole-docs/refs/heads/main/products/messaging/overview.md --- BEGIN CONTENT --- --- title: Messaging Overview description: With Wormhole Messaging, you can enable secure, multichain communication, build multichain apps, sync data, and coordinate actions across blockchains. categories: Basics --- # Messaging Overview Wormhole Messaging is the core protocol of the Wormhole ecosystem—a generic, multichain message-passing layer that enables secure, fast communication between blockchains. It solves the critical problem of blockchain isolation by allowing data and assets to move freely across networks, empowering developers to build true multichain applications. ## Key Features - **Multichain messaging**: Send arbitrary data between blockchains, enabling xDapps, governance actions, or coordination across ecosystems. - **Decentralized validation**: A network of independent [Guardians](/docs/protocol/infrastructure/guardians/){target=\_blank} observes and signs multichain messages, producing [Verifiable Action Approvals (VAAs)](/docs/protocol/infrastructure/vaas/){target=\_blank} that ensure integrity. - **Composable architecture**: Works with smart contracts, token bridges, or decentralized applications, providing a flexible foundation for multichain use cases. ## How It Works The messaging flow consists of several core components: 1. **Source chain (emitter contract)**: A contract emits a message by calling the Wormhole [Core Contract](/docs/protocol/infrastructure/core-contracts/){target=\_blank} on the source chain. 2. **Guardian Network**: [Guardians](/docs/protocol/infrastructure/guardians/){target=\_blank} observe the message, validate it, and generate a signed [VAA](/docs/protocol/infrastructure/vaas/){target=\_blank}. 3. **Relayers**: Off-chain or on-chain [relayers](/docs/protocol/infrastructure/relayer/){target=\_blank} transport the VAA to the destination chain. 4. **Target chain (recipient contract)**: The [Core Contract](/docs/protocol/infrastructure/core-contracts/){target=\_blank} on the destination chain verifies the VAA and triggers the specified application logic. ![Wormhole architecture detailed diagram: source to target chain communication.](/docs/images/protocol/architecture/architecture-1.webp) ## Use Cases Wormhole Messaging enables a wide range of multichain applications. Below are common use cases and the Wormhole stack components you can use to build them. - **Borrowing and Lending Across Chains (e.g., [Folks Finance](https://wormhole.com/case-studies/folks-finance){target=\_blank})** - [**Messaging**](/docs/products/messaging/get-started/){target=\_blank}: Coordinate actions across chains. - [**Native Token Transfers**](/docs/products/native-token-transfers/overview/){target=\_blank}: Transfer collateral as native assets. - [**Queries**](/docs/products/queries/overview/){target=\_blank}: Fetch rates and prices in real-time. - **Oracle Networks (e.g., [Pyth](https://wormhole.com/case-studies/pyth){target=\_blank})** - [**Messaging**](/docs/products/messaging/get-started/){target=\_blank}: Relay verified data. - [**Queries**](/docs/products/queries/overview/){target=\_blank}: Aggregate multi-chain sources. - **Gas Abstraction** - [**Messaging**](/docs/products/messaging/get-started/){target=\_blank}: Coordinate gas logic. - [**Native Token Transfers**](/docs/products/native-token-transfers/overview/){target=\_blank}: Handle native token swaps. - **Bridging Intent Library** - [**Messaging**](/docs/products/messaging/get-started/){target=\_blank}: Dispatch and execute intents. - [**Settlement**](/docs/products/settlement/overview/){target=\_blank}: Execute user-defined bridging intents. - **Decentralized Social Platforms (e.g., [Chingari](https://chingari.io/){target=\_blank})** - [**Messaging**](/docs/products/messaging/get-started/){target=\_blank}: Facilitate decentralized interactions. - [**Token Bridge**](/docs/products/token-bridge/overview/){target=\_blank}: Enable tokenized rewards. ## Next Steps Follow these steps to work with Wormhole Messaging: - [**Get Started with Messaging**](/docs/products/messaging/get-started/){target=\_blank}: Use the core protocol to publish a multichain message and return transaction info with VAA identifiers. - [**Use Wormhole Relayers**](/docs/products/messaging/guides/wormhole-relayers/){target=\_blank}: Send and receive messages without off-chain infrastructure. --- END CONTENT --- Doc-Content: https://raw.githubusercontent.com/wormhole-foundation/wormhole-docs/refs/heads/main/products/overview.md --- BEGIN CONTENT --- --- title: Compare Wormhole's Cross-Chain Solutions description: Compare Wormhole’s cross-chain solutions for bridging, native transfers, data queries, and governance to enable seamless blockchain interoperability. categories: Transfer, Basics --- # Products Wormhole provides a comprehensive suite of cross-chain solutions, enabling seamless asset transfers, data retrieval, and governance across blockchain ecosystems. Wormhole provides multiple options for asset transfers: Connect for a plug-and-play bridging UI, Native Token Transfers (NTT) for moving native assets without wrapped representations, and Token Bridge for a secure lock-and-mint mechanism. Beyond transfers, Wormhole extends interoperability with tools for cross-chain data access, decentralized governance, and an intent-based protocol through Wormhole Settlement. ## Transfer Products Wormhole offers different solutions for cross-chain asset transfer, each designed for various use cases and integration requirements. - [**Native Token Transfers (NTT)**](/docs/products/native-token-transfers/overview/){target=\_blank} - a mechanism to transfer native tokens cross-chain seamlessly without conversion to a wrapped asset. Best for projects that require maintaining token fungibility and native chain functionality across multiple networks - [**Token Bridge**](/docs/products/token-bridge/overview/){target=\_blank} - a bridging solution that uses a lock and mint mechanism. Best for projects that need cross-chain liquidity using wrapped assets and the ability to send messages - [**Settlement**](/docs/products/settlement/overview/){target=\_blank} - intent-based protocols enabling fast multichain transfers, optimized liquidity flows, and interoperability without relying on traditional bridging methods
::spantable:: | | Criteria | NTT | Token Bridge | Settlement | |--------------------------------|---------------------------------------|--------------------|--------------------|--------------------| | Supported Transfer Types @span | Token Transfers | :white_check_mark: | :white_check_mark: | :white_check_mark: | | | Token Transfers with Payloads | :white_check_mark: | :white_check_mark: | :white_check_mark: | | Supported Assets @span | Wrapped Assets | :x: | :white_check_mark: | :white_check_mark: | | | Native Assets | :white_check_mark: | :x: | :white_check_mark: | | Features @span | Out-of-the-Box UI | :x: | :x: | :white_check_mark: | | | Event-Based Actions | :white_check_mark: | :white_check_mark: | :x: | | | Intent-Based Execution | :x: | :x: | :white_check_mark: | | | Fast Settlement | :x: | :x: | :white_check_mark: | | Requirements @span | Contract Deployment | :white_check_mark: | :x: |:x: | ::end-spantable::
## Choose a Transfer Mechanism Wormhole provides two distinct mechanisms for transferring assets cross-chain: [Native Token Transfers (NTT)](/docs/products/native-token-transfers/overview/){target=\_blank} and [Token Bridge](/docs/products/token-bridge/overview/){target=\_blank}. Both options offer distinct integration paths and feature sets tailored to your requirements, as outlined below. | Feature | Native Token Transfers | Token Bridge | |------------------------|----------------------------------------------------------------------------|-----------------------------------------------| | **Best for** | DeFi governance, native assets with multichain liquidity | Consumer apps, games, wrapped-token use cases | | **Mechanism** | Burn-and-mint or hub-and-spoke | Lock-and-mint | | **Security** | Configurable rate limiting, pausing, access control, threshold attestations. Integrated Global Accountant | Preconfigured rate limiting and integrated Global Accountant | | **Contract Ownership** | User retains ownership and upgrade authority on each chain | Managed via Wormhole Governance | | **Token Contracts** | Native contracts owned by your protocol governance | Wrapped asset contract owned by the Wormhole Token Bridge contract, upgradeable via a 13/19 Guardian governance process. | | **Integration** | Customizable, flexible framework for advanced deployments | Straightforward, permissionless deployment | | **Examples** | [NTT Connect](https://github.com/wormhole-foundation/demo-ntt-connect){target=\_blank}, [NTT TypeScript SDK](https://github.com/wormhole-foundation/demo-ntt-ts-sdk){target=\_blank} | [Portal Bridge UI](https://portalbridge.com/){target=\_blank} | In the following video, Wormhole Foundation DevRel Pauline Barnades walks you through the key differences between Wormhole’s Native Token Transfers (NTT) and Token Bridge and how to select the best option for your use case:
Beyond asset transfers, Wormhole provides additional tools for cross-chain data and governance. ## Bridging UI [**Connect**](/docs/products/connect/overview/){target=\_blank} is a pre-built bridging UI for cross-chain token transfers, requiring minimal setup. Best for projects seeking an easy-to-integrate UI for bridging without modifying contracts. ## Real-time Data [**Queries**](/docs/products/queries/overview/){target=\_blank} is a data retrieval service to fetch on-chain data from multiple networks. Best for applications that need multichain analytics, reporting, and data aggregation. ## Multichain Governance [**MultiGov**](/docs/products/multigov/overview/){target=\_blank} is a unified governance framework that manages multichain protocol governance through a single mechanism. Best for projects managing multichain governance and protocol updates. --- END CONTENT --- Doc-Content: https://raw.githubusercontent.com/wormhole-foundation/wormhole-docs/refs/heads/main/products/messaging/get-started.md --- BEGIN CONTENT --- --- title: Get Started with Messaging description: Follow this guide to use Wormhole's core protocol to publish a multichain message and return transaction information with VAA identifiers. categories: Basics, Typescript SDK --- # Get Started with Messaging Wormhole's core functionality allows you to send any data packet from one supported chain to another. This guide demonstrates how to publish your first simple, arbitrary data message from an EVM environment source chain using the Wormhole TypeScript SDK's core messaging capabilities. ## Prerequisites Before you begin, ensure you have the following: - [Node.js and npm](https://docs.npmjs.com/downloading-and-installing-node-js-and-npm){target=\_blank} installed - [TypeScript](https://www.typescriptlang.org/download/){target=\_blank} installed - [Ethers.js](https://docs.ethers.org/v6/getting-started/){target=\_blank} installed (this example uses version 6) - A small amount of testnet tokens for gas fees. This example uses [Sepolia ETH](https://sepolia-faucet.pk910.de/){target=\_blank} but can be adapted for any supported network - A private key for signing blockchain transactions ## Configure Your Messaging Environment 1. Create a directory and initialize a Node.js project: ```bash mkdir core-message cd core-message npm init -y ``` 2. Install TypeScript, tsx, Node.js type definitions, and Ethers.js: ```bash npm install --save-dev tsx typescript @types/node ethers ``` 3. Create a `tsconfig.json` file if you don't have one. You can generate a basic one using the following command: ```bash npx tsc --init ``` Make sure your `tsconfig.json` includes the following settings: ```json { "compilerOptions": { // es2020 or newer "target": "es2020", // Use esnext if you configured your package.json with type: "module" "module": "commonjs", "esModuleInterop": true, "forceConsistentCasingInFileNames": true, "strict": true, "skipLibCheck": true, "resolveJsonModule": true } } ``` 4. Install the [TypeScript SDK](/docs/tools/typescript-sdk/get-started/){target=\_blank}: ```bash npm install @wormhole-foundation/sdk ``` 5. Create a new file named `main.ts`: ```bash touch main.ts ``` ## Construct and Publish Your Message 1. Open `main.ts` and update the code there as follows: ```ts title="main.ts" import { wormhole, signSendWait, toNative, encoding, type Chain, type Network, type NativeAddress, type WormholeMessageId, type UnsignedTransaction, type TransactionId, type WormholeCore, type Signer as WormholeSdkSigner, type ChainContext, } from '@wormhole-foundation/sdk'; // Platform-specific modules import EvmPlatformLoader from '@wormhole-foundation/sdk/evm'; import { getEvmSigner } from '@wormhole-foundation/sdk-evm'; import { ethers, Wallet, JsonRpcProvider, Signer as EthersSigner, } from 'ethers'; /** * The required value (SEPOLIA_PRIVATE_KEY) must * be loaded securely beforehand, for example via a keystore, secrets * manager, or environment variables (not recommended). */ const SEPOLIA_PRIVATE_KEY = SEPOLIA_PRIVATE_KEY!; // Provide a private endpoint RPC URL for Sepolia, defaults to a public node // if not set const RPC_URL = process.env.SEPOLIA_RPC_URL || 'https://ethereum-sepolia-rpc.publicnode.com'; async function main() { // Initialize Wormhole SDK const network = 'Testnet'; const wh = await wormhole(network, [EvmPlatformLoader]); console.log('Wormhole SDK Initialized.'); // Get the EVM signer and provider let ethersJsSigner: EthersSigner; let ethersJsProvider: JsonRpcProvider; try { if (!SEPOLIA_PRIVATE_KEY) { console.error('Please set the SEPOLIA_PRIVATE_KEY environment variable.'); process.exit(1); } ethersJsProvider = new JsonRpcProvider(RPC_URL); const wallet = new Wallet(SEPOLIA_PRIVATE_KEY); ethersJsSigner = wallet.connect(ethersJsProvider); console.log( `Ethers.js Signer obtained for address: ${await ethersJsSigner.getAddress()}`, ); } catch (error) { console.error('Failed to get Ethers.js signer and provider:', error); process.exit(1); } // Define the source chain context const sourceChainName: Chain = 'Sepolia'; const sourceChainContext = wh.getChain(sourceChainName) as ChainContext< 'Testnet', 'Sepolia', 'Evm' >; console.log(`Source chain context obtained for: ${sourceChainContext.chain}`); // Get the Wormhole SDK signer, which is a wrapper around the Ethers.js // signer using the Wormhole SDK's signing and transaction handling // capabilities let sdkSigner: WormholeSdkSigner; try { sdkSigner = await getEvmSigner(ethersJsProvider, ethersJsSigner); console.log( `Wormhole SDK Signer obtained for address: ${sdkSigner.address()}`, ); } catch (error) { console.error('Failed to get Wormhole SDK Signer:', error); process.exit(1); } // Construct your message payload const messageText = `HelloWormholeSDK-${Date.now()}`; const payload: Uint8Array = encoding.bytes.encode(messageText); console.log(`Message to send: "${messageText}"`); // Define message parameters const messageNonce = Math.floor(Math.random() * 1_000_000_000); const consistencyLevel = 1; try { // Get the core protocol client const coreProtocolClient: WormholeCore = await sourceChainContext.getWormholeCore(); // Generate the unsigned transactions const whSignerAddress: NativeAddress = toNative( sdkSigner.chain(), sdkSigner.address(), ); console.log( `Preparing to publish message from ${whSignerAddress.toString()} on ${ sourceChainContext.chain }...`, ); const unsignedTxs: AsyncGenerator> = coreProtocolClient.publishMessage( whSignerAddress, payload, messageNonce, consistencyLevel, ); // Sign and send the transactions console.log( 'Signing and sending the message publication transaction(s)...', ); const txIds: TransactionId[] = await signSendWait( sourceChainContext, unsignedTxs, sdkSigner, ); if (!txIds || txIds.length === 0) { throw new Error('No transaction IDs were returned from signSendWait.'); } const primaryTxIdObject = txIds[txIds.length - 1]; const primaryTxid = primaryTxIdObject.txid; console.log(`Primary transaction ID for parsing: ${primaryTxid}`); console.log( `View on Sepolia Etherscan: https://sepolia.etherscan.io/tx/${primaryTxid}`, ); console.log( '\nWaiting a few seconds for transaction to propagate before parsing...', ); await new Promise((resolve) => setTimeout(resolve, 8000)); // Retrieve VAA identifiers console.log( `Attempting to parse VAA identifiers from transaction: ${primaryTxid}...`, ); const messageIds: WormholeMessageId[] = await sourceChainContext.parseTransaction(primaryTxid); if (messageIds && messageIds.length > 0) { const wormholeMessageId = messageIds[0]; console.log('--- VAA Identifiers (WormholeMessageId) ---'); console.log(' Emitter Chain:', wormholeMessageId.chain); console.log(' Emitter Address:', wormholeMessageId.emitter.toString()); console.log(' Sequence:', wormholeMessageId.sequence.toString()); console.log('-----------------------------------------'); } else { console.error( `Could not parse Wormhole message IDs from transaction ${primaryTxid}.`, ); } } catch (error) { console.error( 'Error during message publishing or VAA identifier retrieval:', error, ); if (error instanceof Error && error.stack) { console.error('Stack Trace:', error.stack); } } } main().catch((e) => { console.error('Critical error in main function (outer catch):', e); if (e instanceof Error && e.stack) { console.error('Stack Trace:', e.stack); } process.exit(1); }); ``` This script initializes the SDK, defines values for the source chain, creates an EVM signer, constructs the message, uses the core protocol to generate, sign, and send the transaction, and returns the VAA identifiers upon successful publication of the message. 2. Run the script using the following command: ```bash npx tsx main.ts ``` You will see terminal output similar to the following:
npx tsx main.ts Wormhole SDK Initialized. Ethers.js Signer obtained for address: 0xCD8Bcd9A793a7381b3C66C763c3f463f70De4e12 Source chain context obtained for: Sepolia Wormhole SDK Signer obtained for address: 0xCD8Bcd9A793a7381b3C66C763c3f463f70De4e12 Message to send: "HelloWormholeSDK-1748362375390" Preparing to publish message from 0xCD8Bcd9A793a7381b3C66C763c3f463f70De4e12 on Sepolia... Signing and sending the message publication transaction(s)... Primary Transaction ID for parsing: 0xeb34f35f91c72e4e5198509071d24fd25d8a979aa93e2f168de075e3568e1508 View on Sepolia Etherscan: https://sepolia.etherscan.io/tx/0xeb34f35f91c72e4e5198509071d24fd25d8a979aa93e2f168de075e3568e1508 Waiting a few seconds for transaction to propagate before parsing... Attempting to parse VAA identifiers from transaction: 0xeb34f35f91c72e4e5198509071d24fd25d8a979aa93e2f168de075e3568e1508... --- VAA Identifiers (WormholeMessageId) --- Emitter Chain: Sepolia Emitter Address: 0x000000000000000000000000cd8bcd9a793a7381b3c66c763c3f463f70de4e12 Sequence: 1 -----------------------------------------
3. Make a note of the transaction ID and VAA identifier values. You can use the transaction ID to [view the transaction on Wormholescan](https://wormholescan.io/#/tx/0xeb34f35f91c72e4e5198509071d24fd25d8a979aa93e2f168de075e3568e1508?network=Testnet){target=\_blank}. The emitter chain, emitter address, and sequence values are used to retrieve and decode signed messages Congratulations! You've published your first multichain message using Wormhole's TypeScript SDK and core protocol functionality. Consider the following options to build upon what you've accomplished. ## Next Steps - [**Get Started with Token Bridge**](/docs/products/token-bridge/get-started/){target=\_blank}: Follow this guide to start working with multichain token transfers using Wormhole Token Bridge's lock and mint mechanism to send tokens across chains. --- END CONTENT --- Doc-Content: https://raw.githubusercontent.com/wormhole-foundation/wormhole-docs/refs/heads/main/products/reference/glossary.md --- BEGIN CONTENT --- --- title: Glossary description: Explore a comprehensive glossary of technical terms and key concepts used in the Wormhole network, covering Chain ID, Guardian, VAA, and more. categories: Basics --- # Glossary This glossary is an index of technical term definitions for words commonly used in Wormhole documentation. ## Chain ID Wormhole assigns a unique `u16` integer chain ID to each supported blockchain. These chain IDs are specific to Wormhole and may differ from those used by blockchains to identify their networks. You can find each chain ID documented on the [Wormhole Chain IDs](/docs/products/reference/chain-ids/){target=\_blank} page. ## Consistency Level The level of finality (consistency) a transaction should meet before being signed by a Guardian. See the [Wormhole Finality](/docs/products/reference/consistency-levels/){target=\_blank} reference page for details. ## Delivery Provider A Delivery Provider monitors for Wormhole Relayer delivery requests and delivers those requests to the intended target chain as instructed. ## Emitter The emitter contract makes the call to the Wormhole Core Contract. The published message includes the emitter contract address and, a sequence number for the message is tracked to provide a unique ID. ## Finality The finality of a transaction depends on its blockchain properties. Once a transaction is considered final, you can assume the resulting state changes it caused won't be reverted. ## Guardian A [Guardian](/docs/protocol/infrastructure/guardians/){target=\_blank} is one of the 19 parties running validators in the Guardian Network contributing to the VAA multisig. ## Guardian Network Validators in their own P2P network who serve as Wormhole's oracle by observing activity on-chain and generating signed messages attesting to that activity. ## Guardian Set The Guardian Set is a set of guardians responsible for validating a message emitted from the core contracts. Occasionally, the members of the set will change through a governance action. ## Heartbeat Each Guardian will issue a `heartbeat` on a 15-second interval to signal that it is still running and convey details about its identity, uptime, version, and the status of the connected nodes. You can view the heartbeats on the [Wormhole dashboard](https://wormhole-foundation.github.io/wormhole-dashboard/#/?endpoint=Mainnet){target=\_blank}. ## Observation An Observation is a data structure describing a message emitted by the Core Contract and noticed by the Guardian node. ## Relayer A relayer is any process that delivers VAAs to a destination. ## Sequence A nonce, strictly increasing, which is tracked by the Wormhole Core Contract and unique to the emitter chain and address. ## Spy A Spy is a daemon that eavesdrops on the messages passed between Guardians, typically to track VAAs as they get signed. ## VAA [Verifiable Action Approvals](/docs/protocol/infrastructure/vaas/){target=\_blank} (VAAs) are the base data structure in the Wormhole ecosystem. They contain emitted messages along with information such as what contract emitted the message. ## Validator A daemon configured to monitor a blockchain node and observe messages emitted by the Wormhole contracts. --- END CONTENT --- Doc-Content: https://raw.githubusercontent.com/wormhole-foundation/wormhole-docs/refs/heads/main/products/messaging/guides/core-contracts.md --- BEGIN CONTENT --- --- title: Get Started with Core Contracts description: This guide walks through the key methods of the Core Contracts, providing you with the knowledge needed to integrate them into your cross-chain contracts categories: Basics --- # Get Started with Core Contracts Wormhole's Core Contracts, deployed on each supported blockchain network, enable the fundamental operations of sending and receiving cross-chain messages. While the implementation details of the Core Contracts varies by network, the core functionality remains consistent across chains. Each version of the Core Contract facilitates secure and reliable cross-chain communication, ensuring that developers can effectively publish and verify messages. This guide will walk you through the variations and key methods of the Core Contracts, providing you with the knowledge needed to integrate them into your cross-chain contracts. To learn more about Core Contracts' features and how it works, please refer to the [Core Contracts](/docs/protocol/infrastructure/core-contracts/){target=\_blank} page in the Learn section. ## Prerequisites To interact with the Wormhole Core Contract, you'll need the following: - The [address of the Core Contract](/docs/products/reference/contract-addresses/#core-contracts){target=\_blank} on the chains you're deploying your contract on - The [Wormhole chain ID](/docs/products/reference/chain-ids/){target=\_blank} of the chains you're deploying your contract on - The [Wormhole Finality](/docs/products/reference/consistency-levels/){target=\_blank} (consistency) levels (required finality) for the chains you're deploying your contract on ## How to Interact with Core Contracts Before writing your own contracts, it's essential to understand the key functions and events of the Wormhole Core Contracts. The primary functionality revolves around: - **Sending messages** - submitting messages to the Wormhole network for cross-chain communication - **Receiving and verifying messages** - validating messages received from other chains via the Wormhole network While the implementation details of the Core Contracts vary by network, the core functionality remains consistent across chains. ### Sending Messages To send a message, regardless of the environment or chain, the Core Contract is invoked with a message argument from an [emitter](/docs/products/reference/glossary/#emitter){target=\_blank}. This emitter might be your contract or an existing application such as the [Token Bridge](/docs/products/token-bridge/overview/){target=\_blank}. === "EVM" The `IWormhole.sol` interface provides the `publishMessage` function, which can be used to publish a message directly to the Core Contract: ```solidity function publishMessage( uint32 nonce, bytes memory payload, uint8 consistencyLevel ) external payable returns (uint64 sequence); ``` ??? interface "Parameters" `nonce` ++"uint32"++ A free integer field that can be used however you like. Note that changing the `nonce` will result in a different digest. --- `payload` ++"bytes memory"++ The content of the emitted message. Due to the constraints of individual blockchains, it may be capped to a certain maximum length. --- `consistencyLevel` ++"uint8"++ A value that defines the required level of finality that must be reached before the Guardians will observe and attest to emitted events. ??? interface "Returns" `sequence` ++"uint64"++ A unique number that increments for every message for a given emitter (and implicitly chain). This, combined with the emitter address and emitter chain ID, allows the VAA for this message to be queried from the [Wormholescan API](https://docs.wormholescan.io/){target=\_blank}. ??? interface "Example" ```solidity IWormhole wormhole = IWormhole(wormholeAddr); // Get the fee for publishing a message uint256 wormholeFee = wormhole.messageFee(); // Check fee and send parameters // Create the HelloWorldMessage struct HelloWorldMessage memory parsedMessage = HelloWorldMessage({ payloadID: uint8(1), message: helloWorldMessage }); // Encode the HelloWorldMessage struct into bytes bytes memory encodedMessage = encodeMessage(parsedMessage); // Send the HelloWorld message by calling publishMessage on the // wormhole core contract and paying the Wormhole protocol fee. messageSequence = wormhole.publishMessage{value: wormholeFee}( 0, // batchID encodedMessage, wormholeFinality() ); ``` View the complete Hello World example in the [Wormhole Scaffolding](https://github.com/wormhole-foundation/wormhole-scaffolding/tree/main/evm/src/01_hello_world){target=\_blank} repository on GitHub. === "Solana" The `wormhole_anchor_sdk::wormhole` module and the Wormhole program account can be used to pass a message directly to the Core Contract via the `wormhole::post_message` function: ```rs pub fn post_message<'info>( ctx: CpiContext<'_, '_, '_, 'info, PostMessage<'info>>, batch_id: u32, payload: Vec, finality: Finality ) -> Result<()> ``` ??? interface "Parameters" `ctx` ++"CpiContext<'_, '_, '_, 'info, PostMessage<'info>>"++ Provides the necessary context for executing the function, including the accounts and program information required for the Cross-Program Invocation (CPI). ??? child "Type `pub struct CpiContext<'a, 'b, 'c, 'info, T>`" ```rs pub struct CpiContext<'a, 'b, 'c, 'info, T> where T: ToAccountMetas + ToAccountInfos<'info>, { pub accounts: T, pub remaining_accounts: Vec>, pub program: AccountInfo<'info>, pub signer_seeds: &'a [&'b [&'c [u8]]], } ``` For more information, please refer to the [`wormhole_anchor_sdk` Rust docs](https://docs.rs/anchor-lang/0.29.0/anchor_lang/context/struct.CpiContext.html){target=\_blank}. ??? child "Type `PostMessage<'info>`" ```rs pub struct PostMessage<'info> { pub config: AccountInfo<'info>, pub message: AccountInfo<'info>, pub emitter: AccountInfo<'info>, pub sequence: AccountInfo<'info>, pub payer: AccountInfo<'info>, pub fee_collector: AccountInfo<'info>, pub clock: AccountInfo<'info>, pub rent: AccountInfo<'info>, pub system_program: AccountInfo<'info>, } ``` For more information, please refer to the [`wormhole_anchor_sdk` Rust docs](https://docs.rs/wormhole-anchor-sdk/latest/wormhole_anchor_sdk/wormhole/instructions/struct.PostMessage.html){target=\_blank}. --- `batch_id` ++"u32"++ An identifier for the message batch. --- `payload` ++"Vec"++ The data being sent in the message. This is a variable-length byte array that contains the actual content or information being transmitted. To learn about the different types of payloads, check out the [VAAs](/docs/protocol/infrastructure/vaas#payload-types){target=\_blank} page. --- `finality` ++"Finality"++ Specifies the level of finality or confirmation required for the message. ??? child "Type `Finality`" ```rs pub enum Finality { Confirmed, Finalized, } ``` ??? interface "Returns" ++"Result<()>"++ The result of the function’s execution. If the function completes successfully, it returns `Ok(())`, otherwise it returns `Err(E)`, indicating that an error occurred along with the details about the error ??? interface "Example" ```rust let fee = ctx.accounts.wormhole_bridge.fee(); // ... Check fee and send parameters let config = &ctx.accounts.config let payload: Vec = HelloWorldMessage::Hello { message }.try_to_vec()?; // Invoke `wormhole::post_message`. wormhole::post_message( CpiContext::new_with_signer( ctx.accounts.wormhole_program.to_account_info(), wormhole::PostMessage { // ... Set fields }, &[ // ... Set seeds ], ), config.batch_id, payload, config.finality.into(), )?; ``` View the complete Hello World example in the [Wormhole Scaffolding](https://github.com/wormhole-foundation/wormhole-scaffolding/tree/main/solana/programs/01_hello_world){target=\_blank} repository on GitHub. Once the message is emitted from the Core Contract, the [Guardian Network](/docs/protocol/infrastructure/guardians/){target=\_blank} will observe the message and sign the digest of an Attestation [VAA](/docs/protocol/infrastructure/vaas/){target=\_blank}. On EVM chains, the body of the VAA is hashed twice with keccak256 to produce the signed digest message. On Solana, the [Solana secp256k1 program](https://solana.com/docs/core/programs#secp256k1-program){target=\_blank} will hash the message passed. In this case, the argument for the message should be a single hash of the body, not the twice-hashed body. VAAs are [multicast](/docs/protocol/infrastructure/core-contracts/#multicast){target=\_blank} by default. This means there is no default target chain for a given message. The application developer decides on the format of the message and its treatment upon receipt. ### Receiving Messages The way a message is received and handled depends on the environment. === "EVM" On EVM chains, the message passed is the raw VAA encoded as binary. The `IWormhole.sol` interface provides the `parseAndVerifyVM` function, which can be used to parse and verify the received message. ```solidity function parseAndVerifyVM( bytes calldata encodedVM ) external view returns (VM memory vm, bool valid, string memory reason); ``` ??? interface "Parameters" `encodedVM` ++"bytes calldata"++ The encoded message as a Verified Action Approval (VAA), which contains all necessary information for verification and processing. ??? interface "Returns" `vm` ++"VM memory"++ The valid parsed VAA, which will include the original `emitterAddress`, `sequenceNumber`, and `consistencyLevel`, among other fields outlined on the [VAAs](/docs/protocol/infrastructure/vaas/) page. ??? child "Struct `VM`" ```solidity struct VM { uint8 version; uint32 timestamp; uint32 nonce; uint16 emitterChainId; bytes32 emitterAddress; uint64 sequence; uint8 consistencyLevel; bytes payload; uint32 guardianSetIndex; Signature[] signatures; bytes32 hash; } ``` For more information, refer to the [`IWormhole.sol` interface](https://github.com/wormhole-foundation/wormhole/blob/main/ethereum/contracts/interfaces/IWormhole.sol){target=\_blank}. --- `valid` ++"bool"++ A boolean indicating whether the VAA is valid or not. --- `reason` ++"string"++ If the VAA is not valid, a reason will be provided ??? interface "Example" ```solidity function receiveMessage(bytes memory encodedMessage) public { // Call the Wormhole core contract to parse and verify the encodedMessage ( IWormhole.VM memory wormholeMessage, bool valid, string memory reason ) = wormhole().parseAndVerifyVM(encodedMessage); // Perform safety checks here // Decode the message payload into the HelloWorldMessage struct HelloWorldMessage memory parsedMessage = decodeMessage( wormholeMessage.payload ); // Your custom application logic here } ``` View the complete Hello World example in the [Wormhole Scaffolding](https://github.com/wormhole-foundation/wormhole-scaffolding/tree/main/evm/src/01_hello_world){target=\_blank} repository on GitHub. === "Solana" On Solana, the VAA is first posted and verified by the Core Contract, after which it can be read by the receiving contract and action taken. Retrieve the raw message data: ```rs let posted_message = &ctx.accounts.posted; posted_message.data() ``` ??? interface "Example" ```rust pub fn receive_message(ctx: Context, vaa_hash: [u8; 32]) -> Result<()> { let posted_message = &ctx.accounts.posted if let HelloWorldMessage::Hello { message } = posted_message.data() { // Check message // Your custom application logic here Ok(()) } else { Err(HelloWorldError::InvalidMessage.into()) } } ``` View the complete Hello World example in the [Wormhole Scaffolding](https://github.com/wormhole-foundation/wormhole-scaffolding/tree/main/solana/programs/01_hello_world){target=\_blank} repository on GitHub. #### Validating the Emitter When processing cross-chain messages, it's critical to ensure that the message originates from a trusted sender (emitter). This can be done by verifying the emitter address and chain ID in the parsed VAA. Typically, contracts should provide a method to register trusted emitters and check incoming messages against this list before processing them. For example, the following check ensures that the emitter is registered and authorized: ```solidity require(isRegisteredSender(emitterChainId, emitterAddress), "Invalid emitter"); ``` This check can be applied after the VAA is parsed, ensuring only authorized senders can interact with the receiving contract. Trusted emitters can be registered using a method like `setRegisteredSender` during contract deployment or initialization. ```typescript const tx = await receiverContract.setRegisteredSender( sourceChain.chainId, ethers.zeroPadValue(senderAddress as BytesLike, 32) ); await tx.wait(); ``` #### Additional Checks In addition to environment-specific checks that should be performed, a contract should take care to check other [fields in the body](/docs/protocol/infrastructure/vaas/){target=\_blank}, including: - **Sequence** - is this the expected sequence number? How should out-of-order deliveries be handled? - **Consistency level** - for the chain this message came from, is the [Wormhole Finality](/docs/products/reference/consistency-levels/){target=\_blank} level enough to guarantee the transaction won't be reverted after taking some action? The VAA digest is separate from the VAA body but is also relevant. It can be used for replay protection by checking if the digest has already been seen. Since the payload itself is application-specific, there may be other elements to check to ensure safety. ## Source Code References For a deeper understanding of the Core Contract implementation for a specific blockchain environment and to review the actual source code, please refer to the following links: - [Algorand Core Contract source code](https://github.com/wormhole-foundation/wormhole/blob/main/algorand/wormhole_core.py){target=\_blank} - [Aptos Core Contract source code](https://github.com/wormhole-foundation/wormhole/tree/main/aptos/wormhole){target=\_blank} - [EVM Core Contract source code](https://github.com/wormhole-foundation/wormhole/tree/main/ethereum/contracts){target=\_blank} ([`IWormhole.sol` interface](https://github.com/wormhole-foundation/wormhole/blob/main/ethereum/contracts/interfaces/IWormhole.sol){target=\_blank}) - [NEAR Core Contract source code](https://github.com/wormhole-foundation/wormhole/tree/main/near/contracts/wormhole){target=\_blank} - [Solana Core Contract source code](https://github.com/wormhole-foundation/wormhole/tree/main/solana/bridge/program){target=\_blank} - [Sui Core Contract source code](https://github.com/wormhole-foundation/wormhole/tree/main/sui/wormhole){target=\_blank} - [Terra Core Contract source code](https://github.com/wormhole-foundation/wormhole/tree/main/terra/contracts/wormhole){target=\_blank} --- END CONTENT --- Doc-Content: https://raw.githubusercontent.com/wormhole-foundation/wormhole-docs/refs/heads/main/products/messaging/guides/wormhole-relayers.md --- BEGIN CONTENT --- --- title: Wormhole-Deployed Relayers description: Learn about the Wormhole-deployed relayer configuration for seamless cross-chain messaging between contracts on different EVM blockchains without off-chain deployments. categories: Relayers, Basics --- # Wormhole Relayer The Wormhole-deployed relayers provide a mechanism for contracts on one blockchain to send messages to contracts on another without requiring off-chain infrastructure. Through the Wormhole relayer module, developers can use an untrusted delivery provider to transport VAAs, saving the need to build and maintain custom relaying solutions. The option to [run a custom relayer](/docs/protocol/infrastructure-guides/run-relayer/) is available for more complex needs. This section covers the components and interfaces involved in using the Wormhole relayer module, such as message sending and receiving, delivery guarantees, and considerations for building reliable and efficient cross-chain applications. Additionally, you'll find details on how to handle specific implementation scenarios and track message delivery progress using the Wormhole CLI tool. ## Get Started with the Wormhole Relayer Before getting started, it's important to note that the Wormhole-deployed relayer configuration is currently **limited to EVM environments**. The complete list of EVM environment blockchains is on the [Supported Networks](/docs/products/reference/supported-networks/) page. To interact with the Wormhole relayer, you'll need to create contracts on the source and target chains to handle the sending and receiving of messages. No off-chain logic needs to be implemented to take advantage of Wormhole-powered relaying.
![Wormhole Relayer](/docs/images/products/messaging/guides/wormhole-relayers/relayer-1.webp)
The components outlined in blue must be implemented.
### Wormhole Relayer Interfaces There are three relevant interfaces to discuss when utilizing the Wormhole relayer module: - [**`IWormholeRelayer`**](https://github.com/wormhole-foundation/wormhole/blob/main/relayer/ethereum/contracts/interfaces/relayer/IWormholeRelayer.sol){target=\_blank} - the primary interface by which you send and receive messages. It allows you to request the sending of messages and VAAs - [**`IWormholeReceiver`**](https://github.com/wormhole-foundation/wormhole/blob/main/relayer/ethereum/contracts/interfaces/relayer/IWormholeReceiver.sol){target=\_blank} - this is the interface you are responsible for implementing. It allows the selected delivery provider to deliver messages/VAAs to your contract - [**`IDeliveryProvider`**](https://github.com/wormhole-foundation/wormhole/blob/main/relayer/ethereum/contracts/interfaces/relayer/IDeliveryProvider.sol){target=\_blank} - this interface represents the delivery pricing information for a given relayer network. Each delivery provider implements this on every blockchain they support delivering from ## Interact with the Wormhole Relayer To start interacting with the Wormhole relayer in your contracts, you'll need to import the `IWormholeRelayer` interface and set up a reference using the contract address to the Wormhole-deployed relayer on the supported network of your choice. To easily integrate with the Wormhole relayer interface, you can use the [Wormhole Solidity SDK](https://github.com/wormhole-foundation/wormhole-solidity-sdk){target=\_blank}. To retrieve the contract address of the Wormhole relayer, refer to the Wormhole relayer section on the [Contract Addresses](/docs/products/reference/contract-addresses/#wormhole-relayer) reference page. Your initial set up should resemble the following: ```solidity // SPDX-License-Identifier: MIT pragma solidity ^0.8.26; import "wormhole-solidity-sdk/interfaces/IWormholeRelayer.sol"; contract Example { IWormholeRelayer public wormholeRelayer; constructor(address _wormholeRelayer) { wormholeRelayer = IWormholeRelayer(_wormholeRelayer); } } ``` The code provided sets up the basic structure for your contract to interact with the Wormhole relayer using the address supplied to the constructor. By leveraging methods from the `IWormholeRelayer` interface, you can implement message sending and receiving functionalities. The following sections will detail the specific methods you need to use for these tasks. ### Send a Message To send a message to a contract on another EVM chain, you can call the `sendPayloadToEvm` method provided by the `IWormholeRelayer` interface. ```solidity function sendPayloadToEvm( // Chain ID in Wormhole format uint16 targetChain, // Contract Address on target chain we're sending a message to address targetAddress, // The payload, encoded as bytes bytes memory payload, // How much value to attach to the delivery transaction uint256 receiverValue, // The gas limit to set on the delivery transaction uint256 gasLimit ) external payable returns ( // Unique, incrementing ID, used to identify a message uint64 sequence ); ``` !!! tip To reduce transaction confirmation time, you can lower the consistency level using the [`sendToEvm`](https://github.com/wormhole-foundation/wormhole/blob/v{{repositories.wormhole.version}}/sdk/js/src/relayer/relayer/send.ts#L33){target=\_blank} method. The `sendPayloadToEvm` method is marked `payable` to receive fee payment for the transaction. The value to attach to the invocation is determined by calling the `quoteEVMDeliveryPrice`, which provides an estimate of the cost of gas on the target chain. ```solidity function quoteEVMDeliveryPrice( // Chain ID in Wormhole format uint16 targetChain, // How much value to attach to delivery transaction uint256 receiverValue, // The gas limit to attach to the delivery transaction uint256 gasLimit ) external view returns ( // How much value to attach to the send call uint256 nativePriceQuote, uint256 targetChainRefundPerGasUnused ); ``` This method should be called before sending a message, and the value returned for `nativePriceQuote` should be attached to the call to send the payload to cover the transaction's cost on the target chain. In total, sending a message across EVM chains can be as simple as getting a fee quote and sending the message as follows: ```solidity // Get a quote for the cost of gas for delivery (cost, ) = wormholeRelayer.quoteEVMDeliveryPrice( targetChain, valueToSend, GAS_LIMIT ); // Send the message wormholeRelayer.sendPayloadToEvm{value: cost}( targetChain, targetAddress, abi.encode(payload), valueToSend, GAS_LIMIT ); ``` ### Receive a Message To receive a message using a Wormhole relayer, the target contract must implement the [`IWormholeReceiver`](https://github.com/wormhole-foundation/wormhole/blob/main/relayer/ethereum/contracts/interfaces/relayer/IWormholeReceiver.sol){target=\_blank} interface, as shown in the [previous section](#interact-with-the-wormhole-relayer). ```solidity function receiveWormholeMessages( bytes memory payload, // Message passed by source contract bytes[] memory additionalVaas, // Any additional VAAs that are needed (Note: these are unverified) bytes32 sourceAddress, // The address of the source contract uint16 sourceChain, // The Wormhole chain ID bytes32 deliveryHash // A hash of contents, useful for replay protection ) external payable; ``` The logic inside the function body may be whatever business logic is required to take action on the specific payload. ## Delivery Guarantees The Wormhole relayer protocol is intended to create a service interface whereby mutually distrustful integrators and delivery providers can work together to provide a seamless dApp experience. You don't trust the delivery providers with your data, and the delivery providers don't trust your smart contract. The primary agreement between integrators and delivery providers is that when a delivery is requested, the provider will attempt to deliver the VAA within the provider's stated delivery timeframe. This creates a marketplace whereby providers can set different price levels and service guarantees. Delivery providers effectively accept the slippage risk premium of delivering your VAAs in exchange for a set fee rate. Thus, the providers agree to deliver your messages even if they do so at a loss. Delivery providers should set their prices such that they turn a profit on average but not necessarily on every single transfer. Thus, some providers may choose to set higher rates for tighter guarantees or lower rates for less stringent guarantees. ## Delivery Statuses All deliveries result in one of the following four outcomes before the delivery provider's delivery timeframe. When they occur, these outcomes are emitted as EVM events from the Wormhole relayer contract. The four possible outcomes are: - (0) Delivery Success - (1) Receiver Failure - (2) Forward Request Success - (3) Forward Request Failure A receiver failure is a scenario in which the selected provider attempted the delivery but it could not be completely successfully. The three possible causes for a delivery failure are: - The target contract does not implement the `IWormholeReceiver` interface - The target contract threw an exception or reverted during the execution of `receiveWormholeMessages` - The target contract exceeded the specified `gasLimit` while executing `receiveWormholeMessages` All three of these scenarios can be avoided with correct design by the integrator, and thus, it is up to the integrator to resolve them. Any other scenario that causes a delivery to not be performed should be considered an outage by some component of the system, including potentially the blockchains themselves. `Forward Request Success` and `Forward Failure` represent when the delivery succeeded and the user requested a forward during the delivery. If the user has enough funds left over as a refund to complete the forward, the forward will be executed, and the status will be `Forward Request Success`. Otherwise, it will be `Forward Request Failure`. ## Other Considerations Some implementation details should be considered during development to ensure safety and a pleasant UX. Ensure that your engineering efforts have appropriately considered each of the following areas: - Receiving a message from a relayer - Checking for expected emitter - Calling `parseAndVerify` on any additional VAAs - Replay protection - Message ordering (no guarantees on order of messages delivered) - Forwarding and call chaining - Refunding overpayment of `gasLimit` - Refunding overpayment of value sent ## Track the Progress of Messages with the Wormhole CLI While no off-chain programs are required, a developer may want to track the progress of messages in flight. To track the progress of messages in flight, use the [Wormhole CLI](/docs/tools/cli/get-started/){target=\_blank} tool's `status` subcommand. As an example, you can use the following commands to track the status of a transfer by providing the environment, origin network, and transaction hash to the `worm status` command: === "Mainnet" ```bash worm status mainnet ethereum INSERT_TRANSACTION_HASH ``` === "Testnet" ```bash worm status testnet ethereum INSERT_TRANSACTION_HASH ``` See the [Wormhole CLI tool docs](/docs/tools/cli/get-started/){target=\_blank} for installation and usage. ## Step-by-Step Tutorial For detailed, step-by-step guidance on creating cross-chain contracts that interact with the Wormhole relayer, refer to the [Create Cross-Chain Contracts](/docs/products/messaging/tutorials/cross-chain-contracts/) tutorial. --- END CONTENT --- Doc-Content: https://raw.githubusercontent.com/wormhole-foundation/wormhole-docs/refs/heads/main/products/messaging/tutorials/cross-chain-contracts.md --- BEGIN CONTENT --- --- title: Create Cross-Chain Contracts description: Learn how to create cross-chain contracts using Wormhole's Solidity SDK. Deploy contracts on Avalanche and Celo Testnets and send messages across chains. categories: Basics --- # Create Cross-Chain Messaging Contracts :simple-github: [Source code on GitHub](https://github.com/wormhole-foundation/demo-wormhole-messaging){target=\_blank} Wormhole's cross-chain messaging allows smart contracts to interact seamlessly across multiple blockchains. This enables developers to build decentralized applications that leverage the strengths of different networks, whether it's Avalanche, Celo, Ethereum, or beyond. In this tutorial, we'll explore using [Wormhole's Solidity SDK](https://github.com/wormhole-foundation/wormhole-solidity-sdk){target=\_blank} to create cross-chain contracts to send and receive messages across chains. Wormhole's messaging infrastructure simplifies data transmission, event triggering, and transaction initiation across blockchains. In this tutorial, we'll guide you through a simple yet powerful hands-on demonstration that showcases this practical capability. We'll deploy contracts on two Testnets—Avalanche Fuji and Celo Alfajores—and send messages from one chain to another. This tutorial is perfect for those new to cross-chain development and seeking hands-on experience with Wormhole's powerful toolkit. By the end of this tutorial, you will have not only built a fully functioning cross-chain message sender and receiver using Solidity but also developed a comprehensive understanding of how to interact with the Wormhole relayer, manage cross-chain costs, and ensure your smart contracts are configured correctly on both source and target chains. This tutorial assumes a basic understanding of Solidity and smart contract development. Before diving in, it may be helpful to review [the basics of Wormhole](/docs/protocol/introduction/){target=\_blank} to familiarize yourself with the protocol. ## Wormhole Overview We'll interact with two key Wormhole components: the [Wormhole relayer](/docs/protocol/infrastructure/relayer/){target=\_blank} and the [Wormhole Core Contracts](/docs/protocol/infrastructure/core-contracts/){target=\_blank}. The relayer handles cross-chain message delivery and ensures the message is accurately received on the target chain. This allows smart contracts to communicate across blockchains without developers worrying about the underlying complexity. Additionally, we'll rely on the Wormhole relayer to automatically determine cross-chain transaction costs and facilitate payments. This feature simplifies cross-chain development by allowing you to specify only the target chain and the message. The relayer handles the rest, ensuring that the message is transmitted with the appropriate fee. ![Wormhole architecture detailed diagram: source to target chain communication.](/docs/images/protocol/architecture/architecture-1.webp) ## Prerequisites Before starting this tutorial, ensure you have the following: - [Node.js and npm](https://docs.npmjs.com/downloading-and-installing-node-js-and-npm){target=\_blank} installed on your machine - [Foundry](https://getfoundry.sh/introduction/installation/){target=\_blank} for deploying contracts - Testnet tokens for [Avalanche-Fuji](https://core.app/tools/testnet-faucet/?token=C){target=\_blank} and [Celo-Alfajores](https://faucet.celo.org/alfajores){target=\_blank} to cover gas fees - Wallet private key ## Build Cross-Chain Messaging Contracts In this section, we'll deploy two smart contracts: one to send a message from Avalanche Fuji and another to receive it on Celo Alfajores. The contracts interact with the Wormhole relayer to transmit messages across chains. At a high level, our contracts will: 1. Send a message from Avalanche to Celo using the Wormhole relayer 2. Receive and process the message on Celo, logging the content of the message Before diving into the deployment steps, let's first break down key parts of the contracts. ### Sender Contract: MessageSender The `MessageSender` contract is responsible for quoting the cost of sending a message cross-chain and then sending that message. Key functions include: - **`quoteCrossChainCost`** - calculates the cost of delivering a message to the target chain using the Wormhole relayer - **`sendMessage`** - encodes the message and sends it to the target chain and contract address using the Wormhole relayer Here's the core of the contract: ```solidity uint16 targetChain, address targetAddress, string memory message ) external payable { uint256 cost = quoteCrossChainCost(targetChain); require( msg.value >= cost, "Insufficient funds for cross-chain delivery" ); wormholeRelayer.sendPayloadToEvm{value: cost}( targetChain, targetAddress, abi.encode(message, msg.sender), 0, GAS_LIMIT ); } ``` You can find the full code for the `MessageSender.sol` below. ??? code "MessageSender.sol" ```solidity // SPDX-License-Identifier: MIT pragma solidity ^0.8.18; import "lib/wormhole-solidity-sdk/src/interfaces/IWormholeRelayer.sol"; contract MessageSender { IWormholeRelayer public wormholeRelayer; uint256 constant GAS_LIMIT = 50000; constructor(address _wormholeRelayer) { wormholeRelayer = IWormholeRelayer(_wormholeRelayer); } function quoteCrossChainCost( uint16 targetChain ) public view returns (uint256 cost) { (cost, ) = wormholeRelayer.quoteEVMDeliveryPrice( targetChain, 0, GAS_LIMIT ); } function sendMessage( uint16 targetChain, address targetAddress, string memory message ) external payable { uint256 cost = quoteCrossChainCost(targetChain); require( msg.value >= cost, "Insufficient funds for cross-chain delivery" ); wormholeRelayer.sendPayloadToEvm{value: cost}( targetChain, targetAddress, abi.encode(message, msg.sender), 0, GAS_LIMIT ); } } ``` ### Receiver Contract: MessageReceiver The `MessageReceiver` contract handles incoming cross-chain messages. When a message arrives, it decodes the payload and logs the message content. It ensures that only authorized contracts can send and process messages, adding an extra layer of security in cross-chain communication. #### Emitter Validation and Registration In cross-chain messaging, validating the sender is essential to prevent unauthorized contracts from sending messages. The `isRegisteredSender` modifier ensures that messages can only be processed if they come from the registered contract on the source chain. This guards against malicious messages and enhances security. Key implementation details include: - **`registeredSender`** - stores the address of the registered sender contract - **`setRegisteredSender`** - registers the sender's contract address on the source chain. It ensures that only registered contracts can send messages, preventing unauthorized senders - **`isRegisteredSender`** - restricts the processing of messages to only those from registered senders, preventing unauthorized cross-chain communication ```solidity require( registeredSenders[sourceChain] == sourceAddress, "Not registered sender" ); _; } function setRegisteredSender( uint16 sourceChain, bytes32 sourceAddress ) public { require( msg.sender == registrationOwner, "Not allowed to set registered sender" ); registeredSenders[sourceChain] = sourceAddress; } ``` #### Message Processing The `receiveWormholeMessages` is the core function that processes the received message. It checks that the Wormhole relayer sent the message, decodes the payload, and emits an event with the message content. It is essential to verify the message sender to prevent unauthorized messages. ```solidity bytes memory payload, bytes[] memory, bytes32 sourceAddress, uint16 sourceChain, bytes32 ) public payable override isRegisteredSender(sourceChain, sourceAddress) { require( msg.sender == address(wormholeRelayer), "Only the Wormhole relayer can call this function" ); // Decode the payload to extract the message string memory message = abi.decode(payload, (string)); // Example use of sourceChain for logging if (sourceChain != 0) { emit SourceChainLogged(sourceChain); } // Emit an event with the received message emit MessageReceived(message); } ``` You can find the full code for the `MessageReceiver.sol` below. ??? code "MessageReceiver.sol" ```solidity // SPDX-License-Identifier: MIT pragma solidity ^0.8.18; import "lib/wormhole-solidity-sdk/src/interfaces/IWormholeRelayer.sol"; import "lib/wormhole-solidity-sdk/src/interfaces/IWormholeReceiver.sol"; contract MessageReceiver is IWormholeReceiver { IWormholeRelayer public wormholeRelayer; address public registrationOwner; // Mapping to store registered senders for each chain mapping(uint16 => bytes32) public registeredSenders; event MessageReceived(string message); event SourceChainLogged(uint16 sourceChain); constructor(address _wormholeRelayer) { wormholeRelayer = IWormholeRelayer(_wormholeRelayer); registrationOwner = msg.sender; // Set contract deployer as the owner } modifier isRegisteredSender(uint16 sourceChain, bytes32 sourceAddress) { require( registeredSenders[sourceChain] == sourceAddress, "Not registered sender" ); _; } function setRegisteredSender( uint16 sourceChain, bytes32 sourceAddress ) public { require( msg.sender == registrationOwner, "Not allowed to set registered sender" ); registeredSenders[sourceChain] = sourceAddress; } // Update receiveWormholeMessages to include the source address check function receiveWormholeMessages( bytes memory payload, bytes[] memory, bytes32 sourceAddress, uint16 sourceChain, bytes32 ) public payable override isRegisteredSender(sourceChain, sourceAddress) { require( msg.sender == address(wormholeRelayer), "Only the Wormhole relayer can call this function" ); // Decode the payload to extract the message string memory message = abi.decode(payload, (string)); // Example use of sourceChain for logging if (sourceChain != 0) { emit SourceChainLogged(sourceChain); } // Emit an event with the received message emit MessageReceived(message); } } ``` ## Deploy Contracts This section will guide you through deploying the cross-chain messaging contracts on the Avalanche Fuji and Celo Alfajores Testnets. Follow these steps to get your contracts up and running. ### Deployment Tools We use _Foundry_ to deploy our smart contracts. However, you can use any tool you're comfortable with, such as: - [Remix](https://remix.ethereum.org/){target=\_blank} for a browser-based IDE - [Hardhat](https://hardhat.org/hardhat-runner/docs/getting-started#installation){target=\_blank} for a more extensive JavaScript/TypeScript workflow - [Foundry](https://getfoundry.sh/introduction/installation/){target=\_blank} for a CLI-focused experience with built-in scripting and testing features The contracts and deployment steps remain the same regardless of your preferred tool. The key is to ensure you have the necessary Testnet funds and are deploying to the right networks. ### Repository Setup To get started with cross-chain messaging using Wormhole, first clone the [GitHub repository](https://github.com/wormhole-foundation/demo-wormhole-messaging){target=\_blank}. This repository includes everything you need to deploy, interact, and test the message flow between chains. This demo focuses on using the scripts, so it's best to take a look at them, starting with `deploySender.ts`, `deployReceiver.ts`, and `sendMessage.ts`. To configure the dependencies properly, run the following command: ```bash npm install ``` The repository includes: - Two Solidity contracts: - **`MessageSender.sol`** - contract that sends the cross-chain message from Avalanche - **`MessageReceiver.sol`** - contract that receives the cross-chain message on Celo - Deployment scripts located in the `script` directory: - **`deploySender.ts`** - deploys the `MessageSender` contract to Avalanche - **`deployReceiver.ts`** - deploys the `MessageReceiver` contract to Celo - **`sendMessage.ts`** - sends a message from Avalanche to Celo - Configuration files and ABI JSON files for easy deployment and interaction: - **`chains.json`** - configuration file that stores key information for the supported Testnets, including the Wormhole relayer addresses, RPC URLs, and chain IDs. You likely won't need to modify this file unless you're working with different networks - A dedicated `interfaces` directory inside the `src` folder for TypeScript type definitions: - **`ChainsConfig.ts`** - defines the types for the `chains.json` configuration file - **`DeployedContracts.ts`** - contains types for deployed contract addresses and related information - **`MessageJsons.ts`** - includes types for ABI and bytecode JSONs used by the deployment scripts - **`index.ts`** - serves as an export aggregator for the interfaces, simplifying imports in other files ### Important Setup Steps 1. **Add your private key** - create a `.env` file in the root of the project and add your private key: ```env touch .env ``` Inside `.env`, add your private key in the following format: ```env PRIVATE_KEY=INSERT_PRIVATE_KEY ``` 2. **Compile the contracts** - ensure everything is set up correctly by compiling the contracts: ```bash forge build ``` The expected output should be similar to this:
forge build > [⠒] Compiling... > [⠰] Compiling 30 files with 0.8.23 [⠔] Solc 0.8.23 finished in 2.29s Compiler run successful!
### Deployment Process Both deployment scripts, `deploySender.ts` and `deployReceiver.ts`, perform the following key tasks: 1. **Load configuration and contract details** - each script begins by loading the necessary configuration details, such as the network's RPC URL and the contract's ABI and bytecode. This information is essential for deploying the contract to the correct blockchain network === "`chains.json`" ```json { "chains": [ { "description": "Avalanche testnet fuji", "chainId": 6, "rpc": "https://api.avax-test.network/ext/bc/C/rpc", "tokenBridge": "0x61E44E506Ca5659E6c0bba9b678586fA2d729756", "wormholeRelayer": "0xA3cF45939bD6260bcFe3D66bc73d60f19e49a8BB", "wormhole": "0x7bbcE28e64B3F8b84d876Ab298393c38ad7aac4C" }, { "description": "Celo Testnet", "chainId": 14, "rpc": "https://alfajores-forno.celo-testnet.org", "tokenBridge": "0x05ca6037eC51F8b712eD2E6Fa72219FEaE74E153", "wormholeRelayer": "0x306B68267Deb7c5DfCDa3619E22E9Ca39C374f84", "wormhole": "0x88505117CA88e7dd2eC6EA1E13f0948db2D50D56" } ] } ``` === "`deploySender.ts`" ```typescript const chains: ChainsConfig = JSON.parse( fs.readFileSync( path.resolve(__dirname, '../deploy-config/chains.json'), 'utf8' ) ); // Get the Avalanche Fuji configuration const avalancheChain = chains.chains.find((chain) => chain.description.includes('Avalanche testnet') ); ``` === "`deployReceiver.ts`" ```typescript const chains: ChainsConfig = JSON.parse( fs.readFileSync( path.resolve(__dirname, '../deploy-config/chains.json'), 'utf8' ) ); // Get the Celo Testnet configuration const celoChain = chains.chains.find((chain) => chain.description.includes('Celo Testnet') ); ``` !!! note The `chains.json` file contains the configuration details for the Avalanche Fuji and Celo Alfajores Testnets. You can modify this file to add more networks if needed. For a complete list of contract addresses, visit the [reference page](/docs/products/reference/contract-addresses/){target=\_blank}. 2. **Set up provider and wallet** - the scripts establish a connection to the blockchain using a provider and create a wallet instance using a private key. This wallet is responsible for signing the deployment transaction === "`deploySender.ts`" ```typescript const wallet = new ethers.Wallet(process.env.PRIVATE_KEY, provider); ``` === "`deployReceiver.ts`" ```typescript const wallet = new ethers.Wallet(process.env.PRIVATE_KEY, provider); ``` 3. **Deploy the contract** - the contract is deployed to the network specified in the configuration. Upon successful deployment, the contract address is returned, which is crucial for interacting with the contract later on === "`deploySender.ts`" ```typescript avalancheChain.wormholeRelayer ); await senderContract.waitForDeployment(); ``` === "`deployReceiver.ts`" ```typescript celoChain.wormholeRelayer ); await receiverContract.waitForDeployment(); ``` 4. **Register the `MessageSender` on the target chain** - after you deploy the `MessageReceiver` contract on the Celo Alfajores network, the sender contract address from Avalanche Fuji needs to be registered. This ensures that only messages from the registered `MessageSender` contract are processed This additional step is essential to enforce emitter validation, preventing unauthorized senders from delivering messages to the `MessageReceiver` contract ```typescript const avalancheSenderAddress = deployedContracts.avalanche?.MessageSender; if (!avalancheSenderAddress) { throw new Error('Avalanche MessageSender address not found.'); } // Define the source chain ID for Avalanche Fuji const sourceChainId = 6; // Call setRegisteredSender on the MessageReceiver contract const tx = await (receiverContract as any).setRegisteredSender( sourceChainId, ethers.zeroPadValue(avalancheSenderAddress, 32) ); await tx.wait(); ``` You can find the full code for the `deploySender.ts` and `deployReceiver.ts` below. ??? code "deploySender.ts" ```typescript import { ethers } from 'ethers'; import fs from 'fs'; import path from 'path'; import dotenv from 'dotenv'; import { ChainsConfig, DeployedContracts, MessageSenderJson, } from './interfaces'; dotenv.config(); async function main(): Promise { // Load the chain configuration from JSON const chains: ChainsConfig = JSON.parse( fs.readFileSync( path.resolve(__dirname, '../deploy-config/chains.json'), 'utf8' ) ); // Get the Avalanche Fuji configuration const avalancheChain = chains.chains.find((chain) => chain.description.includes('Avalanche testnet') ); if (!avalancheChain) { throw new Error( 'Avalanche testnet configuration not found in chains.json.' ); } // Set up the provider and wallet const provider = new ethers.JsonRpcProvider(avalancheChain.rpc); const wallet = new ethers.Wallet(process.env.PRIVATE_KEY, provider); // Load the ABI and bytecode of the MessageSender contract const messageSenderJson: MessageSenderJson = JSON.parse( fs.readFileSync( path.resolve(__dirname, '../out/MessageSender.sol/MessageSender.json'), 'utf8' ) ); const { abi, bytecode } = messageSenderJson; // Create a ContractFactory for MessageSender const MessageSender = new ethers.ContractFactory(abi, bytecode, wallet); // Deploy the contract using the Wormhole Relayer address for Avalanche Fuji const senderContract = await MessageSender.deploy( avalancheChain.wormholeRelayer ); await senderContract.waitForDeployment(); console.log('MessageSender deployed to:', senderContract.target); // `target` is the address in ethers.js v6 // Update the deployedContracts.json file const deployedContractsPath = path.resolve( __dirname, '../deploy-config/deployedContracts.json' ); const deployedContracts: DeployedContracts = JSON.parse( fs.readFileSync(deployedContractsPath, 'utf8') ); deployedContracts.avalanche = { MessageSender: senderContract.target as any, deployedAt: new Date().toISOString(), }; fs.writeFileSync( deployedContractsPath, JSON.stringify(deployedContracts, null, 2) ); } main().catch((error) => { console.error(error); process.exit(1); }); ``` ??? code "deployReceiver.ts" ```typescript import { ethers } from 'ethers'; import fs from 'fs'; import path from 'path'; import dotenv from 'dotenv'; import { ChainsConfig, DeployedContracts, MessageReceiverJson, } from './interfaces'; dotenv.config(); async function main(): Promise { // Load the chain configuration from the JSON file const chains: ChainsConfig = JSON.parse( fs.readFileSync( path.resolve(__dirname, '../deploy-config/chains.json'), 'utf8' ) ); // Get the Celo Testnet configuration const celoChain = chains.chains.find((chain) => chain.description.includes('Celo Testnet') ); if (!celoChain) { throw new Error('Celo Testnet configuration not found.'); } // Set up the provider and wallet const provider = new ethers.JsonRpcProvider(celoChain.rpc); const wallet = new ethers.Wallet(process.env.PRIVATE_KEY, provider); // Load the ABI and bytecode of the MessageReceiver contract const messageReceiverJson: MessageReceiverJson = JSON.parse( fs.readFileSync( path.resolve( __dirname, '../out/MessageReceiver.sol/MessageReceiver.json' ), 'utf8' ) ); const { abi, bytecode } = messageReceiverJson; // Create a ContractFactory for MessageReceiver const MessageReceiver = new ethers.ContractFactory(abi, bytecode, wallet); // Deploy the contract using the Wormhole Relayer address for Celo Testnet const receiverContract = await MessageReceiver.deploy( celoChain.wormholeRelayer ); await receiverContract.waitForDeployment(); console.log('MessageReceiver deployed to:', receiverContract.target); // `target` is the contract address in ethers.js v6 // Update the deployedContracts.json file const deployedContractsPath = path.resolve( __dirname, '../deploy-config/deployedContracts.json' ); const deployedContracts: DeployedContracts = JSON.parse( fs.readFileSync(deployedContractsPath, 'utf8') ); // Retrieve the address of the MessageSender from the deployedContracts.json file const avalancheSenderAddress = deployedContracts.avalanche?.MessageSender; if (!avalancheSenderAddress) { throw new Error('Avalanche MessageSender address not found.'); } // Define the source chain ID for Avalanche Fuji const sourceChainId = 6; // Call setRegisteredSender on the MessageReceiver contract const tx = await (receiverContract as any).setRegisteredSender( sourceChainId, ethers.zeroPadValue(avalancheSenderAddress, 32) ); await tx.wait(); console.log( `Registered MessageSender (${avalancheSenderAddress}) for Avalanche chain (${sourceChainId})` ); deployedContracts.celo = { MessageReceiver: receiverContract.target as any, deployedAt: new Date().toISOString(), }; fs.writeFileSync( deployedContractsPath, JSON.stringify(deployedContracts, null, 2) ); } main().catch((error) => { console.error(error); process.exit(1); }); ``` ### Deploy the Sender Contract The sender contract will handle quoting and sending messages cross-chain. 1. Run the following command to deploy the sender contract: ```bash npm run deploy:sender ``` 2. Once deployed, the contract address will be displayed. You may check the contract on the [Avalanche Fuji Explorer](https://testnet.snowtrace.io/){target=\_blank}
npm run deploy:sender > wormhole-cross-chain@1.0.0 deploy:sender > node script/deploySender.ts MessageSender deployed to: 0xf5c474f335fFf617fA6FD04DCBb17E20ee0cEfb1
### Deploy the Receiver Contract The receiver contract listens for cross-chain messages and logs them when received. 1. Deploy the receiver contract with this command: ```bash npm run deploy:receiver ``` 2. After deployment, note down the contract address. You may check the contract on the [Celo Alfajores Explorer](https://alfajores.celoscan.io/){target=\_blank}. ## Send a Cross-Chain Message Now that both the sender and receiver contracts are deployed, let's move on to the next exciting step: sending a cross-chain message from Avalanche Fuji to Celo Alfajores. In this example, we will use the `sendMessage.ts` script to transmit a message from the sender contract on Avalanche to the receiver contract on Celo. The script uses [Ethers.js](https://docs.ethers.org/v6/){target=\_blank} to interact with the deployed contracts, calculate the cross-chain cost dynamically, and handle the transaction. Let's break down the script step by step. 1. **Load configuration files** 1. **`chains.json`** - contains details about the supported Testnet chains, such as RPC URLs and relayer addresses 2. **`deployedContracts.json`** - stores the addresses of the deployed sender and receiver contracts. This file is dynamically updated when contracts are deployed, but users can also manually add their own deployed contract addresses if needed ```typescript fs.readFileSync( path.resolve(__dirname, '../deploy-config/chains.json'), 'utf8' ) ); const deployedContracts: DeployedContracts = JSON.parse( fs.readFileSync( path.resolve(__dirname, '../deploy-config/deployedContracts.json'), 'utf8' ) ); ``` 2. **Configure the provider and signer** - the script first reads the chain configurations and extracts the contract addresses. One essential step in interacting with a blockchain is setting up a _provider_. A provider is your connection to the blockchain network. It allows your script to interact with the blockchain, retrieve data, and send transactions. In this case, we're using a JSON-RPC provider Next, we configure the wallet, which will be used to sign transactions. The wallet is created using the private key and the provider. This ensures that all transactions sent from this wallet are broadcast to the Avalanche Fuji network: ```typescript const wallet = new ethers.Wallet(process.env.PRIVATE_KEY, provider); ``` After setting up the wallet, the script loads the ABI for the `MessageSender.sol` contract and creates an instance of it: ```typescript fs.readFileSync( path.resolve(__dirname, '../out/MessageSender.sol/MessageSender.json'), 'utf8' ) ); ``` 3. **Set up the message details** - the next part of the script defines the target chain (Celo) and the target address (the receiver contract on Celo): ```typescript const targetAddress = deployedContracts.celo.MessageReceiver; ``` You can customize the message that will be sent across chains: ```typescript ``` 4. **Estimate cross-chain cost** - before sending the message, we dynamically calculate the cross-chain cost using the `quoteCrossChainCost` function: ```typescript ``` This ensures that the transaction includes enough funds to cover the gas fees for the cross-chain message. 5. **Send a message** - with everything set up, the message is sent using the `sendMessage` function: ```typescript targetChain, targetAddress, message, { value: txCost, } ); ``` After sending, the script waits for the transaction to be confirmed: ```typescript ``` 6. **Run the script** - to send the message, run the following command: ```bash npm run send:message ``` If everything is set up correctly, the message will be sent from the Avalanche Fuji Testnet to the Celo Alfajores Testnet. You can monitor the transaction and verify that the message was received on Celo using the [Wormhole Explorer](https://wormholescan.io/#/?network=TESTNET){target=\_blank}. The console should output something similar to this:
npm run send:message > wormhole-cross-chain@1.0.0 send:message > node script/sendMessage.ts Sender Contract Address: 0xD720BFF42a0960cfF1118454A907a44dB358f2b1 Receiver Contract Address: 0x692550997C252cC5044742D1A2BD91E4f4b46D39 ... Transaction sent, waiting for confirmation... ... Message sent! Transaction hash: 0x9d359a66ba42baced80062229c0b02b4f523fe304aff3473dcf53117aee13fb6 You may see the transaction status on the Wormhole Explorer: https://wormholescan.io/#/tx/0x9d359a66ba42baced80062229c0b02b4f523fe304aff3473dcf53117aee13fb6?network=TESTNET
You can find the full code for the `sendMessage.ts` below. ??? code "sendMessage.ts" ```solidity import { ethers } from 'ethers'; import fs from 'fs'; import path from 'path'; import dotenv from 'dotenv'; import { ChainsConfig, DeployedContracts } from './interfaces'; dotenv.config(); async function main(): Promise { // Load the chain configuration and deployed contract addresses const chains: ChainsConfig = JSON.parse( fs.readFileSync( path.resolve(__dirname, '../deploy-config/chains.json'), 'utf8' ) ); const deployedContracts: DeployedContracts = JSON.parse( fs.readFileSync( path.resolve(__dirname, '../deploy-config/deployedContracts.json'), 'utf8' ) ); console.log( 'Sender Contract Address: ', deployedContracts.avalanche.MessageSender ); console.log( 'Receiver Contract Address: ', deployedContracts.celo.MessageReceiver ); console.log('...'); // Get the Avalanche Fuji configuration const avalancheChain = chains.chains.find((chain) => chain.description.includes('Avalanche testnet') ); if (!avalancheChain) { throw new Error( 'Avalanche testnet configuration not found in chains.json.' ); } // Set up the provider and wallet const provider = new ethers.JsonRpcProvider(avalancheChain.rpc); const wallet = new ethers.Wallet(process.env.PRIVATE_KEY, provider); // Load the ABI of the MessageSender contract const messageSenderJson = JSON.parse( fs.readFileSync( path.resolve(__dirname, '../out/MessageSender.sol/MessageSender.json'), 'utf8' ) ); const abi = messageSenderJson.abi; // Create a contract instance for MessageSender const MessageSender = new ethers.Contract( deployedContracts.avalanche.MessageSender, // Automatically use the deployed address abi, wallet ); // Define the target chain and target address (the Celo receiver contract) const targetChain = 14; // Wormhole chain ID for Celo Alfajores const targetAddress = deployedContracts.celo.MessageReceiver; // The message you want to send const message = 'Hello from Avalanche to Celo!'; // Dynamically quote the cross-chain cost const txCost = await MessageSender.quoteCrossChainCost(targetChain); // Send the message (make sure to send enough gas in the transaction) const tx = await MessageSender.sendMessage( targetChain, targetAddress, message, { value: txCost, } ); console.log('Transaction sent, waiting for confirmation...'); await tx.wait(); console.log('...'); console.log('Message sent! Transaction hash:', tx.hash); console.log( `You may see the transaction status on the Wormhole Explorer: https://wormholescan.io/#/tx/${tx.hash}?network=TESTNET` ); } main().catch((error) => { console.error(error); process.exit(1); }); ``` ## Conclusion You're now fully equipped to build cross-chain contracts using the Wormhole protocol! With this tutorial, you've learned how to: - Deploy sender and receiver contracts on different Testnets - Send a cross-chain message from one blockchain to another - Monitor the status of your cross-chain transactions using the Wormhole Explorer and Wormhole-Solidity-SDK Looking for more? Check out the [Wormhole Tutorial Demo repository](https://github.com/wormhole-foundation/demo-tutorials){target=\_blank} for additional examples. --- END CONTENT --- Doc-Content: https://raw.githubusercontent.com/wormhole-foundation/wormhole-docs/refs/heads/main/products/messaging/tutorials/cross-chain-token-contracts.md --- BEGIN CONTENT --- --- title: Cross-Chain Token Transfers description: Learn how to create cross-chain token transfers using Wormhole's Solidity SDK. Build and deploy smart contracts to send tokens from one blockchain to another. categories: Basics --- # Create Cross-Chain Token Transfer Contracts :simple-github: [Source code on GitHub](https://github.com/wormhole-foundation/demo-cross-chain-token-transfer){target=\_blank} In this tutorial, you'll learn how to create a simple cross-chain token transfer system using the Wormhole protocol via the [Wormhole Solidity SDK](https://github.com/wormhole-foundation/wormhole-solidity-sdk){target=\_blank}. We'll guide you through building and deploying smart contracts that enable seamless token transfers of IERC-20 tokens between blockchains. Whether you're a developer looking to explore cross-chain applications or just interested in the Wormhole protocol, this guide will help you understand the fundamentals. By the end of this tutorial, you'll have a working cross-chain token transfer system built with the powerful tools provided by the Wormhole Solidity SDK, which you can further customize and integrate into your projects. ## Prerequisites Before you begin, ensure you have the following: - [Node.js and npm](https://docs.npmjs.com/downloading-and-installing-node-js-and-npm){target=\_blank} installed on your machine - [Foundry](https://getfoundry.sh/introduction/installation/){target=\_blank} for deploying contracts - Testnet tokens for [Avalanche-Fuji](https://core.app/tools/testnet-faucet/?token=C){target=\_blank} and [Celo-Alfajores](https://faucet.celo.org/alfajores){target=\_blank} to cover gas fees - [USDC Testnet](https://faucet.circle.com/){target=\_blank} tokens on Avalanche-Fuji or/and Celo-Alfajores for cross-chain transfer - Wallet private key ## Valid Tokens for Transfer It's important to note that this tutorial leverages [Wormhole's TokenBridge](https://github.com/wormhole-foundation/wormhole/blob/6130bbb6f456b42b789a71f7ea2fd049d632d2fb/ethereum/contracts/bridge/TokenBridge.sol){target=\_blank} to transfer tokens between chains. So, the tokens you'd like to transfer must have an attestation on the `TokenBridge` contract of the target blockchain. To simplify this process, we've included a tool for verifying if a token has an attestation on the target chain. This tool uses the [`wrappedAsset`](https://github.com/wormhole-foundation/wormhole/blob/6130bbb6f456b42b789a71f7ea2fd049d632d2fb/ethereum/contracts/bridge/BridgeGetters.sol#L50-L52){target=\_blank} function from the `TokenBridge` contract. If the token has an attestation, the `wrappedAsset` function returns the address of the wrapped token on the target chain; otherwise, it returns the zero address. ???- tip "Check Token Attestation" 1. Clone the [repository](https://github.com/wormhole-foundation/demo-cross-chain-token-transfer){target=\_blank} and navigate to the project directory: ```bash git clone https://github.com/wormhole-foundation/demo-cross-chain-token-transfer.git cd cross-chain-token-transfers ``` 2. Install the dependencies: ```bash npm install ``` 3. Run the script to check token attestation: ```bash npm run verify ``` 4. Follow the prompts: 1. Enter the RPC URL of the target chain 2. Enter the `TokenBridge` contract address on the target chain 3. Enter the token contract address on the source chain 4. Enter the source chain ID 5. The expected output when the token has an attestation:
npm run verify > cross-chain-token-transfer@1.0.0 verify > npx ts-node script/check-attestation.ts Enter the TARGET chain RPC URL: https://alfajores-forno.celo-testnet.org Enter the Token Bridge contract address on the TARGET chain: 0x05...E153 Enter the token contract address on the SOURCE chain: 0x54...bc65 Enter the SOURCE chain ID: 6 The token is attested on the target chain. Wrapped token address: 0xDDB349c976cA2C873644F21f594767Eb5390C831
Using this tool ensures that you only attempt to transfer tokens with verified attestations, avoiding any potential issues during the cross-chain transfer process. ## Project Setup Let's start by initializing a new Foundry project. This will set up a basic structure for our smart contracts. 1. Open your terminal and run the following command to initialize a new Foundry project: ```bash forge init cross-chain-token-transfers ``` This will create a new directory named `cross-chain-token-transfers` with a basic project structure. This also initializes a new `git` repository. 2. Navigate into the newly created project directory: ```bash cd cross-chain-token-transfers ``` 3. Install the Wormhole Solidity SDK: ```bash forge install wormhole-foundation/wormhole-solidity-sdk ``` To ease development, we'll use the Wormhole Solidity SDK, which provides useful helpers for cross-chain development. This SDK includes the `TokenSender` and `TokenReceiver` abstract classes, which simplify sending and receiving tokens across chains. ## Build Cross-Chain Contracts In this section, we'll build two smart contracts to send tokens from a source chain and receive them on a target chain. These contracts will interact with the Wormhole protocol to facilitate secure and seamless cross-chain token transfers. At a high level, our contracts will: 1. Send tokens from one blockchain to another using the Wormhole protocol 2. Receive and process the tokens on the target chain, ensuring they are correctly transferred to the intended recipient Before diving into the contract implementation steps, let’s first break down the key parts of the contracts. ### Sender Contract: CrossChainSender The `CrossChainSender` contract calculates the cost of sending tokens across chains and then facilitates the actual token transfer. Let's start writing the `CrossChainSender` contract: 1. Create a new file named `CrossChainSender.sol` in the `/src` directory: ```bash touch src/CrossChainSender.sol ``` 2. Open the file. First, we'll start with the imports and the contract setup: ```solidity pragma solidity ^0.8.13; import "lib/wormhole-solidity-sdk/src/WormholeRelayerSDK.sol"; import "lib/wormhole-solidity-sdk/src/interfaces/IERC20.sol"; contract CrossChainSender is TokenSender { uint256 constant GAS_LIMIT = 250_000; constructor( address _wormholeRelayer, address _tokenBridge, address _wormhole ) TokenBase(_wormholeRelayer, _tokenBridge, _wormhole) {} ``` This sets up the basic structure of the contract, including the necessary imports and the constructor that initializes the contract with the Wormhole-related addresses. With the contract structure in place, define the following functions within its body to enable multichain token transfers. 3. Next, let's add a function that estimates the cost of sending tokens across chains: ```solidity uint16 targetChain ) public view returns (uint256 cost) { uint256 deliveryCost; (deliveryCost, ) = wormholeRelayer.quoteEVMDeliveryPrice( targetChain, 0, GAS_LIMIT ); cost = deliveryCost + wormhole.messageFee(); } ``` This function, `quoteCrossChainDeposit`, helps calculate the cost of transferring tokens to a different chain. It factors in the delivery cost and the cost of publishing a message via the Wormhole protocol. 4. Finally, we'll add the function that sends the tokens across chains: ```solidity uint16 targetChain, address targetReceiver, address recipient, uint256 amount, address token ) public payable { uint256 cost = quoteCrossChainDeposit(targetChain); require( msg.value == cost, "msg.value must equal quoteCrossChainDeposit(targetChain)" ); IERC20(token).transferFrom(msg.sender, address(this), amount); bytes memory payload = abi.encode(recipient); sendTokenWithPayloadToEvm( targetChain, targetReceiver, payload, 0, GAS_LIMIT, token, amount ); } ``` This `sendCrossChainDeposit` function is where the actual token transfer happens. It sends the tokens to the recipient on the target chain using the Wormhole protocol. Here’s a breakdown of what happens in each step of the `sendCrossChainDeposit` function: 1. **Cost calculation** - the function starts by calculating the cost of the cross-chain transfer using `quoteCrossChainDeposit`(`targetChain`). This cost includes both the delivery fee and the Wormhole message fee. The `sendCrossChainDeposit` function then checks that the user has sent the correct amount of Ether to cover this cost (`msg.value`) 2. **Token transfer to contract** - the next step is to transfer the specified amount of tokens from the user to the contract itself using `IERC-20(token).transferFrom(msg.sender, address(this), amount)`. This ensures that the contract has custody of the tokens before initiating the cross-chain transfer 3. **Payload encoding** - The recipient's address on the target chain is encoded into a payload using `abi.encode(recipient)`. This payload will be sent along with the token transfer, so the target contract knows who should receive the tokens on the destination chain 4. **Cross-chain transfer** - the `sendTokenWithPayloadToEvm` function is called to initiate the cross-chain token transfer. This function: - Specifies the `targetChain` (the Wormhole chain ID of the destination blockchain). - Sends the `targetReceiver` contract address on the target chain that will receive the tokens. - Attaches the payload containing the recipient's address. - Sets the `GAS_LIMIT` for the transaction. - Passes the token `address` and `amount` to transfer. This triggers the Wormhole protocol to handle the cross-chain messaging and token transfer, ensuring the tokens and payload reach the correct destination on the target chain. You can find the complete code for the `CrossChainSender.sol` below. ??? code "MessageSender.sol" ```solidity // SPDX-License-Identifier: MIT pragma solidity ^0.8.13; import "lib/wormhole-solidity-sdk/src/WormholeRelayerSDK.sol"; import "lib/wormhole-solidity-sdk/src/interfaces/IERC20.sol"; contract CrossChainSender is TokenSender { uint256 constant GAS_LIMIT = 250_000; constructor( address _wormholeRelayer, address _tokenBridge, address _wormhole ) TokenBase(_wormholeRelayer, _tokenBridge, _wormhole) {} // Function to get the estimated cost for cross-chain deposit function quoteCrossChainDeposit( uint16 targetChain ) public view returns (uint256 cost) { uint256 deliveryCost; (deliveryCost, ) = wormholeRelayer.quoteEVMDeliveryPrice( targetChain, 0, GAS_LIMIT ); cost = deliveryCost + wormhole.messageFee(); } // Function to send tokens and payload across chains function sendCrossChainDeposit( uint16 targetChain, address targetReceiver, address recipient, uint256 amount, address token ) public payable { uint256 cost = quoteCrossChainDeposit(targetChain); require( msg.value == cost, "msg.value must equal quoteCrossChainDeposit(targetChain)" ); IERC20(token).transferFrom(msg.sender, address(this), amount); bytes memory payload = abi.encode(recipient); sendTokenWithPayloadToEvm( targetChain, targetReceiver, payload, 0, GAS_LIMIT, token, amount ); } } ``` ### Receiver Contract: CrossChainReceiver The `CrossChainReceiver` contract is designed to handle the receipt of tokens and payloads from another blockchain. It ensures that the tokens are correctly transferred to the designated recipient on the receiving chain. Let's start writing the `CrossChainReceiver` contract: 1. Create a new file named `CrossChainReceiver.sol` in the `/src` directory: ```bash touch src/CrossChainReceiver.sol ``` 2. Open the file. First, we'll start with the imports and the contract setup: ```solidity pragma solidity ^0.8.13; import "lib/wormhole-solidity-sdk/src/WormholeRelayerSDK.sol"; import "lib/wormhole-solidity-sdk/src/interfaces/IERC20.sol"; contract CrossChainReceiver is TokenReceiver { // The Wormhole relayer and registeredSenders are inherited from the Base.sol contract constructor( address _wormholeRelayer, address _tokenBridge, address _wormhole ) TokenBase(_wormholeRelayer, _tokenBridge, _wormhole) {} ``` Similar to the `CrossChainSender` contract, this sets up the basic structure of the contract, including the necessary imports and the constructor that initializes the contract with the Wormhole-related addresses. 3. Next, let's add a function inside the contract to handle receiving the payload and tokens: ```solidity bytes memory payload, TokenReceived[] memory receivedTokens, bytes32 sourceAddress, uint16 sourceChain, bytes32 // deliveryHash ) internal override onlyWormholeRelayer isRegisteredSender(sourceChain, sourceAddress) { require(receivedTokens.length == 1, "Expected 1 token transfer"); // Decode the recipient address from the payload address recipient = abi.decode(payload, (address)); // Transfer the received tokens to the intended recipient IERC20(receivedTokens[0].tokenAddress).transfer( recipient, receivedTokens[0].amount ); } ``` This `receivePayloadAndTokens` function processes the tokens and payload sent from another chain, decodes the recipient address, and transfers the tokens to them using the Wormhole protocol. This function also validates the emitter (`sourceAddress`) to ensure the message comes from a trusted sender. This function ensures that: - It only processes one token transfer at a time - The `sourceAddress` is checked against a list of registered senders using the `isRegisteredSender` modifier, which verifies if the emitter is allowed to send tokens to this contract - The recipient address is decoded from the payload, and the received tokens are transferred to them using the ERC-20 interface After we call `sendTokenWithPayloadToEvm` on the source chain, the message goes through the standard Wormhole message lifecycle. Once a [VAA (Verifiable Action Approval)](/docs/protocol/infrastructure/vaas/){target=\_blank} is available, the delivery provider will call `receivePayloadAndTokens` on the target chain and target address specified, with the appropriate inputs. ??? tip "Understanding the `TokenReceived` Struct" Let’s delve into the fields provided to us in the `TokenReceived` struct: ```solidity struct TokenReceived { bytes32 tokenHomeAddress; uint16 tokenHomeChain; address tokenAddress; uint256 amount; uint256 amountNormalized; } ``` - **`tokenHomeAddress`** - the original address of the token on its native chain. This is the same as the token field in the call to `sendTokenWithPayloadToEvm` unless the original token sent is a Wormhole-wrapped token. In that case, this will be the address of the original version of the token (on its native chain) in Wormhole address format (left-padded with 12 zeros) - **`tokenHomeChain`** - the Wormhole chain ID corresponding to the home address above. This will typically be the source chain unless the original token sent is a Wormhole-wrapped asset, which will be the chain of the unwrapped version of the token - **`tokenAddress`** - the address of the IERC-20 token on the target chain that has been transferred to this contract. If `tokenHomeChain` equals the target chain, this will be the same as `tokenHomeAddress`; otherwise, it will be the Wormhole-wrapped version of the token sent - **`amount`** - the token amount sent to you with the same units as the original token. Since `TokenBridge` only sends with eight decimals of precision, if your token has 18 decimals, this will be the "amount" you sent, rounded down to the nearest multiple of 10^10 - **`amountNormalized`** - the amount of token divided by (1 if decimals ≤ 8, else 10^(decimals - 8)) You can find the complete code for the `CrossChainReceiver.sol` contract below: ??? code "CrossChainReceiver.sol" ```solidity // SPDX-License-Identifier: MIT pragma solidity ^0.8.13; import "lib/wormhole-solidity-sdk/src/WormholeRelayerSDK.sol"; import "lib/wormhole-solidity-sdk/src/interfaces/IERC20.sol"; contract CrossChainReceiver is TokenReceiver { // The Wormhole relayer and registeredSenders are inherited from the Base.sol contract constructor( address _wormholeRelayer, address _tokenBridge, address _wormhole ) TokenBase(_wormholeRelayer, _tokenBridge, _wormhole) {} // Function to receive the cross-chain payload and tokens with emitter validation function receivePayloadAndTokens( bytes memory payload, TokenReceived[] memory receivedTokens, bytes32 sourceAddress, uint16 sourceChain, bytes32 // deliveryHash ) internal override onlyWormholeRelayer isRegisteredSender(sourceChain, sourceAddress) { require(receivedTokens.length == 1, "Expected 1 token transfer"); // Decode the recipient address from the payload address recipient = abi.decode(payload, (address)); // Transfer the received tokens to the intended recipient IERC20(receivedTokens[0].tokenAddress).transfer( recipient, receivedTokens[0].amount ); } } ``` ## Deploy the Contracts Now that you've written the `CrossChainSender` and `CrossChainReceiver` contracts, it's time to deploy them to your chosen networks. 1. **Set up deployment configuration** - before deploying, you must configure the networks and the deployment environment. This information is stored in a configuration file 1. Create a directory named deploy-config in the root of your project: ```bash mkdir deploy-config ``` 2. Create a `config.json` file in the `deploy-config` directory: ```bash touch deploy-config/config.json ``` 3. Open the `config.json` file and add the following configuration: ```json { "chains": [ { "description": "Avalanche testnet fuji", "chainId": 6, "rpc": "https://api.avax-test.network/ext/bc/C/rpc", "tokenBridge": "0x61E44E506Ca5659E6c0bba9b678586fA2d729756", "wormholeRelayer": "0xA3cF45939bD6260bcFe3D66bc73d60f19e49a8BB", "wormhole": "0x7bbcE28e64B3F8b84d876Ab298393c38ad7aac4C" }, { "description": "Celo Testnet", "chainId": 14, "rpc": "https://alfajores-forno.celo-testnet.org", "tokenBridge": "0x05ca6037eC51F8b712eD2E6Fa72219FEaE74E153", "wormholeRelayer": "0x306B68267Deb7c5DfCDa3619E22E9Ca39C374f84", "wormhole": "0x88505117CA88e7dd2eC6EA1E13f0948db2D50D56" } ] } ``` This file specifies the details for each chain where you plan to deploy your contracts, including the RPC URL, the `TokenBridge` address, the Wormhole relayer, and the Wormhole Core Contract. For a complete list of Wormhole contract addresses on various blockchains, refer to the [Wormhole Contract Addresses](/docs/products/reference/contract-addresses/){target=\_blank}. !!! note You can add your desired chains to this file by specifying the required fields for each chain. In this example, we use the Avalanche Fuji and Celo Alfajores Testnets. 4. Create a `contracts.json` file in the `deploy-config` directory: ```bash echo '{}' > deploy-config/contracts.json ``` This file can be left blank initially. It will be automatically updated with the deployed contract addresses after a successful deployment 2. **Set up your Node.js environment** - you'll need to set up your Node.js environment to run the deployment script 1. Initialize a Node.js project: ```bash npm init -y ``` 2. Create a `.gitignore` file to ensure your private key isn't accidentally exposed or committed to version control: ```bash echo ".env" >> .gitignore ``` 3. Install the necessary dependencies: ```bash npm install ethers dotenv readline-sync @types/readline-sync ``` These dependencies are required for the deployment script to work properly. 3. **Compile your smart contracts** - compile your smart contracts using Foundry. This ensures that your contracts are up-to-date and ready for deployment - Run the following command to compile your contracts: ```bash forge build ``` This will generate the necessary ABI and bytecode files in a directory named `/out`. The expected output should be similar to this:
forge build > [⠒] Compiling... > [⠰] Compiling 30 files with 0.8.23 [⠔] Solc 0.8.23 finished in 2.29s Compiler run successful!
4. **Write the deployment script** - you’ll need a script to automate the deployment of your contracts. Let’s create the deployment script 1. Create a new file named `deploy.ts` in the `/script` directory: ```bash touch script/deploy.ts ``` 2. Open the file and load imports and configuration: ```typescript import * as fs from 'fs'; import * as path from 'path'; import * as dotenv from 'dotenv'; import readlineSync from 'readline-sync'; dotenv.config(); ``` Import the required libraries and modules to interact with Ethereum, handle file paths, load environment variables, and enable user interaction via the terminal. 3. Define interfaces to use for chain configuration and contract deployment: ```typescript description: string; chainId: number; rpc: string; tokenBridge: string; wormholeRelayer: string; wormhole: string; } interface DeployedContracts { [chainId: number]: { networkName: string; CrossChainSender?: string; CrossChainReceiver?: string; deployedAt: string; }; } ``` These interfaces define the structure of the chain configuration and the contract deployment details. 4. Load and select the chains for deployment: ```typescript const configPath = path.resolve(__dirname, '../deploy-config/config.json'); return JSON.parse(fs.readFileSync(configPath, 'utf8')).chains; } function selectChain( chains: ChainConfig[], role: 'source' | 'target' ): ChainConfig { console.log(`\nSelect the ${role.toUpperCase()} chain:`); chains.forEach((chain, index) => { console.log(`${index + 1}: ${chain.description}`); }); const chainIndex = readlineSync.questionInt( `\nEnter the number for the ${role.toUpperCase()} chain: ` ) - 1; return chains[chainIndex]; } ``` The `loadConfig` function reads the chain configuration from the `config.json` file, and the `selectChain` function allows the user to choose the source and target chains for deployment interactively. The user is prompted in the terminal to select which chains to use, making the process interactive and user-friendly. 5. Define the main function for deployment and load the chain configuration: ```typescript const chains = loadConfig(); const sourceChain = selectChain(chains, 'source'); const targetChain = selectChain(chains, 'target'); ``` - The `main` function is the entry point for the deployment script - We then call the `loadConfig` function we previously defined to load the chain configuration from the `config.json` file 6. Set up provider and wallet: ```typescript const targetProvider = new ethers.JsonRpcProvider(targetChain.rpc); const wallet = new ethers.Wallet(process.env.PRIVATE_KEY!, sourceProvider); ``` The scripts establish a connection to the blockchain using a provider and create a wallet instance using a private key. This wallet is responsible for signing the deployment transaction on the source chain. 7. Read the compiled contracts: ```typescript fs.readFileSync( path.resolve( __dirname, '../out/CrossChainSender.sol/CrossChainSender.json' ), 'utf8' ) ); ``` - This code reads the `CrossChainSender.json` file, the compiled output of the `CrossChainSender.sol` contract - The file is in the `../out/` directory, which contains the ABI (Application Binary Interface) and bytecode generated during contract compilation - It uses the `fs.readFileSync` function to read the file and `JSON.parse` to convert the file contents (in JSON format) into a JavaScript object 8. Extract the contract ABI and bytecode: ```typescript const bytecode = senderJson.bytecode; ``` - **ABI (Application Binary Interface)** - defines the structure of the contract’s functions, events, and data types, allowing the front end to interact with the contract on the blockchain - **Bytecode** - this is the compiled machine code that will be deployed to the blockchain to create the contract 9. Create the Contract Factory: ```typescript abi, bytecode, wallet ); ``` - **`ethers.ContractFactory`** - creates a new contract factory using the ABI, bytecode, and a wallet (representing the signer). The contract factory is responsible for deploying instances of the contract to the blockchain - This is a crucial step for deploying the contract since the factory will create and deploy the `CrossChainSender` contract 10. Deploy the `CrossChainSender` and `CrossChainReceiver` contracts: === "`CrossChainSender`" ```typescript const senderContract = await CrossChainSenderFactory.deploy( sourceChain.wormholeRelayer, sourceChain.tokenBridge, sourceChain.wormhole ); await senderContract.waitForDeployment(); ``` === "`CrossChainReceiver`" ```typescript process.env.PRIVATE_KEY!, targetProvider ); const receiverJson = JSON.parse( fs.readFileSync( path.resolve( __dirname, '../out/CrossChainReceiver.sol/CrossChainReceiver.json' ), 'utf8' ) ); const CrossChainReceiverFactory = new ethers.ContractFactory( receiverJson.abi, receiverJson.bytecode, targetWallet ); const receiverContract = await CrossChainReceiverFactory.deploy( targetChain.wormholeRelayer, targetChain.tokenBridge, targetChain.wormhole ); await receiverContract.waitForDeployment(); ``` Both functions deploy the respective contracts to the selected chains. For the `CrossChainReceiver` contract: - It defines the wallet related to the target chain - The logic reads the compiled ABI and bytecode from the JSON file generated during compilation - It creates a new contract factory using the ABI, bytecode, and wallet - It deploys the contract to the selected chain passing in the Wormhole Relayer, `TokenBridge`, and Wormhole addresses 11. Save the deployed contract addresses: === "`senderAddress`" ```typescript console.log( `CrossChainSender on ${sourceChain.description}: ${senderAddress}` ); ``` === "`receiverAddress`" ```typescript console.log( `CrossChainReceiver on ${targetChain.description}: ${receiverAddress}` ); ``` You may display the deployed contract addresses in the terminal or save them to a JSON file for future reference. 12. Register the `CrossChainSender` address on the target chain: ```typescript receiverAddress, receiverJson.abi, targetWallet ); const tx = await CrossChainReceiverContract.setRegisteredSender( sourceChain.chainId, ethers.zeroPadValue(senderAddress as BytesLike, 32) ); await tx.wait(); ``` After you deploy the `CrossChainReceiver` contract on the target network, the sender contract address from the source chain needs to be registered. This ensures that only messages from the registered `CrossChainSender` contract are processed. This additional step is essential to enforce emitter validation, preventing unauthorized senders from delivering messages to the `CrossChainReceiver` contract. 13. Save the deployment details: ???- example "Save Deployment Details Example" ```typescript __dirname, '../deploy-config/contracts.json' ); let deployedContracts: DeployedContracts = {}; if (fs.existsSync(deployedContractsPath)) { deployedContracts = JSON.parse( fs.readFileSync(deployedContractsPath, 'utf8') ); } // Update the contracts.json file: // If a contract already exists on a chain, update its address; otherwise, add a new entry. if (!deployedContracts[sourceChain.chainId]) { deployedContracts[sourceChain.chainId] = { networkName: sourceChain.description, deployedAt: new Date().toISOString(), }; } deployedContracts[sourceChain.chainId].CrossChainSender = senderAddress.toString(); deployedContracts[sourceChain.chainId].deployedAt = new Date().toISOString(); if (!deployedContracts[targetChain.chainId]) { deployedContracts[targetChain.chainId] = { networkName: targetChain.description, deployedAt: new Date().toISOString(), }; } deployedContracts[targetChain.chainId].CrossChainReceiver = receiverAddress.toString(); deployedContracts[targetChain.chainId].deployedAt = new Date().toISOString(); // Save the updated contracts.json file fs.writeFileSync( deployedContractsPath, JSON.stringify(deployedContracts, null, 2) ); ``` Add your desired logic to save the deployed contract addresses in a JSON file (or another format). This will be important later when transferring tokens, as you'll need these addresses to interact with the deployed contracts. 14. Handle errors and finalize the script: ```typescript if (error.code === 'INSUFFICIENT_FUNDS') { console.error( 'Error: Insufficient funds for deployment. Please make sure your wallet has enough funds to cover the gas fees.' ); } else { console.error('An unexpected error occurred:', error.message); } process.exit(1); } } main().catch((error) => { console.error(error); process.exit(1); }); ``` The try-catch block wraps the deployment logic to catch any errors that may occur. - If the error is due to insufficient funds, it logs a clear message about needing more gas fees - For any other errors, it logs the specific error message to help with debugging The `process.exit(1)` ensures that the script exits with a failure status code if any error occurs. You can find the full code for the `deploy.ts` file below: ??? code "deploy.ts" ```solidity import { BytesLike, ethers } from 'ethers'; import * as fs from 'fs'; import * as path from 'path'; import * as dotenv from 'dotenv'; import readlineSync from 'readline-sync'; dotenv.config(); interface ChainConfig { description: string; chainId: number; rpc: string; tokenBridge: string; wormholeRelayer: string; wormhole: string; } interface DeployedContracts { [chainId: number]: { networkName: string; CrossChainSender?: string; CrossChainReceiver?: string; deployedAt: string; }; } function loadConfig(): ChainConfig[] { const configPath = path.resolve(__dirname, '../deploy-config/config.json'); return JSON.parse(fs.readFileSync(configPath, 'utf8')).chains; } function selectChain( chains: ChainConfig[], role: 'source' | 'target' ): ChainConfig { console.log(`\nSelect the ${role.toUpperCase()} chain:`); chains.forEach((chain, index) => { console.log(`${index + 1}: ${chain.description}`); }); const chainIndex = readlineSync.questionInt( `\nEnter the number for the ${role.toUpperCase()} chain: ` ) - 1; return chains[chainIndex]; } async function main() { const chains = loadConfig(); const sourceChain = selectChain(chains, 'source'); const targetChain = selectChain(chains, 'target'); const sourceProvider = new ethers.JsonRpcProvider(sourceChain.rpc); const targetProvider = new ethers.JsonRpcProvider(targetChain.rpc); const wallet = new ethers.Wallet(process.env.PRIVATE_KEY!, sourceProvider); const senderJson = JSON.parse( fs.readFileSync( path.resolve( __dirname, '../out/CrossChainSender.sol/CrossChainSender.json' ), 'utf8' ) ); const abi = senderJson.abi; const bytecode = senderJson.bytecode; const CrossChainSenderFactory = new ethers.ContractFactory( abi, bytecode, wallet ); try { const senderContract = await CrossChainSenderFactory.deploy( sourceChain.wormholeRelayer, sourceChain.tokenBridge, sourceChain.wormhole ); await senderContract.waitForDeployment(); // Safely access the deployed contract's address const senderAddress = (senderContract as ethers.Contract).target; console.log( `CrossChainSender on ${sourceChain.description}: ${senderAddress}` ); const targetWallet = new ethers.Wallet( process.env.PRIVATE_KEY!, targetProvider ); const receiverJson = JSON.parse( fs.readFileSync( path.resolve( __dirname, '../out/CrossChainReceiver.sol/CrossChainReceiver.json' ), 'utf8' ) ); const CrossChainReceiverFactory = new ethers.ContractFactory( receiverJson.abi, receiverJson.bytecode, targetWallet ); const receiverContract = await CrossChainReceiverFactory.deploy( targetChain.wormholeRelayer, targetChain.tokenBridge, targetChain.wormhole ); await receiverContract.waitForDeployment(); // Safely access the deployed contract's address const receiverAddress = (receiverContract as ethers.Contract).target; console.log( `CrossChainReceiver on ${targetChain.description}: ${receiverAddress}` ); // Register the sender contract in the receiver contract console.log( `Registering CrossChainSender (${senderAddress}) as a valid sender in CrossChainReceiver (${receiverAddress})...` ); const CrossChainReceiverContract = new ethers.Contract( receiverAddress, receiverJson.abi, targetWallet ); const tx = await CrossChainReceiverContract.setRegisteredSender( sourceChain.chainId, ethers.zeroPadValue(senderAddress as BytesLike, 32) ); await tx.wait(); console.log( `CrossChainSender registered as a valid sender on ${targetChain.description}` ); // Load existing deployed contract addresses from contracts.json const deployedContractsPath = path.resolve( __dirname, '../deploy-config/contracts.json' ); let deployedContracts: DeployedContracts = {}; if (fs.existsSync(deployedContractsPath)) { deployedContracts = JSON.parse( fs.readFileSync(deployedContractsPath, 'utf8') ); } // Update the contracts.json file: // If a contract already exists on a chain, update its address; otherwise, add a new entry. if (!deployedContracts[sourceChain.chainId]) { deployedContracts[sourceChain.chainId] = { networkName: sourceChain.description, deployedAt: new Date().toISOString(), }; } deployedContracts[sourceChain.chainId].CrossChainSender = senderAddress.toString(); deployedContracts[sourceChain.chainId].deployedAt = new Date().toISOString(); if (!deployedContracts[targetChain.chainId]) { deployedContracts[targetChain.chainId] = { networkName: targetChain.description, deployedAt: new Date().toISOString(), }; } deployedContracts[targetChain.chainId].CrossChainReceiver = receiverAddress.toString(); deployedContracts[targetChain.chainId].deployedAt = new Date().toISOString(); // Save the updated contracts.json file fs.writeFileSync( deployedContractsPath, JSON.stringify(deployedContracts, null, 2) ); } catch (error: any) { if (error.code === 'INSUFFICIENT_FUNDS') { console.error( 'Error: Insufficient funds for deployment. Please make sure your wallet has enough funds to cover the gas fees.' ); } else { console.error('An unexpected error occurred:', error.message); } process.exit(1); } } main().catch((error) => { console.error(error); process.exit(1); }); ``` 5. **Add your private key** - you'll need to provide your private key. It allows your deployment script to sign the transactions that deploy the smart contracts to the blockchain. Without it, the script won't be able to interact with the blockchain on your behalf Create a `.env` file in the root of the project and add your private key: ```bash touch .env ``` Inside `.env`, add your private key in the following format: ```env PRIVATE_KEY=INSERT_PRIVATE_KEY ``` 6. **Run the deployment script** 1. Open a terminal and run the following command: ```bash npx ts-node script/deploy.ts ``` This will execute the deployment script, deploying both contracts to the selected chains. 2. Check the deployment output: - You will see the deployed contract addresses printed in the terminal if successful. The `contracts.json` file will be updated with these addresses - If you encounter an error, the script will provide feedback, such as insufficient funds for gas If you followed the logic provided in the full code above, your terminal output should look something like this:
npx ts-node deploy.ts > cross-chain-token-transfer@1.0.0 deploy > npx ts-node script/deploy.ts Select the SOURCE chain: 1: Avalanche testnet fuji 2: Celo Testnet Enter the number for the SOURCE chain: 1 Select the TARGET chain: 1: Avalanche testnet fuji 2: Celo Testnet Enter the number for the TARGET chain: 2 CrossChainSender Avalanche testnet fuji: 0x1Cac52a183D02F9002fdb37b13eC2fAB950d44E3 CrossChainReceiver Celo Testnet: 0xD720BFF42a0960cfF1118454A907a44dB358f2b1 Registering CrossChainSender (0x1Cac52a183D02F9002fdb37b13eC2fAB950d44E3) as a valid sender in CrossChainReceiver (0xD720BFF42a0960cfF1118454A907a44dB358f2b1)... CrossChainSender registered as a valid sender on Celo Testnet
## Transfer Tokens Across Chains ### Quick Recap Up to this point, you've set up a new Solidity project using Foundry, developed two key contracts (`CrossChainSender` and `CrossChainReceiver`), and created a deployment script to deploy these contracts to different blockchain networks. The deployment script also saves the new contract addresses for easy reference. With everything in place, it's time to transfer tokens using the deployed contracts. In this step, you'll write a script to transfer tokens across chains using the `CrossChainSender` and `CrossChainReceiver` contracts you deployed earlier. This script will interact with the contracts and facilitate the cross-chain token transfer. ### Transfer Script 1. **Set up the transfer script** 1. Create a new file named `transfer.ts` in the `/script` directory: ```bash touch script/transfer.ts ``` 2. Open the file. Start with the necessary imports, interfaces and configurations: ```typescript import * as fs from 'fs'; import * as path from 'path'; import * as dotenv from 'dotenv'; import readlineSync from 'readline-sync'; dotenv.config(); interface ChainConfig { description: string; chainId: number; rpc: string; tokenBridge: string; wormholeRelayer: string; wormhole: string; } interface DeployedContracts { [chainId: number]: { networkName: string; CrossChainSender?: string; CrossChainReceiver?: string; deployedAt: string; }; } ``` These imports include the essential libraries for interacting with Ethereum, handling file paths, loading environment variables, and managing user input. 3. Load configuration and contracts: ```typescript const configPath = path.resolve(__dirname, '../deploy-config/config.json'); return JSON.parse(fs.readFileSync(configPath, 'utf8')).chains; } function loadDeployedContracts(): DeployedContracts { const contractsPath = path.resolve( __dirname, '../deploy-config/contracts.json' ); if ( !fs.existsSync(contractsPath) || fs.readFileSync(contractsPath, 'utf8').trim() === '' ) { console.error( 'No contracts found. Please deploy contracts first before transferring tokens.' ); process.exit(1); } return JSON.parse(fs.readFileSync(contractsPath, 'utf8')); } ``` These functions load the network and contract details that were saved during deployment. 4. Allow users to select source and target chains: Refer to the deployed contracts and create logic as desired. In our example, we made this process interactive, allowing users to select the source and target chains from all the historically deployed contracts. This interactive approach helps ensure the correct chains are selected for the token transfer. ```typescript chainId: number; networkName: string; } { const sourceOptions = Object.entries(deployedContracts).filter( ([, contracts]) => contracts.CrossChainSender ); if (sourceOptions.length === 0) { console.error('No source chains available with CrossChainSender deployed.'); process.exit(1); } console.log('\nSelect the source chain:'); sourceOptions.forEach(([chainId, contracts], index) => { console.log(`${index + 1}: ${contracts.networkName}`); }); const selectedIndex = readlineSync.questionInt(`\nEnter the number for the source chain: `) - 1; return { chainId: Number(sourceOptions[selectedIndex][0]), networkName: sourceOptions[selectedIndex][1].networkName, }; } function selectTargetChain(deployedContracts: DeployedContracts): { chainId: number; networkName: string; } { const targetOptions = Object.entries(deployedContracts).filter( ([, contracts]) => contracts.CrossChainReceiver ); if (targetOptions.length === 0) { console.error( 'No target chains available with CrossChainReceiver deployed.' ); process.exit(1); } console.log('\nSelect the target chain:'); targetOptions.forEach(([chainId, contracts], index) => { console.log(`${index + 1}: ${contracts.networkName}`); }); const selectedIndex = readlineSync.questionInt(`\nEnter the number for the target chain: `) - 1; return { chainId: Number(targetOptions[selectedIndex][0]), networkName: targetOptions[selectedIndex][1].networkName, }; } ``` 2. **Implement the token transfer logic** 1. Start the `main` function: ```typescript const chains = loadConfig(); const deployedContracts = loadDeployedContracts(); // Select the source chain (only show chains with CrossChainSender deployed) const { chainId: sourceChainId, networkName: sourceNetworkName } = selectSourceChain(deployedContracts); const sourceChain = chains.find((chain) => chain.chainId === sourceChainId)!; // Select the target chain (only show chains with CrossChainReceiver deployed) const { chainId: targetChainId, networkName: targetNetworkName } = selectTargetChain(deployedContracts); const targetChain = chains.find((chain) => chain.chainId === targetChainId)!; // Set up providers and wallets const sourceProvider = new ethers.JsonRpcProvider(sourceChain.rpc); const wallet = new ethers.Wallet(process.env.PRIVATE_KEY!, sourceProvider); // Load the ABI from the JSON file (use the compiled ABI from Forge or Hardhat) const CrossChainSenderArtifact = JSON.parse( fs.readFileSync( path.resolve( __dirname, '../out/CrossChainSender.sol/CrossChainSender.json' ), 'utf8' ) ); const abi = CrossChainSenderArtifact.abi; // Create the contract instance using the full ABI const CrossChainSender = new ethers.Contract( deployedContracts[sourceChainId].CrossChainSender!, abi, wallet ); ``` The `main` function is where the token transfer logic will reside. It loads the chain and contract details, sets up the wallet and provider, and loads the `CrossChainSender` contract. 2. Ask the user for token transfer details: You'll now ask the user for the token contract address, the recipient address on the target chain, and the amount of tokens to transfer. ```typescript 'Enter the token contract address: ' ); const recipientAddress = readlineSync.question( 'Enter the recipient address on the target chain: ' ); // Get the token contract const tokenContractDecimals = new ethers.Contract( tokenAddress, [ 'function decimals() view returns (uint8)', 'function approve(address spender, uint256 amount) public returns (bool)', ], wallet ); // Fetch the token decimals const decimals = await tokenContractDecimals.decimals(); // Get the amount from the user, then parse it according to the token's decimals const amount = ethers.parseUnits( readlineSync.question('Enter the amount of tokens to transfer: '), decimals ); ``` This section of the script prompts the user for the token contract address and the recipient's address, fetches the token's decimal value, and parses the amount accordingly. 3. Initiate the transfer: Finally, initiate the cross-chain transfer and log the details. ```typescript // Approve the CrossChainSender contract to transfer tokens on behalf of the user const tokenContract = new ethers.Contract( tokenAddress, ['function approve(address spender, uint256 amount) public returns (bool)'], wallet ); const approveTx = await tokenContract.approve( deployedContracts[sourceChainId].CrossChainSender!, amount ); await approveTx.wait(); console.log(`Approved tokens for cross-chain transfer.`); // Initiate the cross-chain transfer const transferTx = await CrossChainSender.sendCrossChainDeposit( targetChainId, deployedContracts[targetChainId].CrossChainReceiver!, recipientAddress, amount, tokenAddress, { value: cost } // Attach the necessary fee for cross-chain transfer ); await transferTx.wait(); console.log( `Transfer initiated from ${sourceNetworkName} to ${targetNetworkName}. Transaction Hash: ${transferTx.hash}` ); } ``` This part of the script first approves the token transfer, then initiates the cross-chain transfer using the `CrossChainSender` contract, and finally logs the transaction hash for the user to track. 4. Finalize the script: ```typescript console.error(error); process.exit(1); }); ``` This section finalizes the script by calling the `main` function and handling any errors that may occur during the token transfer process. You can find the full code for the `transfer.ts` file below: ??? code "transfer.ts" ```solidity import { ethers } from 'ethers'; import * as fs from 'fs'; import * as path from 'path'; import * as dotenv from 'dotenv'; import readlineSync from 'readline-sync'; dotenv.config(); interface ChainConfig { description: string; chainId: number; rpc: string; tokenBridge: string; wormholeRelayer: string; wormhole: string; } interface DeployedContracts { [chainId: number]: { networkName: string; CrossChainSender?: string; CrossChainReceiver?: string; deployedAt: string; }; } function loadConfig(): ChainConfig[] { const configPath = path.resolve(__dirname, '../deploy-config/config.json'); return JSON.parse(fs.readFileSync(configPath, 'utf8')).chains; } function loadDeployedContracts(): DeployedContracts { const contractsPath = path.resolve( __dirname, '../deploy-config/contracts.json' ); if ( !fs.existsSync(contractsPath) || fs.readFileSync(contractsPath, 'utf8').trim() === '' ) { console.error( 'No contracts found. Please deploy contracts first before transferring tokens.' ); process.exit(1); } return JSON.parse(fs.readFileSync(contractsPath, 'utf8')); } function selectSourceChain(deployedContracts: DeployedContracts): { chainId: number; networkName: string; } { const sourceOptions = Object.entries(deployedContracts).filter( ([, contracts]) => contracts.CrossChainSender ); if (sourceOptions.length === 0) { console.error('No source chains available with CrossChainSender deployed.'); process.exit(1); } console.log('\nSelect the source chain:'); sourceOptions.forEach(([chainId, contracts], index) => { console.log(`${index + 1}: ${contracts.networkName}`); }); const selectedIndex = readlineSync.questionInt(`\nEnter the number for the source chain: `) - 1; return { chainId: Number(sourceOptions[selectedIndex][0]), networkName: sourceOptions[selectedIndex][1].networkName, }; } function selectTargetChain(deployedContracts: DeployedContracts): { chainId: number; networkName: string; } { const targetOptions = Object.entries(deployedContracts).filter( ([, contracts]) => contracts.CrossChainReceiver ); if (targetOptions.length === 0) { console.error( 'No target chains available with CrossChainReceiver deployed.' ); process.exit(1); } console.log('\nSelect the target chain:'); targetOptions.forEach(([chainId, contracts], index) => { console.log(`${index + 1}: ${contracts.networkName}`); }); const selectedIndex = readlineSync.questionInt(`\nEnter the number for the target chain: `) - 1; return { chainId: Number(targetOptions[selectedIndex][0]), networkName: targetOptions[selectedIndex][1].networkName, }; } async function main() { const chains = loadConfig(); const deployedContracts = loadDeployedContracts(); // Select the source chain (only show chains with CrossChainSender deployed) const { chainId: sourceChainId, networkName: sourceNetworkName } = selectSourceChain(deployedContracts); const sourceChain = chains.find((chain) => chain.chainId === sourceChainId)!; // Select the target chain (only show chains with CrossChainReceiver deployed) const { chainId: targetChainId, networkName: targetNetworkName } = selectTargetChain(deployedContracts); const targetChain = chains.find((chain) => chain.chainId === targetChainId)!; // Set up providers and wallets const sourceProvider = new ethers.JsonRpcProvider(sourceChain.rpc); const wallet = new ethers.Wallet(process.env.PRIVATE_KEY!, sourceProvider); // Load the ABI from the JSON file (use the compiled ABI from Forge or Hardhat) const CrossChainSenderArtifact = JSON.parse( fs.readFileSync( path.resolve( __dirname, '../out/CrossChainSender.sol/CrossChainSender.json' ), 'utf8' ) ); const abi = CrossChainSenderArtifact.abi; // Create the contract instance using the full ABI const CrossChainSender = new ethers.Contract( deployedContracts[sourceChainId].CrossChainSender!, abi, wallet ); // Display the selected chains console.log( `\nInitiating transfer from ${sourceNetworkName} to ${targetNetworkName}.` ); // Ask the user for token transfer details const tokenAddress = readlineSync.question( 'Enter the token contract address: ' ); const recipientAddress = readlineSync.question( 'Enter the recipient address on the target chain: ' ); // Get the token contract const tokenContractDecimals = new ethers.Contract( tokenAddress, [ 'function decimals() view returns (uint8)', 'function approve(address spender, uint256 amount) public returns (bool)', ], wallet ); // Fetch the token decimals const decimals = await tokenContractDecimals.decimals(); // Get the amount from the user, then parse it according to the token's decimals const amount = ethers.parseUnits( readlineSync.question('Enter the amount of tokens to transfer: '), decimals ); // Calculate the cross-chain transfer cost const cost = await CrossChainSender.quoteCrossChainDeposit(targetChainId); // Approve the CrossChainSender contract to transfer tokens on behalf of the user const tokenContract = new ethers.Contract( tokenAddress, ['function approve(address spender, uint256 amount) public returns (bool)'], wallet ); const approveTx = await tokenContract.approve( deployedContracts[sourceChainId].CrossChainSender!, amount ); await approveTx.wait(); console.log(`Approved tokens for cross-chain transfer.`); // Initiate the cross-chain transfer const transferTx = await CrossChainSender.sendCrossChainDeposit( targetChainId, deployedContracts[targetChainId].CrossChainReceiver!, recipientAddress, amount, tokenAddress, { value: cost } // Attach the necessary fee for cross-chain transfer ); await transferTx.wait(); console.log( `Transfer initiated from ${sourceNetworkName} to ${targetNetworkName}. Transaction Hash: ${transferTx.hash}` ); } main().catch((error) => { console.error(error); process.exit(1); }); ``` ### Transfer Tokens Now that your transfer script is ready, it’s time to execute it and perform a cross-chain token transfer. 1. **Run the transfer script** Open your terminal and run the transfer script: ```bash npx ts-node script/transfer.ts ``` This command will start the script, prompting you to select the source and target chains, input the token address, recipient address, and the amount of tokens to transfer. 2. **Follow the prompts** - the script will guide you through selecting the source and target chains and entering the necessary details for the token transfer. Once you provide all the required information, the script will initiate the token transfer 3. **Verify the transaction** - after running the script, you should see a confirmation message with the transaction hash. You can use this transaction hash to check the transfer status on the respective blockchain explorers You can verify the transaction on the [Wormhole Explorer](https://wormholescan.io/){target=\_balnk} using the link provided in the terminal output. This explorer also offers the option to add the transferred token to your MetaMask wallet automatically. If you followed the logic provided in the `transfer.ts` file above, your terminal output should look something like this:
npx ts-node transfer.ts > cross-chain-token-transfer@1.0.0 transfer > npx ts-node script/transfer.ts Select the source chain: 1: Avalanche testnet fuji 2: Celo Testnet Enter the number for the SOURCE chain: 1 Select the target chain: 1: Avalanche testnet fuji 2: Celo Testnet Enter the number for the TARGET chain: 2 Initiating transfer from Avalanche testnet fuji to Celo Testnet Enter the token contract address: 0x5425890298aed601595a70ab815c96711a31bc65 Enter the recipient address on the target chain: INSERT_YOUR_WALLET_ADDRESS Enter the amount of tokens to transfer: 2 Approved tokens for cross-chain transfer. Transfer initiated from Avalanche testnet fuji to Celo Testnet. Transaction Hash: 0x4a923975d955c1f226a1c2f61a1a0fa1ab1a9e229dc29ceaeadf8ef40acd071f
!!! note In this example, we demonstrated a token transfer from the Avalanche Fuji Testnet to the Celo Alfajores Testnet. We sent two units of USDC Testnet tokens using the token contract address `0x5425890298aed601595a70ab815c96711a31bc65`. You can replace these details with those relevant to your project or use the same for testing purposes. ## Resources If you'd like to explore the complete project or need a reference while following this tutorial, you can find the complete codebase in the [Cross-Chain Token Transfers GitHub repository](https://github.com/wormhole-foundation/demo-cross-chain-token-transfer){target=\_blank}. The repository includes all the scripts, contracts, and configurations needed to deploy and transfer tokens across chains using the Wormhole protocol. ## Conclusion Congratulations! You've successfully built and deployed a cross-chain token transfer system using Solidity and the Wormhole protocol. You've learned how to: - Set up a new Solidity project using Foundry - Develop smart contracts to send and receive tokens across chains - Write deployment scripts to manage and deploy contracts on different networks Looking for more? Check out the [Wormhole Tutorial Demo repository](https://github.com/wormhole-foundation/demo-tutorials){target=\_blank} for additional examples. --- END CONTENT --- Doc-Content: https://raw.githubusercontent.com/wormhole-foundation/wormhole-docs/refs/heads/main/products/messaging/tutorials/replace-signatures.md --- BEGIN CONTENT --- --- title: Replace Outdated Signatures in VAAs description: Learn how to fetch, validate, and replace outdated signatures in Wormhole VAAs using Wormholescan and the Wormhole SDK to ensure seamless processing. categories: Basics, Typescript SDK --- # Replace Outdated Signatures in VAAs :simple-github: [Source code on GitHub](https://github.com/wormhole-foundation/demo-vaa-signature-replacement){target=\_blank} Cross-chain transactions in Wormhole rely on [Verifiable Action Approvals (VAAs)](/docs/protocol/infrastructure/vaas/){target=\_blank}, which contain signatures from a trusted set of validators called [Guardians](/docs/protocol/infrastructure/guardians/){target=\_blank}. These signatures prove that the network approved an action, such as a token transfer. However, the set of Guardians changes over time. If a user generates a transaction and waits too long before redeeming it, the Guardian set may have already changed. This means the VAA will contain outdated signatures from Guardians, who are no longer part of the network, causing the transaction to fail. Instead of discarding these VAAs, we can fetch updated signatures and replace the outdated ones to ensure smooth processing. In this tutorial, you'll build a script from scratch to: - Fetch a VAA from [Wormholescan](https://wormholescan.io/#/developers/api-doc){target=\_blank} - Validate its signatures against the latest Guardian set - Replace outdated signatures using the [Wormhole SDK](https://github.com/wormhole-foundation/wormhole-sdk-ts){target=\_blank} - Output a valid VAA ready for submission By the end, you'll have a script that ensures VAAs remain valid and processable, avoiding transaction failures. ## Prerequisites Before you begin, ensure you have the following: - [Node.js and npm](https://docs.npmjs.com/downloading-and-installing-node-js-and-npm){target=\_blank} installed on your machine - [TypeScript](https://www.typescriptlang.org/download/){target=\_blank} installed globally ## Project Setup In this section, you will create the directory, initialize a Node.js project, install dependencies, and configure TypeScript. 1. **Create the project** - set up the directory and navigate into it ```bash mkdir wormhole-scan-api-demo cd wormhole-scan-api-demo ``` 2. **Initialize a Node.js project** - generate a `package.json` file ```bash npm init -y ``` 3. **Set up TypeScript** - create a `tsconfig.json` file ```bash touch tsconfig.json ``` Then, add the following configuration: ```json title="tsconfig.json" { "compilerOptions": { "target": "es2016", "module": "commonjs", "esModuleInterop": true, "forceConsistentCasingInFileNames": true, "strict": true, "skipLibCheck": true } } ``` 4. **Install dependencies** - add the required packages ```bash npm install @wormhole-foundation/sdk axios web3 tsx @types/node ``` - `@wormhole-foundation/sdk` - handles VAAs and cross-chain interactions - `axios` - makes HTTP requests to the Wormholescan API - `web3` - interacts with Ethereum transactions and contracts - `tsx` - executes TypeScript files without compilation - `@types/node` - provides Node.js type definitions 5. **Create the project structure** - set up the required directories and files ```bash mkdir -p src/config && touch src/config/constants.ts src/config/layouts.ts mkdir -p src/helpers && touch src/helpers/vaaHelper.ts mkdir -p src/scripts && touch scripts/replaceSignatures.ts ``` - **`src/config/*`** - stores public configuration variables and layouts for serializing and deserializing data structures - **`src/helpers/*`** - contains utility functions - **`src/scripts/*`** - contains scripts for fetching and replacing signatures 6. **Set variables** - define key constants in `src/config/constants.ts` ```bash title="src/config/constants.ts" export const RPC = 'https://ethereum-rpc.publicnode.com'; export const ETH_CORE = '0x98f3c9e6E3fAce36bAAd05FE09d375Ef1464288B'.toLowerCase(); export const WORMHOLESCAN_API = 'https://api.wormholescan.io/v1'; export const LOG_MESSAGE_PUBLISHED_TOPIC = '0x6eb224fb001ed210e379b335e35efe88672a8ce935d981a6896b27ffdf52a3b2'; export const TXS = [ '0x3ad91ec530187bb2ce3b394d587878cd1e9e037a97e51fbc34af89b2e0719367', '0x3c989a6bb40dcd4719453fbe7bbac420f23962c900ae75793124fc9cc614368c', ]; ``` - **`RPC`** - endpoint for interacting with an Ethereum RPC node - **`ETH_CORE`** - [Wormhole's Core Contract address on Ethereum](/docs/products/reference/contract-addresses/#core-contracts){target=\_blank} responsible for verifying VAAs - **`WORMHOLESCAN_API`** - base URL for querying the Wormholescan API to fetch VAA data and Guardian sets - **`LOG_MESSAGE_PUBLISHED_TOPIC`** - the event signature hash for `LogMessagePublished`, a Wormhole contract event that signals when a VAA has been emitted. This is used to identify relevant logs in transaction receipts - **`TXS`** - list of example transaction hashes that will be used for testing 7. **Define data structure for working with VAAs** - specify the ABI for the Wormhole Core Contract's `parseAndVerifyVM` function, which parses and verifies VAAs. Defining the data structure, also referred to as a [layout](/docs/tools/typescript-sdk/guides/sdk-layout/){target=\_blank}, for this function ensures accurate decoding and validation of VAAs ```typescript title="src/config/layouts.ts" export const PARSE_AND_VERIFY_VM_ABI = { inputs: [{ internalType: 'bytes', name: 'encodedVM', type: 'bytes' }], name: 'parseAndVerifyVM', outputs: [ { components: [ { internalType: 'uint8', name: 'version', type: 'uint8' }, { internalType: 'uint32', name: 'timestamp', type: 'uint32' }, { internalType: 'uint32', name: 'nonce', type: 'uint32' }, { internalType: 'uint16', name: 'emitterChainId', type: 'uint16' }, { internalType: 'bytes32', name: 'emitterAddress', type: 'bytes32' }, { internalType: 'uint64', name: 'sequence', type: 'uint64' }, { internalType: 'uint8', name: 'consistencyLevel', type: 'uint8' }, { internalType: 'bytes', name: 'payload', type: 'bytes' }, { internalType: 'uint32', name: 'guardianSetIndex', type: 'uint32' }, { components: [ { internalType: 'bytes32', name: 'r', type: 'bytes32' }, { internalType: 'bytes32', name: 's', type: 'bytes32' }, { internalType: 'uint8', name: 'v', type: 'uint8' }, { internalType: 'uint8', name: 'guardianIndex', type: 'uint8' }, ], internalType: 'struct Structs.Signature[]', name: 'signatures', type: 'tuple[]', }, { internalType: 'bytes32', name: 'hash', type: 'bytes32' }, ], internalType: 'struct Structs.VM', name: 'vm', type: 'tuple', }, { internalType: 'bool', name: 'valid', type: 'bool' }, { internalType: 'string', name: 'reason', type: 'string' }, ], stateMutability: 'view', type: 'function', }; ``` ## Create VAA Handling Functions In this section, we'll create a series of helper functions in the `src/helpers/vaaHelper.ts` file that will retrieve and verify VAAs and fetch and replace outdated Guardian signatures to generate a correctly signed VAA. To get started, import the necessary dependencies: ```typescript title="src/helpers/vaaHelper.ts" import { eth } from 'web3'; import { deserialize, serialize, VAA, Signature, } from '@wormhole-foundation/sdk'; import { RPC, ETH_CORE, LOG_MESSAGE_PUBLISHED_TOPIC, WORMHOLESCAN_API, } from '../config/constants'; import { PARSE_AND_VERIFY_VM_ABI } from '../config/layouts'; ``` ### Fetch a VAA ID from a Transaction To retrieve a VAA, we first need to get its VAA ID from a transaction hash. This ID allows us to fetch the full VAA later. The VAA ID is structured as follows: ```bash chain/emitter/sequence ``` - `chain` - the [Wormhole chain ID](/docs/products/reference/chain-ids/){target=\_blank} (Ethereum is 2) - `emitter` - the contract address that emitted the VAA - `sequence` - a unique identifier for the event We must assemble the ID correctly since this is the format the Wormholescan API expects when querying VAAs. Follow the below steps to process the transaction logs and construct the VAA ID: 1. **Get the transaction receipt** - iterate over the array of transaction hashes and fetch the receipt to access its logs 2. **Find the Wormhole event** - iterate over the transaction logs and check for events emitted by the Wormhole Core contract. Look specifically for `LogMessagePublished` events, which indicate a VAA was created 3. **Extract the emitter and sequence number** - if a matching event is found, extract the emitter address from `log.topics[1]` and remove the `0x` prefix. Then, the sequence number from `log.data` is extracted, converting it from hex to an integer 4. **Construct the VAA ID** - format the extracted data in `chain/emitter/sequence` format ```typescript title="src/helpers/vaaHelper.ts" const vaaIds: string[] = []; for (const tx of txHashes) { try { const result = ( await axios.post(RPC, { jsonrpc: '2.0', id: 1, method: 'eth_getTransactionReceipt', params: [tx], }) ).data.result; if (!result) throw new Error(`Unable to fetch transaction receipt for ${tx}`); for (const log of result.logs) { if ( log.address === ETH_CORE && log.topics?.[0] === LOG_MESSAGE_PUBLISHED_TOPIC ) { const emitter = log.topics[1].substring(2); const seq = BigInt(log.data.substring(0, 66)).toString(); vaaIds.push(`2/${emitter}/${seq}`); } } } catch (error) { console.error(`Error processing ${tx}:`, error); } } return vaaIds; } ``` ???- code "Try it out: VAA ID retrieval" If you want to try out the function before moving forward, create a test file inside the `test` directory: 1. **Create the directory and file** - add a script to call `fetchVaaId` and print the result ```bash mkdir -p test touch test/fetchVaaId.run.ts ``` 2. **Add the function call** ```typescript title="test/fetchVaaId.run.ts" import { fetchVaaId } from '../src/helpers/vaaHelper'; import { TXS } from '../src/config/constants'; const testFetchVaaId = async () => { for (const tx of TXS) { const vaaIds = await fetchVaaId([tx]); if (vaaIds.length > 0) { console.log(`Transaction: ${tx}`); vaaIds.forEach((vaaId) => console.log(`VAA ID: ${vaaId}`)); } else { console.log(`No VAA ID found for transaction: ${tx}`); } } }; testFetchVaaId(); ``` 3. **Run the script** ```bash npx tsx test/fetchVaaId.run.ts ``` If successful, the output will be:
npx tsx test/fetchVaaId.run.ts Transaction: 0x3ad91ec530187bb2ce3b394d587878cd1e9e037a97e51fbc34af89b2e0719367 VAA ID: 2/0000000000000000000000003ee18b2214aff97000d974cf647e7c347e8fa585/164170
If no VAA ID is found, the script will log an error message. ### Fetch the Full VAA Now that you have the VAA ID, we can use it to fetch the full VAA payload from the Wormholescan API. This payload contains the VAA bytes, which will later be used for signature validation. Open `src/helpers/vaaHelper.ts` and create the `fetchVaa()` function to iterate through VAA IDs and extract the `vaaBytes` payload. ```typescript title="src/helpers/vaaHelper.ts" vaaIds: string[] ): Promise<{ id: string; vaaBytes: string }[]> { const results: { id: string; vaaBytes: string }[] = []; for (const id of vaaIds) { try { const response = await axios.get(`${WORMHOLESCAN_API}/signed_vaa/${id}`); const vaaBytes = response.data.vaaBytes; results.push({ id, vaaBytes }); } catch (error) { console.error(`Error fetching VAA for ${id}:`, error); } } return results; } ``` ???- code "Try it out: VAA retrieval" If you want to try the function before moving forward, create a script inside the `test` directory 1. **Create the script file** ```bash touch test/fetchVaa.run.ts ``` 2. **Add the function call** ```typescript title="test/fetchVaa.run.ts" import { fetchVaaId, fetchVaa } from '../src/helpers/vaaHelper'; import { TXS } from '../src/config/constants'; const testFetchVaa = async () => { for (const tx of TXS) { const vaaIds = await fetchVaaId([tx]); if (vaaIds.length === 0) { console.log(`No VAA ID found for transaction: ${tx}`); continue; } for (const vaaId of vaaIds) { const vaaBytes = await fetchVaa([vaaId]); console.log( `Transaction: ${tx}\nVAA ID: ${vaaId}\nVAA Bytes: ${ vaaBytes.length > 0 ? vaaBytes[0].vaaBytes : 'Not found' }` ); } } }; testFetchVaa(); ``` 3. **Run the script** ```bash npx tsx test/fetchVaa.run.ts ``` If successful, the output will be:
npx tsx test/fetchVaa.run.ts Transaction: 0x3ad91ec530187bb2ce3b394d587878cd1e9e037a97e51fbc34af89b2e0719367 VAA Bytes: AQAAAAMNANQSwD/HRPcKp7Yxypl1ON8dZeMBzgYJrd2KYz6l9Tq9K9fj72fYJgkMeMaB9h...
If no VAA is found, the script will log an error message. ### Validate VAA Signatures Now, we need to verify its validity. A VAA is only considered valid if it contains signatures from currently active Guardians and is correctly verified by the Wormhole Core contract. Open `src/helpers/vaaHelper.ts` and add the `checkVaaValidity()` function. This function verifies whether a VAA is valid by submitting it to an Ethereum RPC node and checking for outdated signatures. Follow these steps to implement the function: 1. **Prepare the VAA for verification** - construct the VAA payload in a format that can be sent to the Wormhole Core contract 2. **Send an `eth_call` request** - submit the VAA to an Ethereum RPC node, calling the `parseAndVerifyVM` function on the Wormhole Core contract 3. **Decode the response** - check whether the VAA is valid. If it contains outdated signatures, further action will be required to replace them ```typescript title="src/helpers/vaaHelper.ts" try { const vaa = Buffer.from(vaaBytes, 'base64'); vaa[4] = 4; // Set guardian set index to 4 const result = ( await axios.post(RPC, { jsonrpc: '2.0', id: 1, method: 'eth_call', params: [ { from: null, to: ETH_CORE, data: eth.abi.encodeFunctionCall(PARSE_AND_VERIFY_VM_ABI, [ `0x${vaa.toString('hex')}`, ]), }, 'latest', ], }) ).data.result; const decoded = eth.abi.decodeParameters( PARSE_AND_VERIFY_VM_ABI.outputs, result ); console.log( `${decoded.valid ? '✅' : '❌'} VAA Valid: ${decoded.valid}${ decoded.valid ? '' : `, Reason: ${decoded.reason}` }` ); return { valid: decoded.valid, reason: decoded.reason }; } catch (error) { console.error(`Error checking VAA validity:`, error); return { valid: false, reason: 'RPC error' }; } } ``` ???- code "Try it out: VAA Validity" If you want to try the function before moving forward, create a script inside the `test` directory 1. **Create the script file** ```bash touch test/checkVaaValidity.run.ts ``` 2. **Add the function call** ```typescript title="test/checkVaaValidity.run.ts" import { fetchVaaId, fetchVaa, checkVaaValidity, } from '../src/helpers/vaaHelper'; import { TXS } from '../src/config/constants'; const testCheckVaaValidity = async () => { for (const tx of TXS) { const vaaIds = await fetchVaaId([tx]); if (vaaIds.length === 0) { console.log(`No VAA ID found for transaction: ${tx}`); continue; } for (const vaaId of vaaIds) { const vaaData = await fetchVaa([vaaId]); if (vaaData.length === 0 || !vaaData[0].vaaBytes) { console.log(`VAA not found for ID: ${vaaId}`); continue; } const result = await checkVaaValidity(vaaData[0].vaaBytes); console.log( `Transaction: ${tx}\nVAA ID: ${vaaId}\nVAA Validity:`, result ); } } }; testCheckVaaValidity(); ``` 3. **Run the script** ```bash npx tsx test/checkVaaValidity.run.ts ``` If the VAA is valid, the output will be:
npx tsx test/checkVaaValidity.run.ts ✅ VAA Valid: true
If invalid, the output will include the reason:
npx tsx test/checkVaaValidity.run.ts ❌ VAA Valid: false, Reason: VM signature invalid Transaction: 0x3ad91ec530187bb2ce3b394d587878cd1e9e037a97e51fbc34af89b2e0719367
### Fetch Observations (VAA Signatures) Before replacing outdated signatures, we need to fetch the original VAA signatures from Wormholescan. This allows us to compare them with the latest Guardian set and determine which ones need updating. Inside `src/helpers/vaaHelper.ts`, create the `fetchObservations()` function to query the Wormholescan API for observations related to a given VAA. Format the response by converting Guardian addresses to lowercase for consistency, and return an empty array if an error occurs. ```typescript title="src/helpers/vaaHelper.ts" try { console.log(`Fetching observations`); const response = await axios.get( `https://api.wormholescan.io/api/v1/observations/${vaaId}` ); return response.data.map((obs: any) => ({ guardianAddr: obs.guardianAddr.toLowerCase(), signature: obs.signature, })); } catch (error) { console.error(`Error fetching observations:`, error); return []; } } ``` ???- code "Try it out: Fetch Observations" If you want to try the function before moving forward, create a script inside the `test` directory 1. **Create the script file** ```bash touch test/fetchObservations.run.ts ``` 2. **Add the function call** ```typescript title="test/fetchObservations.run.ts" import { fetchVaaId, fetchObservations } from '../src/helpers/vaaHelper'; import { TXS } from '../src/config/constants'; const testFetchObservations = async () => { for (const tx of TXS) { const vaaIds = await fetchVaaId([tx]); if (vaaIds.length === 0) { console.log(`No VAA ID found for transaction: ${tx}`); continue; } for (const vaaId of vaaIds) { const observations = await fetchObservations(vaaId); if (observations.length === 0) { console.log(`No observations found for VAA ID: ${vaaId}`); continue; } console.log( `Transaction: ${tx}\nVAA ID: ${vaaId}\nObservations:`, observations ); } } }; testFetchObservations(); ``` 3. **Run the script** ```bash npx tsx test/fetchObservations.run.ts ``` If successful, the output will be:
npx tsx test/fetchObservations.run.ts Fetching observations Transaction: 0x3ad91ec530187bb2ce3b394d587878cd1e9e037a97e51fbc34af89b2e0719367 Observations: [ { guardianAddr: '0xda798f6896a3331f64b48c12d1d57fd9cbe70811', signature: 'ZGFlMDYyOGNjZjFjMmE0ZTk5YzE2OThhZjAzMDM4NzZlYTM1OWMxMzczNDA3YzdlMDMxZTkyNzk0ODkwYjRiYjRiOWFmNzM3NjRiMzIyOTE0ZTQwYzNlMjllMWEzNmM2NTc3ZDc5ZTdhNTM2MzA5YjA4YjExZjE3YzE3MDViNWIwMQ==' }, { guardianAddr: '0x74a3bf913953d695260d88bc1aa25a4eee363ef0', signature: 'MzAyOTU4OGU4MWU0ODc0OTAwNDU3N2EzMGZlM2UxMDJjOWYwMjM0NWVhY2VmZWQ0ZGJlNTFkNmI3YzRhZmQ5ZTNiODFjNTg3MDNmYzUzNmJiYWFiZjNlODc1YTY3OTQwMGE4MmE3ZjZhNGYzOGY3YmRmNDNhM2VhNGQyNWNlNGMwMA==' }, ...]
If no observations are found, the script will log an error message. ### Fetch the Latest Guardian Set Now that we have the original VAA signatures, we must fetch the latest Guardian set from Wormholescan. This will allow us to compare the stored signatures with the current Guardians and determine which signatures need replacing. Create the `fetchGuardianSet()` function inside `src/helpers/vaaHelper.ts` to fetch the latest Guardian set. ```typescript title="src/helpers/vaaHelper.ts" export async function fetchGuardianSet() { try { console.log('Fetching current guardian set'); const response = await axios.get(`${WORMHOLESCAN_API}/guardianset/current`); const guardians = response.data.guardianSet.addresses.map((addr: string) => addr.toLowerCase() ); const guardianSet = response.data.guardianSet.index; return [guardians, guardianSet]; } catch (error) { console.error('Error fetching guardian set:', error); return []; } } ``` ???- code "Try it out: Fetch Guardian Set" If you want to try the function before moving forward, create a script inside the `test` directory 1. **Create the script file** ```bash touch test/fetchGuardianSet.run.ts ``` 2. **Add the function call** ```typescript title="test/fetchGuardianSet.run.ts" import { fetchGuardianSet } from '../src/helpers/vaaHelper'; const testFetchGuardianSet = async () => { const [guardians, guardianSetIndex] = await fetchGuardianSet(); console.log('Current Guardian Set Index:', guardianSetIndex); console.log('Guardian Addresses:', guardians); }; testFetchGuardianSet(); ``` 3. **Run the script** ```bash npx tsx test/fetchGuardianSet.run.ts ``` If successful, the output will be:
npx tsx test/fetchGuardianSet.run.ts Fetching current guardian set Current Guardian Set Index: 4 Guardian Addresses: [ '0x5893b5a76c3f739645648885bdccc06cd70a3cd3', '0xff6cb952589bde862c25ef4392132fb9d4a42157', '0x114de8460193bdf3a2fcf81f86a09765f4762fd1', '0x107a0086b32d7a0977926a205131d8731d39cbeb', ...]
If an error occurs while fetching the Guardian set, a `500` status error will be logged. ### Replace Outdated Signatures With the full VAA, Guardian signatures, and the latest Guardian set, we can now update outdated signatures while maintaining the required signature count. 1. **Create the `replaceSignatures()` function** - open `src/helpers/vaaHelper.ts` and add the function header. To catch and handle errors properly, all logic will be wrapped inside a `try` block ```typescript title="src/helpers/vaaHelper.ts" vaa: string | Uint8Array, observations: { guardianAddr: string; signature: string }[], currentGuardians: string[], guardianSetIndex: number ) { console.log('Replacing Signatures...'); try { // Add logic in the following steps here console.error('Unexpected error in replaceSignatures:', error); } } ``` - **`vaa`** - original VAA bytes - **`observations`** - observed signatures from the network - **`currentGuardians`** - latest Guardian set - **`guardianSetIndex`** - current Guardian set index 2. **Validate input data** - ensure all required parameters are present before proceeding. If any required input is missing, the function throws an error to prevent execution with incomplete data. The Guardian set should never be empty; if it is, this likely indicates an error in fetching the Guardian set in a previous step ```typescript if (currentGuardians.length === 0) throw new Error('Guardian set is empty.'); if (observations.length === 0) throw new Error('No observations provided.'); ``` 3. **Filter valid signatures** - remove signatures from inactive Guardians, keeping only valid ones. If there aren't enough valid signatures to replace the outdated ones, execution is halted to prevent an incomplete or invalid VAA ```typescript currentGuardians.includes(sig.guardianAddr) ); if (validSigs.length === 0) throw new Error('No valid signatures found. Cannot proceed.'); ``` 4. **Convert valid signatures** - ensure signatures are correctly formatted for verification. Convert hex-encoded signatures if necessary and extract their components ```typescript .map((sig) => { try { const sigBuffer = Buffer.from(sig.signature, 'base64'); // If it's 130 bytes, it's hex-encoded and needs conversion const sigBuffer1 = sigBuffer.length === 130 ? Buffer.from(sigBuffer.toString(), 'hex') : sigBuffer; const r = BigInt('0x' + sigBuffer1.subarray(0, 32).toString('hex')); const s = BigInt('0x' + sigBuffer1.subarray(32, 64).toString('hex')); const vRaw = sigBuffer1[64]; const v = vRaw < 27 ? vRaw : vRaw - 27; return { guardianIndex: currentGuardians.indexOf(sig.guardianAddr), signature: new Signature(r, s, v), }; } catch (error) { console.error( `Failed to process signature for guardian: ${sig.guardianAddr}`, error ); return null; } }) .filter( (sig): sig is { guardianIndex: number; signature: Signature } => sig !== null ); // Remove null values ``` 5. **Deserialize the VAA** - convert the raw VAA data into a structured format for further processing ```typescript try { parsedVaa = deserialize('Uint8Array', vaa); } catch (error) { throw new Error(`Error deserializing VAA: ${error}`); } ``` 6. **Identify outdated signatures** - compare the current VAA signatures with the newly formatted ones to detect which signatures belong to outdated Guardians. Remove these outdated signatures to ensure only valid ones remain ```typescript .filter( (vaaSig) => !formattedSigs.some( (sig) => sig.guardianIndex === vaaSig.guardianIndex ) ) .map((sig) => sig.guardianIndex); console.log('Outdated Guardian Indexes:', outdatedGuardianIndexes); let updatedSignatures = parsedVaa.signatures.filter( (sig) => !outdatedGuardianIndexes.includes(sig.guardianIndex) ); ``` 7. **Replace outdated signatures** - substitute outdated signatures with valid ones while maintaining the correct number of signatures. If there aren’t enough valid replacements, execution stops ```typescript (sig) => !updatedSignatures.some((s) => s.guardianIndex === sig.guardianIndex) ); // Check if we have enough valid signatures to replace outdated ones** if (outdatedGuardianIndexes.length > validReplacements.length) { console.warn( `Not enough valid replacement signatures! Need ${outdatedGuardianIndexes.length}, but only ${validReplacements.length} available.` ); return; } updatedSignatures = [ ...updatedSignatures, ...validReplacements.slice(0, outdatedGuardianIndexes.length), ]; updatedSignatures.sort((a, b) => a.guardianIndex - b.guardianIndex); ``` 8. **Serialize the updated VAA** - reconstruct the VAA with the updated signatures and convert it into a format suitable for submission ```typescript ...parsedVaa, guardianSet: guardianSetIndex, signatures: updatedSignatures, }; let patchedVaa: Uint8Array; try { patchedVaa = serialize(updatedVaa); } catch (error) { throw new Error(`Error serializing updated VAA: ${error}`); } ``` 9. **Send the updated VAA for verification and handle errors** - submit the updated VAA to an Ethereum RPC node for validation, ensuring it can be proposed for Guardian approval. If an error occurs during submission or signature replacement, log the issue and prevent further execution ```typescript if (!(patchedVaa instanceof Uint8Array)) throw new Error('Patched VAA is not a Uint8Array!'); const vaaHex = `0x${Buffer.from(patchedVaa).toString('hex')}`; console.log('Sending updated VAA to RPC...'); const result = await axios.post(RPC, { jsonrpc: '2.0', id: 1, method: 'eth_call', params: [ { from: null, to: ETH_CORE, data: eth.abi.encodeFunctionCall(PARSE_AND_VERIFY_VM_ABI, [vaaHex]), }, 'latest', ], }); const verificationResult = result.data.result; console.log('Updated VAA (hex):', vaaHex); return verificationResult; } catch (error) { throw new Error(`Error sending updated VAA to RPC: ${error}`); } ``` ???- code "Complete Function" ```typescript vaa: string | Uint8Array, observations: { guardianAddr: string; signature: string }[], currentGuardians: string[], guardianSetIndex: number ) { console.log('Replacing Signatures...'); try { if (!vaa) throw new Error('VAA is undefined or empty.'); if (currentGuardians.length === 0) throw new Error('Guardian set is empty.'); if (observations.length === 0) throw new Error('No observations provided.'); const validSigs = observations.filter((sig) => currentGuardians.includes(sig.guardianAddr) ); if (validSigs.length === 0) throw new Error('No valid signatures found. Cannot proceed.'); const formattedSigs = validSigs .map((sig) => { try { const sigBuffer = Buffer.from(sig.signature, 'base64'); // If it's 130 bytes, it's hex-encoded and needs conversion const sigBuffer1 = sigBuffer.length === 130 ? Buffer.from(sigBuffer.toString(), 'hex') : sigBuffer; const r = BigInt('0x' + sigBuffer1.subarray(0, 32).toString('hex')); const s = BigInt('0x' + sigBuffer1.subarray(32, 64).toString('hex')); const vRaw = sigBuffer1[64]; const v = vRaw < 27 ? vRaw : vRaw - 27; return { guardianIndex: currentGuardians.indexOf(sig.guardianAddr), signature: new Signature(r, s, v), }; } catch (error) { console.error( `Failed to process signature for guardian: ${sig.guardianAddr}`, error ); return null; } }) .filter( (sig): sig is { guardianIndex: number; signature: Signature } => sig !== null ); // Remove null values let parsedVaa: VAA<'Uint8Array'>; try { parsedVaa = deserialize('Uint8Array', vaa); } catch (error) { throw new Error(`Error deserializing VAA: ${error}`); } const outdatedGuardianIndexes = parsedVaa.signatures .filter( (vaaSig) => !formattedSigs.some( (sig) => sig.guardianIndex === vaaSig.guardianIndex ) ) .map((sig) => sig.guardianIndex); console.log('Outdated Guardian Indexes:', outdatedGuardianIndexes); let updatedSignatures = parsedVaa.signatures.filter( (sig) => !outdatedGuardianIndexes.includes(sig.guardianIndex) ); const validReplacements = formattedSigs.filter( (sig) => !updatedSignatures.some((s) => s.guardianIndex === sig.guardianIndex) ); // Check if we have enough valid signatures to replace outdated ones** if (outdatedGuardianIndexes.length > validReplacements.length) { console.warn( `Not enough valid replacement signatures! Need ${outdatedGuardianIndexes.length}, but only ${validReplacements.length} available.` ); return; } updatedSignatures = [ ...updatedSignatures, ...validReplacements.slice(0, outdatedGuardianIndexes.length), ]; updatedSignatures.sort((a, b) => a.guardianIndex - b.guardianIndex); const updatedVaa: VAA<'Uint8Array'> = { ...parsedVaa, guardianSet: guardianSetIndex, signatures: updatedSignatures, }; let patchedVaa: Uint8Array; try { patchedVaa = serialize(updatedVaa); } catch (error) { throw new Error(`Error serializing updated VAA: ${error}`); } try { if (!(patchedVaa instanceof Uint8Array)) throw new Error('Patched VAA is not a Uint8Array!'); const vaaHex = `0x${Buffer.from(patchedVaa).toString('hex')}`; console.log('Sending updated VAA to RPC...'); const result = await axios.post(RPC, { jsonrpc: '2.0', id: 1, method: 'eth_call', params: [ { from: null, to: ETH_CORE, data: eth.abi.encodeFunctionCall(PARSE_AND_VERIFY_VM_ABI, [vaaHex]), }, 'latest', ], }); const verificationResult = result.data.result; console.log('Updated VAA (hex):', vaaHex); return verificationResult; } catch (error) { throw new Error(`Error sending updated VAA to RPC: ${error}`); } } catch (error) { console.error('Unexpected error in replaceSignatures:', error); } } ``` ## Create Script to Replace Outdated VAA Signatures Now that we have all the necessary helper functions, we will create a script to automate replacing outdated VAA signatures. This script will retrieve a transaction’s VAA sequentially, check its validity, fetch the latest Guardian set, and update its signatures. By the end, it will output a correctly signed VAA that can be proposed for Guardian approval. 1. **Open the file** - inside `src/scripts/replaceSignatures.ts`, import the required helper functions needed to process the VAAs ```typescript title="src/scripts/replaceSignatures.ts" fetchVaaId, fetchVaa, checkVaaValidity, fetchObservations, fetchGuardianSet, replaceSignatures, } from '../helpers/vaaHelper'; import { TXS } from '../config/constants'; ``` 2. **Define the main execution function** - add the following function inside `src/scripts/replaceSignatures.ts` to process each transaction in `TXS`, going step by step through the signature replacement process ```typescript try { for (const tx of TXS) { console.log(`\nProcessing TX: ${tx}\n`); // 1. Fetch Transaction VAA IDs: const vaaIds = await fetchVaaId([tx]); if (!vaaIds.length) continue; // 2. Fetch VAA Data: const vaaData = await fetchVaa(vaaIds); if (!vaaData.length) continue; const vaaBytes = vaaData[0].vaaBytes; if (!vaaBytes) continue; // 3. Check VAA Validity: const { valid } = await checkVaaValidity(vaaBytes); if (valid) continue; // 4. Fetch Observations (VAA signatures): const observations = await fetchObservations(vaaIds[0]); // 5. Fetch Current Guardian Set: const [currentGuardians, guardianSetIndex] = await fetchGuardianSet(); // 6. Replace Signatures: const response = await replaceSignatures( Buffer.from(vaaBytes, 'base64'), observations, currentGuardians, guardianSetIndex ); if (!response) continue; } } catch (error) { console.error('❌ Error in execution:', error); process.exit(1); } } ``` 3. **Make the script executable** - ensure it runs when executed ```typescript ``` To run the script, use the following command: ```bash npx tsx src/scripts/replaceSignatures.ts ```
npx tsx src/scripts/replaceSignatures.ts Processing TX: 0x3ad91ec530187bb2ce3b394d587878cd1e9e037a97e51fbc34af89b2e0719367 ❌ VAA Valid: false, Reason: VM signature invalid Fetching observations Fetching current guardian set Replacing Signatures... Outdated Guardian Indexes: [ 0 ] Sending updated VAA to RPC... Updated VAA (hex): 0x01000000040d010019447b72d51e33923a3d6b28496ccd3722d5f1e33e2...
The script logs each step, skipping valid VAAs, replacing outdated signatures for invalid VAAs, and logging any errors. It then completes with a valid VAA ready for submission. ## Resources You can explore the complete project and find all necessary scripts and configurations in Wormhole's [demo GitHub repository](https://github.com/wormhole-foundation/demo-vaa-signature-replacement){target=\_blank}. The demo repository includes a bonus script to check the VAA redemption status on Ethereum and Solana, allowing you to verify whether a transaction has already been redeemed on the destination chain. ## Conclusion You've successfully built a script to fetch, validate, and replace outdated signatures in VAAs using Wormholescan and the Wormhole SDK. It's important to note that this tutorial does not update VAAs in the Wormhole network. Before redeeming the VAA, you must propose it for Guardian approval to finalize the process. Looking for more? Check out the [Wormhole Tutorial Demo repository](https://github.com/wormhole-foundation/demo-tutorials){target=\_blank} for additional examples. --- END CONTENT --- Doc-Content: https://raw.githubusercontent.com/wormhole-foundation/wormhole-docs/refs/heads/main/protocol/architecture.md --- BEGIN CONTENT --- --- title: Architecture description: Overview of Wormhole's architecture, detailing key on-chain and off-chain components like the Core Contract, Guardian Network, and relayers. categories: Basics --- # Architecture Wormhole has several noteworthy components. Before discussing each component in depth, this page will provide an overview of how the major pieces fit together. ![Wormhole architecture detailed diagram: source to target chain communication.](/docs/images/protocol/architecture/architecture-1.webp) 
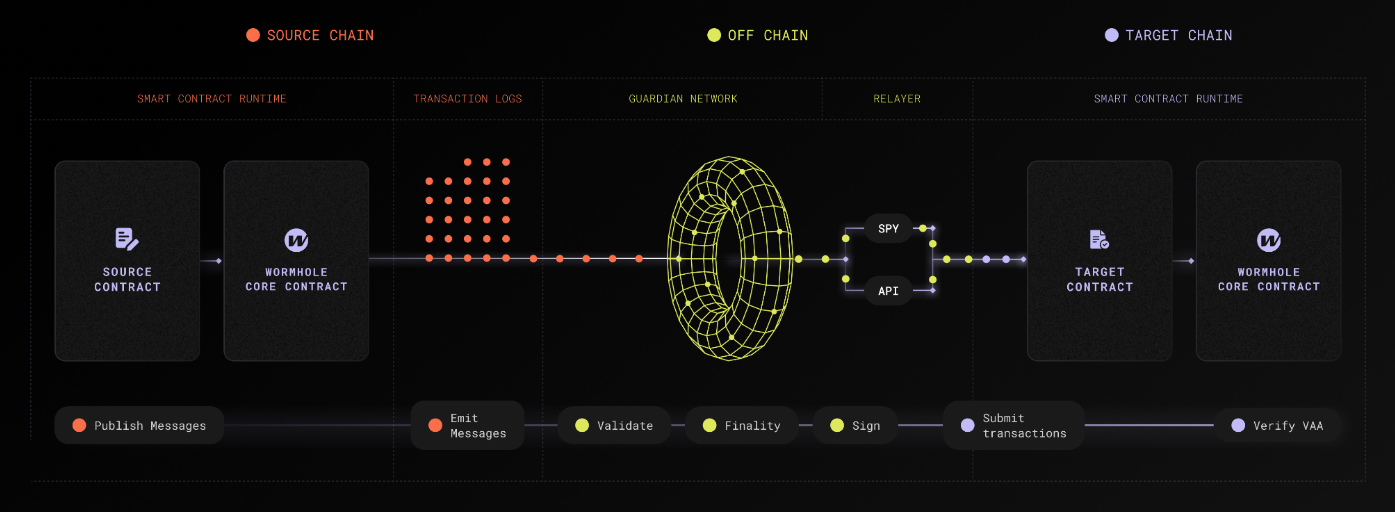
The preceding diagram outlines the end-to-end flow of multichain communication through Wormhole's architecture, which is described as follows: 1. **Source chain** - a source contract emits a message by interacting with the [Wormhole Core Contract](/docs/protocol/infrastructure/core-contracts/){target=\_blank} on the source chain, which publishes the message in the blockchain's transaction logs 2. **Guardian Network** - [Guardians](/docs/protocol/infrastructure/guardians/){target=\_blank} validate these messages and sign them to produce [Verifiable Action Approvals (VAAs)](/docs/protocol/infrastructure/vaas/){target=\_blank} 3. **Relayers** - off-chain relayers or applications fetch the VAA and relay it to the target chain 4. **Target chain** - on the target chain, the message is consumed by the appropriate contract. This contract interacts with the Wormhole Core Contract to verify the VAA and execute the intended multichain operation. The flow from the relayer to the target chain involves an entry point contract, which could vary based on the use case: - In some applications, the target contract acts as the entry point and performs verification via the Core Contract - In products like the Token Bridge, the Token Bridge contract itself interacts with the Core Contract ## On-Chain Components - **Emitter** - a contract that calls the publish message method on the Core Contract. To identify the message, the Core Contract will write an event to the transaction logs with details about the emitter and sequence number. This may be your cross-chain dApp or an existing ecosystem protocol - **[Wormhole Core Contract](/docs/protocol/infrastructure/core-contracts/){target=\_blank}** - primary contract, this is the contract which the Guardians observe and which fundamentally allows for multichain communication - **Transaction logs** - blockchain-specific logs that allow the Guardians to observe messages emitted by the Core Contract ## Off-Chain Components - **Guardian Network** - validators that exist in their own P2P network. Guardians observe and validate the messages emitted by the Core Contract on each supported chain to produce VAAs (signed messages) - **[Guardian](/docs/protocol/infrastructure/guardians/){target=\_blank}** - one of 19 validators in the Guardian Network that contributes to the VAA multisig - **[Spy](/docs/protocol/infrastructure/spy/){target=\_blank}** - a daemon that subscribes to messages published within the Guardian Network. A Spy can observe and forward network traffic, which helps scale up VAA distribution - **[API](https://docs.wormholescan.io/){target=\_blank}** - a REST server to retrieve details for a VAA or the Guardian Network - **[VAAs](/docs/protocol/infrastructure/vaas/){target=\_blank}** - Verifiable Action Approvals (VAAs) are the signed attestation of an observed message from the Wormhole Core Contract - **[Relayer](/docs/protocol/infrastructure/relayer/){target=\_blank}** - any off-chain process that relays a VAA to the target chain - **Wormhole relayers** - a decentralized relayer network that delivers messages that are requested on-chain via the Wormhole relayer contract - **Custom relayers** - relayers that only handle VAAs for a specific protocol or multichain application. They can execute custom logic off-chain, reducing gas costs and increasing multichain compatibility. Currently, multichain application developers are responsible for developing and hosting custom relayers ## Next Steps
- :octicons-book-16:{ .lg .middle } **Core Contracts** --- Discover Wormhole's Core Contracts, enabling multichain communication with message sending, receiving, and multicast features for efficient synchronization. [:custom-arrow: Explore Core Contracts](/docs/protocol/infrastructure/core-contracts/) - :octicons-tools-16:{ .lg .middle } **Core Messaging** --- Follow the guides in this section to work directly with the building blocks of Wormhole messaging, Wormhole-deployed relayers and Core Contracts, to send, receive, validate, and track multichain messages. [:custom-arrow: Build with Core Messaging](/docs/products/messaging/guides/wormhole-relayers/)
--- END CONTENT --- Doc-Content: https://raw.githubusercontent.com/wormhole-foundation/wormhole-docs/refs/heads/main/protocol/ecosystem.md --- BEGIN CONTENT --- --- title: Ecosystem description: Explore Wormhole's modular ecosystem of cross-chain tools for messaging, bridging, governance, and developer integration. categories: Basics --- # The Wormhole Ecosystem [Wormhole](/docs/protocol/introduction/){target=\_blank} is a cross-chain messaging protocol connecting decentralized applications across multiple blockchains. It offers a suite of interoperability tools, each addressing different multichain challenges, and allows developers to mix and match these products as needed. Whether you’re looking for a simple UI-based bridging experience, a native token transfer flow without wrapped assets, real-time cross-chain data queries, or an advanced settlement layer for complex asset movements, Wormhole has a product designed for that purpose. Every solution integrates with Wormhole’s core messaging network, ensuring each module can operate independently or in combination with others. This page will guide you through the structural layout of these tools—how they fit together, can be used independently, and can be layered to build robust, multichain applications.
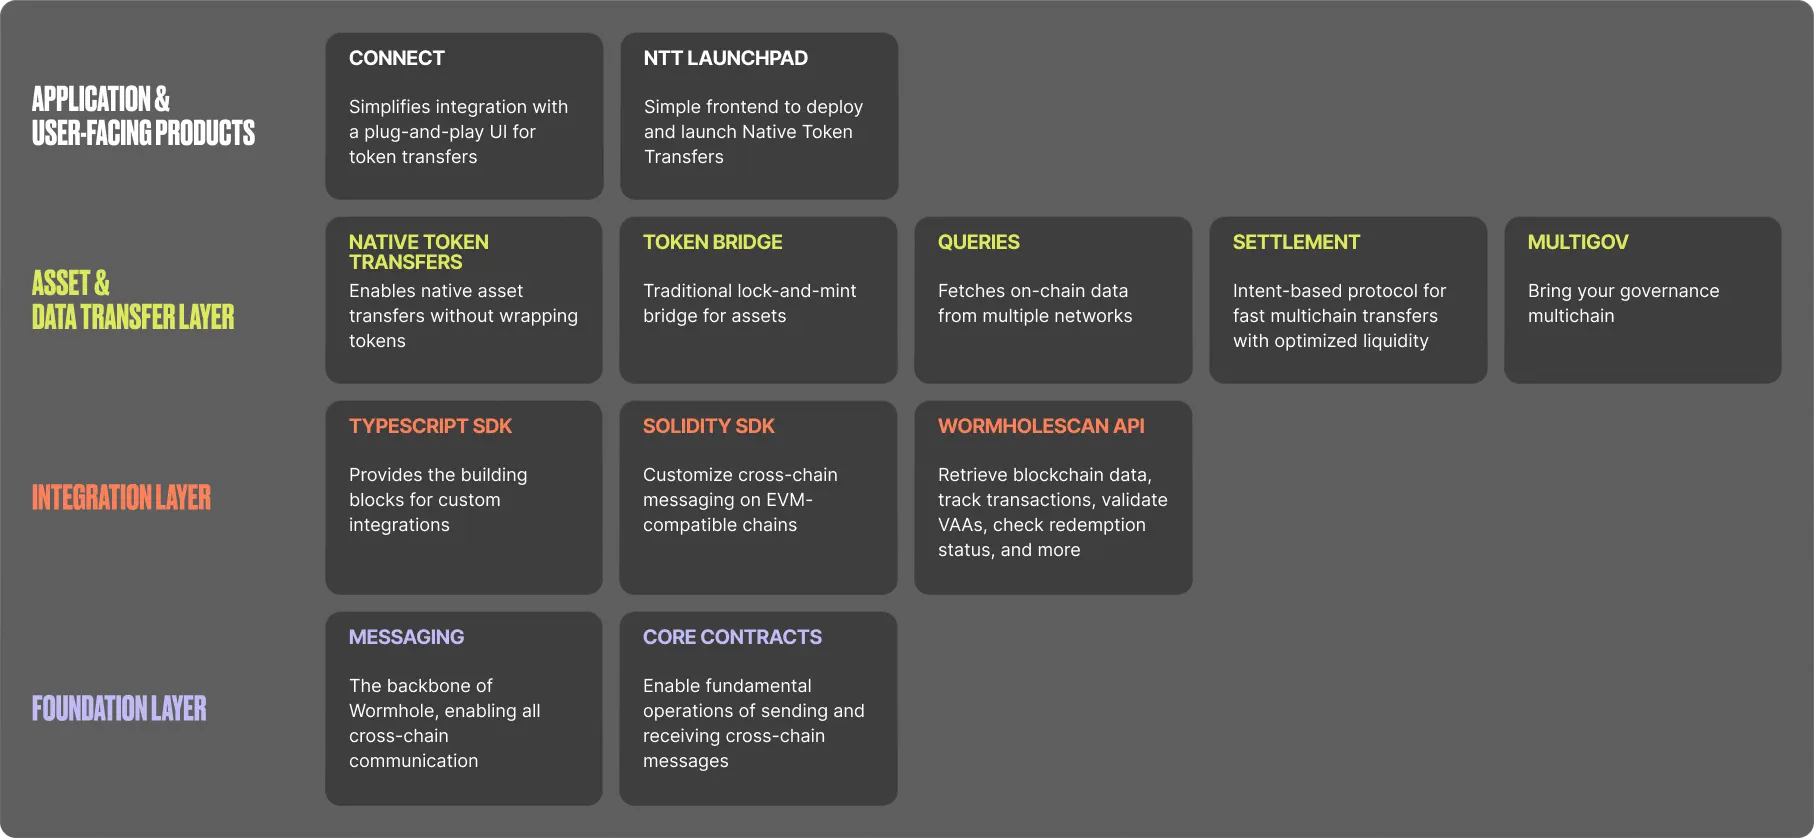
 ## Ecosystem Overview The diagram shows a high-level view of Wormhole’s modular stack, illustrating how different tools are grouped into four layers: - **Application and user-facing products**: The top layer includes user-centric solutions such as [Connect](/docs/products/connect/overview/){target=\_blank} (a simple bridging interface) and the [NTT Launchpad](https://ntt.wormhole.com/){target=\_blank} (for streamlined native asset deployments). - **Asset and data transfer layer**: Below it sits the core bridging and data solutions—[NTT](/docs/products/native-token-transfers/overview/){target=\_blank}, [Token Bridge](/docs/products/token-bridge/overview/){target=\_blank}, [Queries](/docs/products/queries/overview/){target=\_blank}, [Settlement](/docs/products/settlement/overview/){target=\_blank}, and [MultiGov](/docs/products/multigov/overview/){target=\_blank}—that handle the movement of tokens, real-time data fetching, advanced cross-chain settlements, and cross-chain governance. - **Integration layer**: The [TypeScript SDK](/docs/tools/typescript-sdk/get-started/){target=\_blank} and [WormholeScan API](https://wormholescan.io/#/){target=\_blank} provide developer-friendly libraries and APIs to integrate cross-chain capabilities into applications. - **Foundation layer**: At the base, the [Wormhole messaging](/docs/products/messaging/overview/){target=\_blank} system and the [core contracts](/docs/protocol/infrastructure/core-contracts/){target=\_blank} secure the entire network, providing essential verification and cross-chain message delivery. ![Wormhole ecosystem diagram](/docs/images/protocol/ecosystem/ecosystem-1.webp) ## Bringing It All Together: Interoperability in Action Wormhole’s modularity makes it easy to adopt just the pieces you need. If you want to quickly add bridging to a dApp, use Connect at the top layer while relying on the Foundation Layer behind the scenes. Or if your app needs to send raw messages between chains, integrate the Messaging layer directly via the Integration Layer (TypeScript or Solidity SDK). You can even layer on additional features—like real-time data calls from Queries or more flexible bridging flows with Native Token Transfers. Ultimately, these components aren’t siloed but designed to be combined. You could, for instance, fetch a balance from one chain using Queries and then perform an on-chain swap on another chain using Settlement. Regardless of your approach, each Wormhole product is powered by the same Guardian-secured messaging backbone, ensuring all cross-chain interactions remain reliable and secure. ## Next Steps Unsure which bridging solution you need? Visit the [Product Comparison](/docs/products/overview/){target=\_blank} page to quickly match your requirements with the right Wormhole tool. --- END CONTENT --- Doc-Content: https://raw.githubusercontent.com/wormhole-foundation/wormhole-docs/refs/heads/main/protocol/infrastructure/core-contracts.md --- BEGIN CONTENT --- --- title: Core Contracts description: Discover Wormhole's Core Contracts, which enable multichain communication with message sending, receiving, and multicast features for efficient synchronization. categories: Basics --- # Core Contracts The Wormhole Core Contract is deployed across each supported blockchain network. This contract is a fundamental component of the Wormhole interoperability protocol and acts as the foundational layer enabling secure and efficient multichain messaging. All multichain applications either interact directly with the Core Contract or with another contract that does. This page summarizes the key functions of the Core Contract and outlines how the Core Contract works. ## Key Functions Key functions of the Wormhole Core Contract include the following: - **Multichain messaging** - standardizes and secures the format of messages to facilitate consistent communication for message transfer between Wormhole-connected blockchain networks, allowing developers to leverage the unique features of each network - **Verification and validation** - verifies and validates all VAAs received on the target chain by confirming the Guardian signature to ensure the message is legitimate and has not been manipulated or altered - **Guardian Network coordination** - coordinates with Wormhole's Guardian Network to facilitate secure, trustless communication across chains and ensure that only validated interactions are processed to enhance the protocol's overall security and reliability - **Event emission for monitoring** - emits events for every multichain message processed, allowing for network activity monitoring like tracking message statuses, debugging, and applications that can react to multichain events in real time ## How the Core Contract Works The Wormhole Core Contract is central in facilitating secure and efficient multichain transactions. It enables communication between different blockchain networks by packaging transaction data into standardized messages, verifying their authenticity, and ensuring they are executed correctly on the destination chain. The following describes the role of the Wormhole Core Contract in message transfers: 1. **Message submission** - when a user initiates a multichain transaction, the Wormhole Core Contract on the source chain packages the transaction data into a standardized message payload and submits it to the Guardian Network for verification 2. **Guardian verification** - the Guardians independently observe and sign the message. Once enough Guardians have signed the message, the collection of signatures is combined with the message and metadata to produce a VAA 3. **Message reception and execution** - on the target chain, the Wormhole Core Contract receives the verified message, checks the Guardians' signatures, and executes the corresponding actions like minting tokens, updating states, or calling specific smart contract functions For a closer look at how messages flow between chains and all of the components involved, you can refer to the [Architecture Overview](/docs/protocol/architecture/) page. ### Message Submission You can send multichain messages by calling a function against the source chain Core Contract, which then publishes the message. Message publishing strategies can differ by chain; however, generally, the Core Contract posts the following items to the blockchain logs: - `emitterAddress` - the contract which made the call to publish the message - `sequenceNumber` - a unique number that increments for every message for a given emitter (and implicitly chain) - `consistencyLevel`- the level of finality to reach before the Guardians will observe and attest the emitted event. This is a defense against reorgs and rollbacks since a transaction, once considered "final," is guaranteed not to have the state changes it caused rolled back. Since different chains use different consensus mechanisms, each one has different finality assumptions, so this value is treated differently on a chain-by-chain basis. See the options for finality for each chain in the [Wormhole Finality](/docs/products/reference/consistency-levels/){target=\_blank} reference page There are no fees to publish a message except when publishing on Solana, but this is subject to change in the future. ### Message Reception When you receive a multichain message on the target chain Core Contract, you generally must parse and verify the [components of a VAA](/docs/protocol/infrastructure/vaas#vaa-format){target=\_blank}. Receiving and verifying a VAA ensures that the Guardian Network properly attests to the message and maintains the integrity and authenticity of the data transmitted between chains. ## Multicast Multicast refers to simultaneously broadcasting a single message or transaction across different blockchains with no destination address or chain for the sending and receiving functions. VAAs attest that "this contract on this chain said this thing." Therefore, VAAs are multicast by default and will be verified as authentic on any chain where they are used. This multicast-by-default model makes it easy to synchronize state across the entire ecosystem. A blockchain can make its data available to every chain in a single action with low latency, which reduces the complexity of the n^2 problems encountered by routing data to many blockchains. This doesn't mean an application _cannot_ specify a destination address or chain. For example, the [Token Bridge](/docs/products/token-bridge/overview/){target=\_blank} and [Wormhole relayer](/docs/protocol/infrastructure/relayer/){target=\_blank} contracts require that some destination details be passed and verified on the destination chain. Because the VAA creation is separate from relaying, the multicast model does not incur an additional cost when a single chain is targeted. If the data isn't needed on a certain blockchain, don't relay it there, and it won't cost anything. ## Next Steps
- :octicons-book-16:{ .lg .middle } **Verified Action Approvals (VAA)** --- Learn about Verified Action Approvals (VAAs) in Wormhole, their structure, validation, and their role in multichain communication. [:custom-arrow: Learn About VAAs](/docs/protocol/infrastructure/vaas/) - :octicons-tools-16:{ .lg .middle } **Get Started with Core Contracts** --- This guide walks through the key methods of the Core Contracts, providing you with the knowledge needed to integrate them into your multichain contracts. [:custom-arrow: Build with Core Contracts](/docs/products/messaging/guides/core-contracts/)
--- END CONTENT --- Doc-Content: https://raw.githubusercontent.com/wormhole-foundation/wormhole-docs/refs/heads/main/protocol/infrastructure/guardians.md --- BEGIN CONTENT --- --- title: Guardians description: Explore Wormhole's Guardian Network, a decentralized system for secure, scalable cross-chain communication across various blockchain ecosystems. categories: Basics --- # Guardians Wormhole relies on a set of 19 distributed nodes that monitor the state on several blockchains. In Wormhole, these nodes are referred to as Guardians. The current Guardian set can be seen in the [Dashboard](https://wormhole-foundation.github.io/wormhole-dashboard/#/?endpoint=Mainnet){target=\_blank}. Guardians fulfill their role in the messaging protocol as follows: 1. Each Guardian observes messages and signs the corresponding payloads in isolation from the other Guardians 2. Guardians combine their independent signatures to form a multisig 3. This multisig represents proof that a majority of the Wormhole network has observed and agreed upon a state Wormhole refers to these multisigs as [Verifiable Action Approvals](/docs/protocol/infrastructure/vaas/){target=\_blank} (VAAs). ## Guardian Network The Guardian Network functions as Wormhole's decentralized oracle, ensuring secure, cross-chain interoperability. Learning about this critical element of the Wormhole ecosystem will help you better understand the protocol. The Guardian Network is designed to help Wormhole deliver on five key principles: - **Decentralization** - control of the network is distributed across many parties - **Modularity** - independent components (e.g., oracle, relayer, applications) ensure flexibility and upgradeability - **Chain agnosticism** - supports EVM, Solana, and other blockchains without relying on a single network - **Scalability** - can handle large transaction volumes and high-value transfers - **Upgradeable** - can change the implementation of its existing modules without breaking integrators to adapt to changes in decentralized computing The following sections explore each principle in detail. ### Decentralization Decentralization remains the core concern for interoperability protocols. Earlier solutions were fully centralized, and even newer models often rely on a single entity or just one or two actors, creating low thresholds for collusion or failure. Two common approaches to decentralization have notable limitations: - **Proof-of-Stake (PoS)** - while PoS is often seen as a go-to model for decentralization, it's not well-suited for a network that verifies many blockchains and doesn't run its own smart contracts. Its security in this context is unproven, and it introduces complexities that make other design goals harder to achieve - **Zero-Knowledge Proofs (ZKPs)** - ZKPs offer a trustless and decentralized approach, but the technology is still early-stage. On-chain verification is often too computationally expensive—especially on less capable chains—so a multisig-based fallback is still required for practical deployment In the current De-Fi landscape, most major blockchains are secured by a small group of validator companies. Only a limited number of companies worldwide have the expertise and capital to run high-performance validators. If a protocol could unite many of these top validator companies into a purpose-built consensus mechanism designed for interoperability, it would likely offer better performance and security than a token-incentivized network. The key question is: how many of them could Wormhole realistically involve? To answer that, consider these key constraints and design decisions: - **Threshold signatures allow flexibility, but** - with threshold signatures, in theory, any number of validators could participate. However, threshold signatures are not yet widely supported across blockchains. Verifying them is expensive and complex, especially in a chain-agnostic system - **t-Schnorr multisig is more practical** - Wormhole uses [t-Schnorr multisig](https://en.wikipedia.org/wiki/Schnorr_signature){target=\_blank}, which is broadly supported and relatively inexpensive to verify. However, verification costs scale linearly with the number of signers, so the size of the validator set needs to be carefully chosen - **19 validators is the optimal tradeoff** - a set of 19 participants presents a practical compromise between decentralization and efficiency. With a two-thirds consensus threshold, only 13 signatures must be verified on-chain—keeping gas costs reasonable while ensuring strong security - **Security through reputation, not tokens** - Wormhole relies on a network of established validator companies instead of token-based incentives. These 19 Guardians are among the most trusted operators in the industry—real entities with a track record, not anonymous participants This forms the foundation for a purpose-built Proof-of-Authority (PoA) consensus model, where each Guardian has an equal stake. As threshold signatures gain broader support, the set can expand. Once ZKPs become widely viable, the network can evolve into a fully trustless system. ### Modularity Wormhole is designed with simple components that are very good at a single function. Separating security and consensus (Guardians) from message delivery ([relayers](/docs/protocol/infrastructure/relayer/){target=\_blank}) allows for the flexibility to change or upgrade one component without disrupting the others. ### Chain Agnosticism Today, Wormhole supports a broader range of ecosystems than any other interoperability protocol because it uses simple tech (t-schnorr signatures), an adaptable, heterogeneous relayer model, and a robust validator network. Wormhole can expand to new ecosystems as quickly as a [Core Contract](/docs/protocol/infrastructure/core-contracts/){target=\_blank} can be developed for the smart contract runtime. ### Scalability Wormhole scales well, as demonstrated by its ability to handle substantial total value locked (TVL) and transaction volume even during tumultuous events. Every Guardian must run a full node for every blockchain in the ecosystem. This requirement can be computationally heavy to set up; however, once all the full nodes are running, the Guardian Network's actual computation needs become lightweight. Performance is generally limited by the speed of the underlying blockchains, not the Guardian Network itself. ### Upgradeable Wormhole is designed to adapt and evolve in the following ways: - **Guardian Set expansion** – future updates may introduce threshold signatures to allow for more Guardians in the set - **ZKP integration** - as Zero-Knowledge Proofs become more widely supported, the network can transition to a fully trustless model These principles combine to create a clear pathway towards a fully trustless interoperability layer that spans decentralized computing. ## Next Steps
- :octicons-book-16:{ .lg .middle } **Relayers** --- Discover the role of relayers in the Wormhole network, including client-side, custom, and Wormhole-deployed types, for secure cross-chain communication. [:custom-arrow: Learn About Relayers](/docs/protocol/infrastructure/relayer/) - :octicons-tools-16:{ .lg .middle } **Query Guardian Data** --- Learn how to use Wormhole Queries to add real-time access to Guardian-attested on-chain data via a REST endpoint to your dApp, enabling secure cross-chain interactions and verifications. [:custom-arrow: Build with Queries](/docs/products/queries/overview/)
--- END CONTENT --- Doc-Content: https://raw.githubusercontent.com/wormhole-foundation/wormhole-docs/refs/heads/main/protocol/infrastructure/relayer.md --- BEGIN CONTENT --- --- title: Relayers description: Discover the role of relayers in the Wormhole network, including client-side, custom, and Wormhole-deployed types, for secure cross-chain communication. categories: Basics --- # Relayers This page provides a comprehensive guide to relayers within the Wormhole network, describing their role, types, and benefits in facilitating cross-chain processes. Relayers in the Wormhole context are processes that deliver [Verified Action Approvals (VAAs)](/docs/protocol/infrastructure/vaas/){target=\_blank} to their destination, playing a crucial role in Wormhole's security model. They can't compromise security, only availability, and act as delivery mechanisms for VAAs without the capacity to tamper with the outcome. There are three primary types of relayers discussed: - **Client-side relaying** - a cost-efficient, no-backend-infrastructure approach relying on user-facing front ends. It provides a simple solution, although it can complicate the user experience due to the manual steps involved - **Custom relayers** - backend components that handle parts of the cross-chain process, offering a smoother user experience and allowing off-chain calculations to reduce gas costs. These relayers could operate through direct listening to the Guardian Network (Spy relaying) - **Wormhole-deployed relayers** - a decentralized relayer network that can deliver arbitrary VAAs, reducing the developer's need to develop, host, or maintain relayers. However, they require all calculations to be done on-chain and might be less gas-efficient ## Fundamentals This section highlights the crucial principles underpinning the operation and handling of relayers within the Wormhole network. Relayers are fundamentally trustless entities within the network, meaning while they don't require your trust to operate, you also shouldn't trust them implicitly. Relayers function as delivery mechanisms, transporting VAAs from their source to their destination. Key characteristics of VAAs include: - Public emission from the Guardian Network - Authentication through signatures from the Guardian Network - Verifiability by any entity or any Wormhole Core Contract These characteristics mean anyone can pick up a VAA and deliver it anywhere, but no one can alter the VAA content without invalidating the signatures. Keep in mind the following security considerations around relayers: - **Trusting information** - it is crucial not to trust information outside your contract or a VAA. Relying on information from a relayer could expose you to input attacks - **Gas optimization** - using relayers to perform trustless off-chain computation to pass into the destination contract can optimize gas costs but also risk creating attack vectors if not used correctly - **Deterministic by design** - the design of a relayer should ensure a single, deterministic way to process messages in your protocol. Relayers should have a "correct" implementation, mirroring "crank turner" processes used elsewhere in blockchain ## Client-Side Relaying Client-side relaying relies on user-facing front ends, such as a webpage or a wallet, to complete the cross-chain process. ### Key Features - **Cost-efficiency** - users only pay the transaction fee for the second transaction, eliminating any additional costs - **No backend infrastructure** - the process is wholly client-based, eliminating the need for a backend relaying infrastructure ### Implementation Users themselves carry out the three steps of the cross-chain process: 1. Perform an action on chain A 2. Retrieve the resulting VAA from the Guardian Network 3. Perform an action on chain B using the VAA ### Considerations Though simple, this type of relaying is generally not recommended if your aim is a highly polished user experience. It can, however, be useful for getting a Minimum Viable Product (MVP) up and running. - Users must sign all required transactions with their own wallet - Users must have funds to pay the transaction fees on every chain involved - The user experience may be cumbersome due to the manual steps involved ## Custom Relayers Custom relayers are purpose-built components within the Wormhole protocol, designed to relay messages for specific applications. They can perform off-chain computations and can be customized to suit a variety of use cases. The main method of setting up a custom relayer is by listening directly to the Guardian Network via a [Spy](/docs/protocol/infrastructure/spy/). ### Key Features - **Optimization** - capable of performing trustless off-chain computations which can optimize gas costs - **Customizability** - allows for specific strategies like batching, conditional delivery, multi-chain deliveries, and more - **Incentive structure** - developers have the freedom to design an incentive structure suitable for their application - **Enhanced UX** - the ability to retrieve a VAA from the Guardian Network and perform an action on the target chain using the VAA on behalf of the user can simplify the user experience ### Implementation A plugin relayer to make the development of custom relayers easier is available in the [main Wormhole repository](https://github.com/wormhole-foundation/wormhole/tree/main/relayer){target=\_blank}. This plugin sets up the basic infrastructure for relaying, allowing developers to focus on implementing the specific logic for their application. ### Considerations Remember, despite their name, custom relayers still need to be considered trustless. VAAs are public and can be submitted by anyone, so developers shouldn't rely on off-chain relayers to perform any computation considered "trusted." - Development work and hosting of relayers are required - The fee-modeling can become complex, as relayers are responsible for paying target chain fees - Relayers are responsible for availability, and adding dependencies for the cross-chain application ## Wormhole Relayers Wormhole relayers are a component of a decentralized network in the Wormhole protocol. They facilitate the delivery of VAAs to recipient contracts compatible with the standard relayer API. ### Key Features - **Lower operational costs** - no need to develop, host, or maintain individual relayers - **Simplified integration** - because there is no need to run a relayer, integration is as simple as calling a function and implementing an interface ### Implementation The Wormhole relayer integration involves two key steps: - **Delivery request** - request delivery from the ecosystem Wormhole relayer contract - **Relay reception** - implement a [`receiveWormholeMessages`](https://github.com/wormhole-foundation/wormhole-solidity-sdk/blob/bacbe82e6ae3f7f5ec7cdcd7d480f1e528471bbb/src/interfaces/IWormholeReceiver.sol#L44-L50){target=\_blank} function within their contracts. This function is invoked upon successful relay of the VAA ### Considerations Developers should note that the choice of relayers depends on their project's specific requirements and constraints. Wormhole relayers offer simplicity and convenience but limit customization and optimization opportunities compared to custom relayers. - All computations are performed on-chain - Potentially less gas-efficient compared to custom relayers - Optimization features like conditional delivery, batching, and off-chain calculations might be restricted - Support may not be available for all chains ## Next Steps
- :octicons-book-16:{ .lg .middle } **Spy** --- Discover Wormhole's Spy daemon, which subscribes to gossiped messages in the Guardian Network, including VAAs and Observations, with setup instructions. [:custom-arrow: Learn More About the Spy](/docs/protocol/infrastructure/spy/) - :octicons-book-16:{ .lg .middle } **Build with Wormhole Relayers** --- Learn how to use Wormhole-deployed relayer configurations for seamless cross-chain messaging between contracts on different EVM blockchains without off-chain deployments. [:custom-arrow: Get Started with Wormhole Relayers](/docs/products/messaging/guides/wormhole-relayers/) - :octicons-book-16:{ .lg .middle } **Run a Custom Relayer** --- Learn how to build and configure your own off-chain custom relaying solution to relay Wormhole messages for your applications using the Relayer Engine. [:custom-arrow: Get Started with Custom Relayers](/docs/protocol/infrastructure-guides/run-relayer/)
--- END CONTENT --- Doc-Content: https://raw.githubusercontent.com/wormhole-foundation/wormhole-docs/refs/heads/main/protocol/infrastructure/spy.md --- BEGIN CONTENT --- --- title: Spy description: Discover Wormhole's Spy daemon, which subscribes to gossiped messages in the Guardian Network, including VAAs and Observations, with setup instructions. categories: Basics --- # Spy In Wormhole's ecosystem, the _Spy_ is a daemon, a continuously running background process that monitors messages within the Guardian Network. Unlike Guardians, a Spy doesn't perform validation; instead, it serves as an interface for observing the network's message traffic, enabling applications and users to access live data transmitted over Wormhole. The primary purpose of a Spy is to subscribe to the gossiped messages across the Guardian Network, tracking key message types that allow integrators and applications to monitor real-time network activity without directly engaging in consensus operations. This page provides a comprehensive guide to where the Spy fits within the Wormhole network, describing the key features and role in facilitating multichain processes. ## Key Features - **Real-time monitoring of Wormhole messages** - the Spy allows users to observe Wormhole messages as they are published across supported chains in near real-time - **Filterable and observable message streams** - users can filter message streams by chain, emitter, and other criteria, making it easier to track specific contracts or categories of interest - **Integration-friendly event streaming** - the Spy exposes gRPC and WebSocket interfaces, making it easy to integrate message observation into custom tooling, dashboards, or indexing services - **Support for multiple message protocols** - it can observe messages from different Wormhole messaging protocols (Token Bridge, CCTP, NTT, etc.), providing broad coverage of cross-chain activity - **Lightweight and infrastructure-ready** - the Spy is designed to run as part of indexing or backend services, not requiring validator-level infrastructure ## Integrator Use Case The Spy provides a valuable mechanism for integrators to observe real-time network activity in the Guardian Network without directly engaging in validation or consensus. By running a Spy, integrators can track multichain events and message flows — such as VAAs, observations, and Guardian heartbeats — to monitor network activity essential to their applications. This monitoring capability is especially beneficial for applications that need immediate insights into multichain data events. Integrators can run a Spy to ensure their applications are promptly informed of message approvals, observations, or Guardian liveness signals, supporting timely and responsive app behavior without additional overhead on network resources. ## Observable Message Categories A Spy can access the following categories of messages shared over the gossip protocol: - [Verifiable Action Approvals (VAAs)](/docs/protocol/infrastructure/vaas/){target=\_blank} - packets of multichain data - The Spy can detect whether a VAA has been approved by the Guardian Network, making it a valuable tool for applications needing real-time multichain verification - [Observations](/docs/products/reference/glossary/#observation){target=\_blank} - emitted by Wormhole's core contracts, observations are picked up by the Guardians and relayed across the network - A Spy allow users to monitor these messages, adding transparency and insight into blockchain events - [Guardian heartbeats](/docs/products/reference/glossary/#heartbeat){target=\_blank} - heartbeat messages represent Guardian node status - By monitoring heartbeats, a Spy can signal the liveness and connectivity of Guardians in the network ## Additional Resources
- :octicons-code-16:{ .lg .middle } **Spy Source Code** --- To see the source code for the Go implementation of the Spy, visit the `wormhole` repository on GitHub. [:custom-arrow: View the Source Code](https://github.com/wormhole-foundation/wormhole/blob/main/node/cmd/spy/spy.go){target=\_blank} - :octicons-code-16:{ .lg .middle } **Alternative Implementation** --- Visit the `beacon` repository on GitHub to learn more about Beacon, an alternative highly available, reduced-latency version of the Wormhole Spy. [:custom-arrow: Get Started with Pyth Beacon](https://github.com/pyth-network/beacon) - :octicons-book-16:{ .lg .middle } **Discover Wormhole Queries** --- For an alternative option to on-demand access to Guardian-attested multichain data, see the Wormhole Queries page. Queries provide a simple, REST endpoint style developer experience. [:custom-arrow: Explore Queries](/docs/products/queries/overview/)
## Next Steps
- :octicons-code-16:{ .lg .middle } **Run a Spy** --- Learn how to run the needed infrastructure to spin up a Spy daemon locally and subscribe to a stream of Verifiable Action Approvals (VAAs). [:custom-arrow: Spin Up a Spy](/docs/protocol/infrastructure-guides/run-spy/){target=\_blank} - :octicons-code-16:{ .lg .middle } **Use Queries** --- For access to real-time network data without infrastructure overhead, follow this guide and use Wormhole Query to construct a query, make a request, and verify the response. [:custom-arrow: Get Started with Queries](/docs/products/queries/guides/use-queries/)
--- END CONTENT --- Doc-Content: https://raw.githubusercontent.com/wormhole-foundation/wormhole-docs/refs/heads/main/protocol/infrastructure/vaas.md --- BEGIN CONTENT --- --- title: VAAs description: Learn about Verified Action Approvals (VAAs) in Wormhole, their structure, validation, and role in cross-chain communication. categories: Basics --- # Verified Action Approvals Verified Action Approvals (VAAs) are Wormhole's core messaging primitive. They are packets of cross-chain data emitted whenever a cross-chain application contract interacts with the Core Contract. [Guardians](/docs/protocol/infrastructure/guardians/){target=\_blank} validate messages emitted by contracts before sending them to the target chain. Once a majority of Guardians agree the message is valid, they sign a keccak256 hash of the message body. The message is wrapped up in a structure called a VAA, which combines the message with the Guardian signatures to form a proof. VAAs are uniquely indexed by the (`emitter_chain`, `emitter_address`, `sequence`) tuple. To obtain a VAA, one can query the [Wormholescan API](https://docs.wormholescan.io/){target=\_blank} with this information. The `sequence` field depends on the final ordering of blocks on the emitter chain. When a lower consistency level is chosen (i.e., not waiting for finality), there is a chance that chain reorganizations could lead to multiple, different VAAs appearing for what looks like the “same” message on the user side. The tuple (`emitter_chain`, `emitter_address`, `sequence`) can only be considered unique if the chain does not undergo a reorg and the block containing the message has effectively reached finality. However, there is always a small chance of an extended reorg that could invalidate or alter a previously emitted sequence number. ## VAA Format The basic VAA consists of header and body components described as follows: - **Header** - holds metadata about the current VAA, the Guardian set that is currently active, and the list of signatures gathered so far - `version` ++"byte"++ - the VAA Version - `guardian_set_index` ++"u32"++ - indicates which Guardian set is signing - `len_signatures` ++"u8"++ - the number of signatures stored - `signatures` ++"[]signature"++ - the collection of Guardian signatures Where each `signature` is: - `index` ++"u8"++ - the index of this Guardian in the Guardian set - `signature` ++"[65]byte"++ - the ECDSA signature - **Body** - _deterministically_ derived from an on-chain message. Any two Guardians processing the same message must derive the same resulting body to maintain a one-to-one relationship between VAAs and messages to avoid double-processing messages - `timestamp` ++"u32"++ - the timestamp of the block this message was published in - `nonce` ++"u32"++ - `emitter_chain` ++"u16"++ - the id of the chain that emitted the message - `emitter_address` ++"[32]byte"++ - the contract address (Wormhole formatted) that called the Core Contract - `sequence` ++"u64"++ - the auto-incrementing integer that represents the number of messages published by this emitter - `consistency_level` ++"u8"++ - the consistency level (finality) required by this emitter - `payload` ++"[]byte"++ - arbitrary bytes containing the data to be acted on The deterministic nature of the body is only strictly true once the chain's state is finalized. If a reorg occurs, and a transaction that previously appeared in block X is replaced by block Y, Guardians observing different forks may generate different VAAs for what the emitter contract believes is the same message. This scenario is less likely once a block is sufficiently buried, but it can still happen if you choose a faster (less finalized) consistency level The body contains relevant information for entities, such as contracts or other systems, that process or utilize VAAs. When a function like `parseAndVerifyVAA` is called, the body is returned, allowing verification of the `emitterAddress` to determine if the VAA originated from a trusted contract. Because VAAs have no destination, they are effectively multicast. Any Core Contract on any chain in the network will verify VAAs as authentic. If a VAA has a specific destination, relayers are responsible for appropriately completing that delivery. ## Consistency and Finality The consistency level determines whether Guardians wait for a chain's final commitment state or issue a VAA sooner under less-final conditions. This choice is especially relevant for blockchains without instant finality, where the risk of reorganization remains until a block is deeply confirmed. Guardian watchers are specialized processes that monitor each blockchain in real-time. They enforce the selected consistency level by deciding whether enough commitment has been reached before signing and emitting a VAA. Some chains allow only one commitment level (effectively final), while others let integrators pick between near-final or fully finalized states. Choosing a faster option speeds up VAA production but increases reorg risk. A more conservative option takes longer but reduces the likelihood of rollback. ## Signatures The body of the VAA is hashed twice with `keccak256` to produce the signed digest message. ```js // hash the bytes of the body twice digest = keccak256(keccak256(body)) // sign the result signature = ecdsa_sign(digest, key) ``` !!!tip "Hash vs. double hash" Different implementations of the ECDSA signature validation may apply a keccak256 hash to the message passed, so care must be taken to pass the correct arguments. For example, the [Solana secp256k1 program](https://solana.com/docs/core/programs#secp256k1-program){target=\_blank} will hash the message passed. In this case, the argument for the message should be a single hash of the body, not the twice-hashed body. ## Payload Types Different applications built on Wormhole may specify a format for the payloads attached to a VAA. This payload provides information on the target chain and contract so it can take action (e.g., minting tokens to a receiver address). ### Token Transfer Many bridges use a lockup/mint and burn/unlock mechanism to transfer tokens between chains. Wormhole's generic message-passing protocol handles the routing of lock and burn events across chains to ensure Wormhole's Token Bridge is chain-agnostic and can be rapidly integrated into any network with a Wormhole contract. Transferring tokens from the sending chain to the destination chain requires the following steps: 1. Lock the token on the sending chain 2. The sending chain emits a message as proof the token lockup is complete 3. The destination chain receives the message confirming the lockup event on the sending chain 4. The token is minted on the destination chain The message the sending chain emits to verify the lockup is referred to as a transfer message and has the following structure: - `payload_id` ++"u8"++ - the ID of the payload. This should be set to `1` for a token transfer - `amount` ++"u256"++ - amount of tokens being transferred - `token_address` ++"u8[32]"++ - address on the source chain - `token_chain` ++"u16"++ - numeric ID for the source chain - `to` ++"u8[32]"++ - address on the destination chain - `to_chain` ++"u16"++ - numeric ID for the destination chain - `fee` ++"u256"++ - portion of amount paid to a relayer This structure contains everything the destination chain needs to learn about a lockup event. Once the destination chain receives this payload, it can mint the corresponding asset. Note that the destination chain is agnostic regarding how the tokens on the sending side were locked. They could have been burned by a mint or locked in a custody account. The protocol relays the event once enough Guardians have attested to its existence. ### Attestation While the destination chain can trust the message from the sending chain to inform it of token lockup events, it has no way of verifying the correct token is locked up. To solve this, the Token Bridge supports token attestation. To create a token attestation, the sending chain emits a message containing metadata about a token, which the destination chain may use to preserve the name, symbol, and decimal precision of a token address. The message format for token attestation is as follows: - `payload_id` ++"u8"++ - the ID of the payload. This should be set to `2` for an attestation - `token_address` ++"[32]byte"++ - address of the originating token contract - `token_chain` ++"u16"++ - chain ID of the originating token - `decimals` ++"u8"++ - number of decimals this token should have - `symbol` ++"[32]byte"++ - short name of asset - `name` ++"[32]byte"++ - full name of asset #### Attestation Tips Be aware of the following considerations when working with attestations: - Attestations use a fixed-length byte array to encode UTF8 token name and symbol data. Because the byte array is fixed length, the data contained may truncate multibyte Unicode characters - When sending an attestation VAA, it is recommended to send the longest UTF8 prefix that doesn't truncate a character and then right-pad it with zero bytes - When parsing an attestation VAA, it is recommended to trim all trailing zero bytes and convert the remainder to UTF-8 via any lossy algorithm - Be mindful that different on-chain systems may have different VAA parsers, resulting in different names/symbols on different chains if the string is long or contains invalid UTF8 - Without knowing a token's decimal precision, the destination chain cannot correctly mint the number of tokens when processing a transfer. For this reason, the Token Bridge requires an attestation for each token transfer ### Token Transfer with Message The Token Transfer with Message data structure is identical to the token-only data structure, except for the following: - **`fee` field** - replaced with the `from_address` field - **`payload` field** - is added containing arbitrary bytes. A dApp may include additional data in this arbitrary byte field to inform some application-specific behavior This VAA type was previously known as Contract Controlled Transfer and is also sometimes referred to as a `payload3` message. The Token Transfer with Message data sructure is as follows: - `payload_id` ++"u8"++ - the ID of the payload. This should be set to `3` for a token transfer with message - `amount` ++"u256"++ - amount of tokens being transferred - `token_address` ++"u8[32]"++ - address on the source chain - `token_chain` ++"u16"++ - numeric ID for the source chain - `to` ++"u8[32]"++ - address on the destination chain - `to_chain` ++"u16"++ - numeric ID for the destination chain - `from_address` ++"u8[32]"++ - address that called the Token Bridge on the source chain - `payload` ++"[]byte"++ - message, arbitrary bytes, app-specific ### Governance Governance VAAs don't have a `payload_id` field like the preceding formats. Instead, they trigger an action in the deployed contracts (for example, an upgrade). #### Action Structure Governance messages contain pre-defined actions, which can target the various Wormhole modules currently deployed on-chain. The structure includes the following fields: - `module` ++"u8[32]"++ - contains a right-aligned module identifier - `action` ++"u8"++ - predefined governance action to execute - `chain` ++"u16"++ - chain the action is targeting. This should be set to `0` for all chains - `args` ++"any"++ - arguments to the action Below is an example message containing a governance action triggering a code upgrade to the Solana Core Contract. The module field here is a right-aligned encoding of the ASCII Core, represented as a 32-byte hex string. ```js module: 0x0000000000000000000000000000000000000000000000000000436f7265 action: 1 chain: 1 new_contract: 0x348567293758957162374959376192374884562522281937446234828323 ``` #### Actions The meaning of each numeric action is pre-defined and documented in the Wormhole design documents. For each application, the relevant definitions can be found via these links: - [Core governance actions](https://github.com/wormhole-foundation/wormhole/blob/main/whitepapers/0002_governance_messaging.md){target=\_blank} - [Token Bridge governance actions](https://github.com/wormhole-foundation/wormhole/blob/main/whitepapers/0003_token_bridge.md){target=\_blank} ## Lifetime of a Message Anyone can submit a VAA to the target chain. Guardians typically don't perform this step to avoid transaction fees. Instead, applications built on top of Wormhole can acquire a VAA via the Guardian RPC and submit it in a separate flow. With the concepts now defined, it is possible to illustrate a full flow for message passing between two chains. The following stages demonstrate each step of processing that the Wormhole network performs to route a message. 
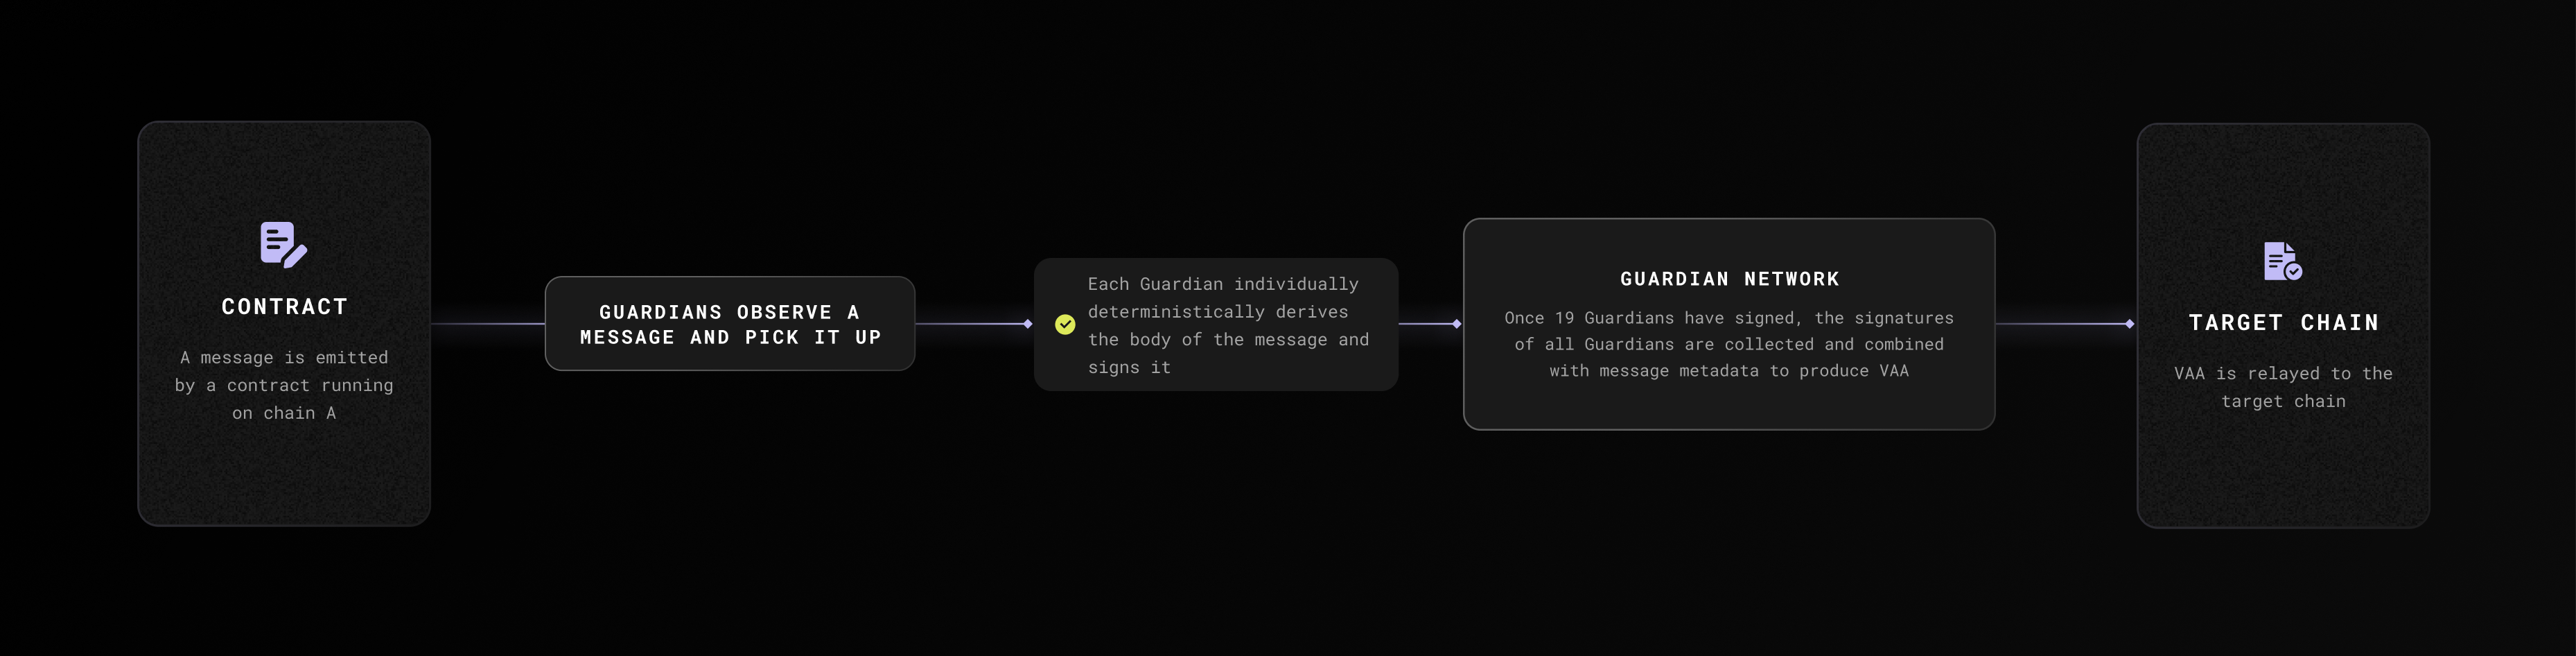
1. **A message is emitted by a contract running on Chain A** - any contract can emit messages, and the Guardians are programmed to observe all chains for these events. Here, the Guardians are represented as a single entity to simplify the graphics, but the observation of the message must be performed individually by each of the 19 Guardians 2. **Signatures are aggregated** - Guardians independently observe and sign the message. Once enough Guardians have signed the message, the collection of signatures is combined with the message and metadata to produce a VAA 3. **VAA submitted to target chain** - the VAA acts as proof that the Guardians have collectively attested the existence of the message payload. The VAA is submitted (or relayed) to the target chain to be processed by a receiving contract and complete the final step ![Lifetime of a message diagram](/docs/images/protocol/infrastructure/vaas/lifetime-vaa-diagram.webp) ## Next Steps
- :octicons-book-16:{ .lg .middle } **Guardians** --- Explore Wormhole's Guardian Network, a decentralized system for secure, scalable cross-chain communication across various blockchain ecosystems. [:custom-arrow: Learn About Guardians](/docs/protocol/infrastructure/guardians/) - :octicons-tools-16:{ .lg .middle } **Wormhole Relayer** --- Explore this guide to using Wormhole-deployed relayers to send and receive messages using VAAs. [:custom-arrow: Build with Wormhole Relayer](/docs/products/messaging/guides/wormhole-relayers/)
--- END CONTENT --- Doc-Content: https://raw.githubusercontent.com/wormhole-foundation/wormhole-docs/refs/heads/main/protocol/introduction.md --- BEGIN CONTENT --- --- title: Introduction to Wormhole description: Wormhole is a protocol for seamless communication between blockchains, enabling cross-chain applications and integrations. categories: Basics --- # Introduction to Wormhole In the rapidly evolving landscape of blockchain technology, interoperability between different blockchains remains a significant challenge. Developers often face hurdles in creating applications that can seamlessly operate across multiple blockchains, limiting innovation and the potential of decentralized ecosystems. Wormhole addresses this problem by providing a _generic message-passing_ protocol that enables secure and efficient communication between blockchains. By allowing data and asset transfers across various blockchain networks, Wormhole breaks down the walls that traditionally separate these ecosystems. Wormhole is distinguished by its focus on robust security, scalability, and transparency. The protocol is supported by a decentralized network of validators that ensure the integrity of every cross-chain transaction. This, combined with Wormhole’s proven performance in real-world applications, gives developers a dependable platform to create and scale multichain applications confidently. ![Message-passing process in the Wormhole protocol](/docs/images/protocol/introduction/introduction-1.webp) !!! note The above is an oversimplified illustration of the protocol; details about the architecture and components are available on the [architecture page](/docs/protocol/architecture/){target=\_blank}. Wormhole allows developers to leverage the strengths of multiple blockchain ecosystems without being confined to one. This means applications can benefit from the unique features of various networks—such as Solana's high throughput, Ethereum's security, and Cosmos's interoperability while maintaining a unified, efficient user experience. This page introduces the key concepts and components necessary to understand how Wormhole enables fast, secure, and scalable cross-chain communication. ## What Problems Does Wormhole Solve? Interoperability is a critical challenge in the rapidly evolving blockchain landscape. Individual blockchains are often isolated, limiting the potential for integrated applications operating across multiple ecosystems. Wormhole solves this problem by enabling seamless communication between blockchains, allowing developers to create multichain applications that can leverage the unique features of each network. Critical problems Wormhole addresses include: - **Blockchain isolation**: Wormhole connects disparate blockchains, enabling the transfer of assets, data, and governance actions across networks. - **Cross-chain complexity**: By abstracting the complexities of cross-chain communication, Wormhole makes it easier for developers to build and deploy cross-chain applications. - **Security and decentralization**: Wormhole prioritizes security through a decentralized Guardian network that validates and signs messages, ensuring the integrity of cross-chain interactions. ## What Does Wormhole Offer? Wormhole provides a suite of tools and protocols that support a wide range of use cases: - **Cross-chain messaging**: Securely transfer arbitrary data between blockchains, enabling the development of cross-chain decentralized applications. - **Asset transfers**: Facilitate the movement of tokens and NFTs across supported chains with ease, powered by protocols built on Wormhole like [Portal](https://portalbridge.com/){target=\_blank}. - **Developer tools**: Leverage Wormhole’s [TypeScript SDK](/docs/tools/typescript-sdk/get-started/){target=\_blank}, [Wormholescan](https://wormholescan.io/){target=\_blank}, and the [Wormholescan API](https://wormholescan.io/#/developers/api-doc){target=\_blank} and documentation to build and deploy cross-chain applications quickly and efficiently. ## What Isn't Wormhole? - **Wormhole is _not_ a blockchain**: It acts as a communication layer that connects different blockchains, enabling them to interact without being a blockchain itself. - **Wormhole is _not_ a token bridge**: While it facilitates token transfers, Wormhole also supports a wide range of cross-chain applications, making it much more versatile than a typical bridge. ## Use Cases of Wormhole Consider the following examples of potential applications enabled by Wormhole: - **Cross-chain exchange**: Using [Wormhole Connect](/docs/products/connect/overview/){target=\_blank}, developers can build exchanges that allow deposits from any Wormhole-connected chain, significantly increasing liquidity access. - **[Cross-chain governance](https://wormhole.com/blog/stake-for-governance-is-now-live-for-w-token-holders){target=\_blank}**: NFT collections on different networks can use Wormhole to communicate votes cast on their respective chains to a designated "voting" chain for combined proposals - **Cross-chain game**: Games can be developed on a performant network like Solana, with rewards issued as NFTs on another network, such as Ethereum. ## Explore Discover more about the Wormhole ecosystem, components, and protocols: - **[Architecture](/docs/protocol/architecture/){target=\_blank}**: Explore the components of the protocol. - **[Protocol Specifications](https://github.com/wormhole-foundation/wormhole/tree/main/whitepapers){target=\_blank}**: Learn about the protocols built on top of Wormhole. ## Demos Demos offer more realistic implementations than tutorials: - **[Wormhole Scaffolding](https://github.com/wormhole-foundation/wormhole-scaffolding){target=\_blank}**: Quickly set up a project with the Scaffolding repository. - **[Demo Tutorials](https://github.com/wormhole-foundation/demo-tutorials){target=\_blank}**: Explore various demos that showcase Wormhole's capabilities across different blockchains. !!! note Wormhole Integration Complete? Let us know so we can list your project in our ecosystem directory and introduce you to our global, multichain community! **[Reach out now!](https://forms.clickup.com/45049775/f/1aytxf-10244/JKYWRUQ70AUI99F32Q){target=\_blank}** ## Supported Networks by Product Wormhole supports a growing number of blockchains. Check out the [Supported Networks by Product](/docs/products/reference/supported-networks/){target=\_blank} page to see which networks are supported for each Wormhole product. --- END CONTENT --- Doc-Content: https://raw.githubusercontent.com/wormhole-foundation/wormhole-docs/refs/heads/main/protocol/security.md --- BEGIN CONTENT --- --- title: Security description: Explore Wormhole's security features, including the Guardian network, governance, monitoring, open-source development, and bug bounty programs. categories: Basics --- # Security ## Core Security Assumptions At its core, Wormhole is secured by a network of [Guardian](/docs/protocol/infrastructure/guardians/){target=\_blank} nodes that validate and sign messages. If a super majority (e.g., 13 out of 19) of Guardians sign the same message, it can be considered valid. A smart contract on the target chain will verify the signatures and format of the message before approving any transaction. - Wormhole's core security primitive is its signed messages (signed [VAAs](/docs/protocol/infrastructure/vaas/){target=\_blank}) - The Guardian network is currently secured by a collection of 19 of the world's top [validator companies](https://wormhole-foundation.github.io/wormhole-dashboard/#/?endpoint=Mainnet){target=\_blank} - Guardians produce signed state attestations (signed VAAs) when requested by a Core Contract integrator - Every Guardian runs full nodes (rather than light nodes) of every blockchain in the Wormhole network, so if a blockchain suffers a consensus attack or hard fork, the blockchain will disconnect from the network rather than potentially produce invalid signed VAAs - Any Signed VAA can be verified as authentic by the Core Contract of any other chain - [Relayers](/docs/protocol/infrastructure/relayer/){target=\_blank} are considered untrusted in the Wormhole ecosystem In summary: - **Core integrators aren't exposed to risk from chains and contracts they don't integrate with** - By default, you only trust Wormhole's signing process and the core contracts of the chains you're on - You can expand your contract and chain dependencies as you see fit Core assumptions aside, many other factors impact the real-world security of decentralized platforms. Here is more information on additional measures that have been put in place to ensure the security of Wormhole. ## Guardian Network Wormhole is an evolving platform. While the Guardian set currently comprises 19 validators, this is a limitation of current blockchain technology. ### Governance Governance is the process through which contract upgrades happen. Guardians manually vote on governance proposals that originate inside the Guardian Network and are then submitted to ecosystem contracts. This means that governance actions are held to the same security standard as the rest of the system. A two-thirds supermajority of the Guardians is required to pass any governance action. Governance messages can target any of the various wormhole modules, including the core contracts and all currently deployed token bridge contracts. When a Guardian signs such a message, its signature implies a vote on the action in question. Once more than two-thirds of the Guardians have signed, the message and governance action are considered valid. All governance actions and contract upgrades have been managed via Wormhole's on-chain governance system. Via governance, the Guardians can: - Change the current Guardian set - Expand the Guardian set - Upgrade ecosystem contract implementations The governance system is fully open source in the core repository. See the [Open Source section](#open-source){target=\_blank} for contract source. ## Monitoring A key element of Wormhole's defense-in-depth strategy is that each Guardian is a highly competent validator company with its own in-house processes for running, monitoring, and securing blockchain operations. This heterogeneous approach to monitoring increases the likelihood that fraudulent activity is detected and reduces the number of single failure points in the system. Guardians are not just running Wormhole validators; they're running validators for every blockchain inside of Wormhole as well, which allows them to perform monitoring holistically across decentralized computing rather than just at a few single points. Guardians monitor: - Block production and consensus of each blockchain - if a blockchain's consensus is violated, it will be disconnected from the network until the Guardians resolve the issue - Smart contract level data - via processes like the Governor, Guardians constantly monitor the circulating supply and token movements across all supported blockchains - Guardian level activity - the Guardian Network functions as an autonomous decentralized computing network, ensuring independent security measures across its validators ## Asset Layer Protections One key strength of the Wormhole ecosystem is the Guardians’ ability to validate and protect the integrity of assets across multiple blockchains. To enforce the Wormhole Asset Layer’s core protections, the Global Accountant tracks the total circulating supply of all Wormhole assets across all chains, preventing any blockchain from bridging assets that could violate the supply invariant. In addition to the Global Accountant, Guardians may only sign transfers that do not violate the requirements of the Governor. The [Governor](https://github.com/wormhole-foundation/wormhole/blob/main/whitepapers/0007_governor.md){target=\_blank} tracks inflows and outflows of all blockchains and delays suspicious transfers that may indicate an exploit. ## Open Source Wormhole builds in the open and is always open source. - **[Wormhole core repository](https://github.com/wormhole-foundation/wormhole){target=\_blank}** - **[Wormhole Foundation GitHub organization](https://github.com/wormhole-foundation){target=\_blank}** - **[Wormhole contract deployments](/docs/protocol/infrastructure/core-contracts/){target=\_blank}** ## Audits Wormhole has been heavily audited, with _29 third-party audits completed_ and more started. Audits have been performed by the following firms: - [Trail of Bits](https://www.trailofbits.com/){target=\_blank} - [Neodyme](https://neodyme.io/en/){target=\_blank} - [Kudelski](https://kudelskisecurity.com/){target=\_blank} - [OtterSec](https://osec.io/){target=\_blank} - [Certik](https://www.certik.com/){target=\_blank} - [Hacken](https://hacken.io/){target=\_blank} - [Zellic](https://www.zellic.io/){target=\_blank} - [Coinspect](https://www.coinspect.com/){target=\_blank} - [Halborn](https://www.halborn.com/){target=\_blank} - [Cantina](https://cantina.xyz/welcome){target=\_blank} All audits and final reports can be found in [security page of the GitHub Repo](https://github.com/wormhole-foundation/wormhole/blob/main/SECURITY.md#3rd-party-security-audits){target=\blank}. ## Bug Bounties Wormhole has one of the largest bug bounty programs in software development and has repeatedly shown commitment to engaging with the white hat community. Wormhole runs a bug bounty program through [Immunefi](https://immunefi.com/bug-bounty/wormhole/){target=\blank} program, with a top payout of **5 million dollars**. If you are interested in contributing to Wormhole security, please look at this section for [Getting Started as a White Hat](https://github.com/wormhole-foundation/wormhole/blob/main/SECURITY.md#white-hat-hacking){target=\blank}, and follow the [Wormhole Contributor Guidelines](https://github.com/wormhole-foundation/wormhole/blob/main/CONTRIBUTING.md){target=\blank}. For more information about submitting to the bug bounty programs, refer to the [Wormhole Immunefi page](https://immunefi.com/bug-bounty/wormhole/){target=\blank}. ## Learn More The [SECURITY.md](https://github.com/wormhole-foundation/wormhole/blob/main/SECURITY.md){target=\blank} from the official repository has the latest security policies and updates. --- END CONTENT --- ## Shared Concepts from reference The following section contains reference material for Wormhole, including chain IDs, canonical contract addresses, finality levels, and other advanced specs. While it may not be required for all use cases, it provides a deeper layer for advanced development work. --- ## List of Shared Concept Pages: Doc-Page: https://raw.githubusercontent.com/wormhole-foundation/wormhole-docs/refs/heads/main/products/reference/chain-ids.md [type: reference] Doc-Page: https://raw.githubusercontent.com/wormhole-foundation/wormhole-docs/refs/heads/main/products/reference/consistency-levels.md [type: reference] Doc-Page: https://raw.githubusercontent.com/wormhole-foundation/wormhole-docs/refs/heads/main/products/reference/contract-addresses.md [type: reference] Doc-Page: https://raw.githubusercontent.com/wormhole-foundation/wormhole-docs/refs/heads/main/products/reference/supported-networks.md [type: reference] Doc-Page: https://raw.githubusercontent.com/wormhole-foundation/wormhole-docs/refs/heads/main/products/reference/testnet-faucets.md [type: reference] Doc-Page: https://raw.githubusercontent.com/wormhole-foundation/wormhole-docs/refs/heads/main/products/reference/wormhole-formatted-addresses.md [type: reference] ## Full content for shared concepts: Doc-Content: https://raw.githubusercontent.com/wormhole-foundation/wormhole-docs/refs/heads/main/products/reference/chain-ids.md --- BEGIN CONTENT --- --- title: Chain IDs description: This page documents the Wormhole-specific chain IDs for each chain and contrasts them to the more commonly referenced EVM chain IDs originating in EIP-155. categories: Reference --- # Chain IDs The following table documents the chain IDs used by Wormhole and places them alongside the more commonly referenced [EVM Chain IDs](https://chainlist.org/){target=\_blank}. !!! note Please note, Wormhole chain IDs are different than the more commonly referenced EVM [chain IDs](https://eips.ethereum.org/EIPS/eip-155){target=\_blank}, specified in the Mainnet and Testnet ID columns. === "Mainnet" | Ethereum | 2 | 1 | | Solana | 1 | Mainnet Beta-5eykt4UsFv8P8NJdTREpY1vzqKqZKvdpKuc147dw2N9d | | Algorand | 8 | mainnet-v1.0 | | Aptos | 22 | 1 | | Arbitrum | 23 | Arbitrum One-42161 | | Avalanche | 6 | C-Chain-43114 | | Base | 30 | Base-8453 | | Berachain | 39 | | | BNB Smart Chain | 4 | 56 | | Celestia | 4004 | celestia | | Celo | 14 | 42220 | | Converge | 53 | | | Cosmos Hub | 4000 | cosmoshub-4 | | Dymension | 4007 | dymension_1100-1 | | Evmos | 4001 | evmos_9001-2 | | Fantom | 10 | 250 | | Fogo | 51 | | | HyperEVM :material-information-outline:{ title='⚠️ The HyperEVM integration is experimental, as its node software is not open source. Use Wormhole messaging on HyperEVM with caution.' } | 47 | | | Injective | 19 | injective-1 | | Ink | 46 | | | Kaia | 13 | 8217 | | Kujira | 4002 | kaiyo-1 | | Linea | 38 | 59144 | | Mantle | 35 | 5000 | | Mezo | 50 | | | Monad | 48 | | | Moonbeam | 16 | 1284 | | NEAR | 15 | mainnet | | Neon | 17 | 245022934 | | Neutron | 4003 | neutron-1 | | Noble | 4009 | noble-1 | | Optimism | 24 | 10 | | Osmosis | 20 | osmosis-1 | | Plume | 55 | 98866 | | Polygon | 5 | 137 | | Provenance | 4008 | pio-mainnet-1 | | Pythnet | 26 | | | Scroll | 34 | 534352 | | SEDA | 4006 | | | Sei | 32 | pacific-1 | | Seievm | 40 | | | Sonic | 52 | 146 | | Stargaze | 4005 | stargaze-1 | | Sui | 21 | 35834a8a | | Unichain | 44 | | | World Chain | 45 | 480 | | X Layer | 37 | 196 | === "Testnet" | Ethereum Holesky | 10006 | Holesky-17000 | | Ethereum Sepolia | 10002 | Sepolia-11155111 | | Solana | 1 | Devnet-EtWTRABZaYq6iMfeYKouRu166VU2xqa1wcaWoxPkrZBG | | Algorand | 8 | testnet-v1.0 | | Aptos | 22 | 2 | | Arbitrum Sepolia | 10003 | Sepolia-421614 | | Avalanche | 6 | Fuji-43113 | | Base Sepolia | 10004 | Base Sepolia-84532 | | Berachain | 39 | 80084 | | BNB Smart Chain | 4 | 97 | | Celestia | 4004 | mocha-4 | | Celo | 14 | Alfajores-44787 | | Converge | 53 | 52085145 | | Cosmos Hub | 4000 | theta-testnet-001 | | Dymension | 4007 | | | Evmos | 4001 | evmos_9000-4 | | Fantom | 10 | 4002 | | Fogo | 51 | 9GGSFo95raqzZxWqKM5tGYvJp5iv4Dm565S4r8h5PEu9 | | HyperEVM :material-information-outline:{ title='⚠️ The HyperEVM integration is experimental, as its node software is not open source. Use Wormhole messaging on HyperEVM with caution.' } | 47 | 998 | | Injective | 19 | injective-888 | | Ink | 46 | 763373 | | Kaia | 13 | Kairos-1001 | | Kujira | 4002 | harpoon-4 | | Linea | 38 | 59141 | | Mantle | 35 | Sepolia-5003 | | Mezo | 50 | 31611 | | Monad | 48 | 10143 | | Moonbeam | 16 | Moonbase-Alphanet-1287 | | NEAR | 15 | testnet | | Neon | 17 | 245022940 | | Neutron | 4003 | pion-1 | | Noble | 4009 | grand-1 | | Optimism Sepolia | 10005 | Optimism Sepolia-11155420 | | Osmosis | 20 | osmo-test-5 | | Plume | 55 | 98867 | | Polygon Amoy | 10007 | Amoy-80002 | | Provenance | 4008 | | | Pythnet | 26 | | | Scroll | 34 | Sepolia-534351 | | SEDA | 4006 | seda-1-testnet | | Sei | 32 | atlantic-2 | | Seievm | 40 | | | Sonic | 52 | 57054 | | Stargaze | 4005 | | | Sui | 21 | 4c78adac | | Unichain | 44 | Unichain Sepolia-1301 | | World Chain | 45 | 4801 | | X Layer | 37 | 195 | !!! warning Wormhole Contributors recommend that all connected chains implement robust security practices, including (but not exclusively): - Open-sourcing code and running public bug bounty programs - Undergoing security audits and publishing those reports - Using version control with adequate access controls and mandatory code review - High unit and integration test coverage, where the results of those tests are available publicly Chains that can't verifiably prove they meet most of these may be marked with a :warning: symbol. Wormhole integrators are encouraged to understand the security assumptions of any chain before trusting messages from it. See [Wormhole’s security program](https://github.com/wormhole-foundation/wormhole/blob/main/SECURITY.md#chain-integrators){target=\_blank} for recommended practices. --- END CONTENT --- Doc-Content: https://raw.githubusercontent.com/wormhole-foundation/wormhole-docs/refs/heads/main/products/reference/consistency-levels.md --- BEGIN CONTENT --- --- title: Wormhole Finality | Consistency Levels description: This page documents how long to wait for finality before signing, based on each chain’s consistency (finality) level and consensus mechanism. categories: Reference --- # Wormhole Finality The following table documents each chain's `consistencyLevel` values (i.e., finality reached before signing). The consistency level defines how long the Guardians should wait before signing a VAA. The finalization time depends on the specific chain's consensus mechanism. The consistency level is a `u8`, so any single byte may be used. However, a small subset has particular meanings. If the `consistencyLevel` isn't one of those specific values, the `Otherwise` column describes how it's interpreted. | Ethereum | 200 | 201 | | finalized | ~ 19min | Details | | Solana | | 0 | 1 | | ~ 14s | Details | | Algorand | | | 0 | | ~ 4s | Details | | Aptos | | | 0 | | ~ 4s | Details | | Arbitrum | 200 | 201 | | finalized | ~ 18min | Details | | Avalanche | 200 | | | finalized | ~ 2s | Details | | Base | 200 | 201 | | finalized | ~ 18min | | | Berachain | 200 | | | finalized | ~ 4s | | | BNB Smart Chain | 200 | 201 | | finalized | ~ 48s | Details | | Celestia | | | 0 | | ~ 5s | | | Celo | 200 | | | finalized | ~ 10s | | | Converge | | | 0 | | ~ 7min | | | Cosmos Hub | | | 0 | | ~ 5s | | | Dymension | | | 0 | | ~ 5s | | | Evmos | | | 0 | | ~ 2s | | | Fantom | 200 | | | finalized | ~ 5s | | | Fogo | | | 0 | | ~ 14s | | | Injective | | | 0 | | ~ 3s | | | Ink | | | 0 | | ~ 9min | | | Kaia | 200 | | | finalized | ~ 1s | | | Kujira | | | 0 | | ~ 3s | | | Mantle | 200 | 201 | | finalized | ~ 18min | | | Mezo | | | 0 | | ~ 8s | | | Monad | | | 0 | | ~ 2s | | | Moonbeam | 200 | 201 | | finalized | ~ 24s | Details | | NEAR | | | 0 | | ~ 2s | Details | | Neutron | | | 0 | | ~ 5s | | | Optimism | 200 | 201 | | finalized | ~ 18min | | | Osmosis | | | 0 | | ~ 6s | | | Plume | | | 0 | | ~ 18min | | | Polygon | 200 | | | finalized | ~ 66s | Details | | Scroll | 200 | | | finalized | ~ 16min | | | Sei | | | 0 | | ~ 1s | | | Seievm | | | 0 | | ~ 1s | | | Sonic | | | 0 | | ~ 1s | | | Stargaze | | | 0 | | ~ 5s | | | Sui | | | 0 | | ~ 3s | Details | | Unichain | 200 | 201 | | finalized | ~ 18min | | | World Chain | | | 0 | | ~ 18min | | | X Layer | 200 | 201 | | finalized | ~ 16min | | --- END CONTENT --- Doc-Content: https://raw.githubusercontent.com/wormhole-foundation/wormhole-docs/refs/heads/main/products/reference/contract-addresses.md --- BEGIN CONTENT --- --- title: Contract Addresses description: This page documents the deployed contract addresses of the Wormhole contracts on each chain, including Core Contracts, TokenBridge, and more. categories: Reference --- # Contract Addresses ## Core Contracts === "Mainnet" | Ethereum | 0x98f3c9e6E3fAce36bAAd05FE09d375Ef1464288B | | Solana | worm2ZoG2kUd4vFXhvjh93UUH596ayRfgQ2MgjNMTth | | Algorand | 842125965 | | Aptos | 0x5bc11445584a763c1fa7ed39081f1b920954da14e04b32440cba863d03e19625 | | Arbitrum | 0xa5f208e072434bC67592E4C49C1B991BA79BCA46 | | Avalanche | 0x54a8e5f9c4CbA08F9943965859F6c34eAF03E26c | | Base | 0xbebdb6C8ddC678FfA9f8748f85C815C556Dd8ac6 | | Berachain | 0xCa1D5a146B03f6303baF59e5AD5615ae0b9d146D | | BNB Smart Chain | 0x98f3c9e6E3fAce36bAAd05FE09d375Ef1464288B | | Celo | 0xa321448d90d4e5b0A732867c18eA198e75CAC48E | | Fantom | 0x126783A6Cb203a3E35344528B26ca3a0489a1485 | | HyperEVM :material-information-outline:{ title='⚠️ The HyperEVM integration is experimental, as its node software is not open source. Use Wormhole messaging on HyperEVM with caution.' } | 0x7C0faFc4384551f063e05aee704ab943b8B53aB3 | | Injective | inj17p9rzwnnfxcjp32un9ug7yhhzgtkhvl9l2q74d | | Ink | 0xCa1D5a146B03f6303baF59e5AD5615ae0b9d146D | | Kaia | 0x0C21603c4f3a6387e241c0091A7EA39E43E90bb7 | | Mantle | 0xbebdb6C8ddC678FfA9f8748f85C815C556Dd8ac6 | | Mezo | 0xaBf89de706B583424328B54dD05a8fC986750Da8 | | Moonbeam | 0xC8e2b0cD52Cf01b0Ce87d389Daa3d414d4cE29f3 | | NEAR | contract.wormhole_crypto.near | | Neutron | neutron16rerygcpahqcxx5t8vjla46ym8ccn7xz7rtc6ju5ujcd36cmc7zs9zrunh | | Optimism | 0xEe91C335eab126dF5fDB3797EA9d6aD93aeC9722 | | Plume | 0xaBf89de706B583424328B54dD05a8fC986750Da8 | | Polygon | 0x7A4B5a56256163F07b2C80A7cA55aBE66c4ec4d7 | | Pythnet | H3fxXJ86ADW2PNuDDmZJg6mzTtPxkYCpNuQUTgmJ7AjU | | Scroll | 0xbebdb6C8ddC678FfA9f8748f85C815C556Dd8ac6 | | Sei | sei1gjrrme22cyha4ht2xapn3f08zzw6z3d4uxx6fyy9zd5dyr3yxgzqqncdqn | | Seievm | 0xCa1D5a146B03f6303baF59e5AD5615ae0b9d146D | | Sui | 0xaeab97f96cf9877fee2883315d459552b2b921edc16d7ceac6eab944dd88919c | | Unichain | 0xCa1D5a146B03f6303baF59e5AD5615ae0b9d146D | | World Chain | 0xcbcEe4e081464A15d8Ad5f58BB493954421eB506 | | X Layer | 0x194B123c5E96B9b2E49763619985790Dc241CAC0 | === "Testnet" | Ethereum Holesky | 0xa10f2eF61dE1f19f586ab8B6F2EbA89bACE63F7a | | Ethereum Sepolia | 0x4a8bc80Ed5a4067f1CCf107057b8270E0cC11A78 | | Solana | 3u8hJUVTA4jH1wYAyUur7FFZVQ8H635K3tSHHF4ssjQ5 | | Algorand | 86525623 | | Aptos | 0x5bc11445584a763c1fa7ed39081f1b920954da14e04b32440cba863d03e19625 | | Arbitrum Sepolia | 0x6b9C8671cdDC8dEab9c719bB87cBd3e782bA6a35 | | Avalanche | 0x7bbcE28e64B3F8b84d876Ab298393c38ad7aac4C | | Base Sepolia | 0x79A1027a6A159502049F10906D333EC57E95F083 | | Berachain | 0xBB73cB66C26740F31d1FabDC6b7A46a038A300dd | | BNB Smart Chain | 0x68605AD7b15c732a30b1BbC62BE8F2A509D74b4D | | Celo | 0x88505117CA88e7dd2eC6EA1E13f0948db2D50D56 | | Converge | 0x556B259cFaCd9896B2773310080c7c3bcE90Ff01 | | Fantom | 0x1BB3B4119b7BA9dfad76B0545fb3F531383c3bB7 | | Fogo | BhnQyKoQQgpuRTRo6D8Emz93PvXCYfVgHhnrR4T3qhw4 | | HyperEVM :material-information-outline:{ title='⚠️ The HyperEVM integration is experimental, as its node software is not open source. Use Wormhole messaging on HyperEVM with caution.' } | 0xBB73cB66C26740F31d1FabDC6b7A46a038A300dd | | Injective | inj1xx3aupmgv3ce537c0yce8zzd3sz567syuyedpg | | Ink | 0xBB73cB66C26740F31d1FabDC6b7A46a038A300dd | | Kaia | 0x1830CC6eE66c84D2F177B94D544967c774E624cA | | Linea | 0x79A1027a6A159502049F10906D333EC57E95F083 | | Mantle | 0x376428e7f26D5867e69201b275553C45B09EE090 | | Mezo | 0x268557122Ffd64c85750d630b716471118F323c8 | | Monad | 0xBB73cB66C26740F31d1FabDC6b7A46a038A300dd | | Moonbeam | 0xa5B7D85a8f27dd7907dc8FdC21FA5657D5E2F901 | | NEAR | wormhole.wormhole.testnet | | Neon | 0x268557122Ffd64c85750d630b716471118F323c8 | | Neutron | neutron1enf63k37nnv9cugggpm06mg70emcnxgj9p64v2s8yx7a2yhhzk2q6xesk4 | | Optimism Sepolia | 0x31377888146f3253211EFEf5c676D41ECe7D58Fe | | Osmosis | osmo1hggkxr0hpw83f8vuft7ruvmmamsxmwk2hzz6nytdkzyup9krt0dq27sgyx | | Plume | 0x81705b969cDcc6FbFde91a0C6777bE0EF3A75855 | | Polygon Amoy | 0x6b9C8671cdDC8dEab9c719bB87cBd3e782bA6a35 | | Pythnet | EUrRARh92Cdc54xrDn6qzaqjA77NRrCcfbr8kPwoTL4z | | Scroll | 0x055F47F1250012C6B20c436570a76e52c17Af2D5 | | Sei | sei1nna9mzp274djrgzhzkac2gvm3j27l402s4xzr08chq57pjsupqnqaj0d5s | | Seievm | 0xBB73cB66C26740F31d1FabDC6b7A46a038A300dd | | Sui | 0x31358d198147da50db32eda2562951d53973a0c0ad5ed738e9b17d88b213d790 | | Unichain | 0xBB73cB66C26740F31d1FabDC6b7A46a038A300dd | | World Chain | 0xe5E02cD12B6FcA153b0d7fF4bF55730AE7B3C93A | | X Layer | 0xA31aa3FDb7aF7Db93d18DDA4e19F811342EDF780 | === "Devnet" | Ethereum | 0xC89Ce4735882C9F0f0FE26686c53074E09B0D550 | | Solana | Bridge1p5gheXUvJ6jGWGeCsgPKgnE3YgdGKRVCMY9o | | Algorand | 1004 | | Aptos | 0xde0036a9600559e295d5f6802ef6f3f802f510366e0c23912b0655d972166017 | | BNB Smart Chain | 0xC89Ce4735882C9F0f0FE26686c53074E09B0D550 | | NEAR | wormhole.test.near | | Sui | 0x5a5160ca3c2037f4b4051344096ef7a48ebf4400b3f385e57ea90e1628a8bde0 | ## Token Bridge === "Mainnet" | Ethereum | 0x3ee18B2214AFF97000D974cf647E7C347E8fa585 | | Solana | wormDTUJ6AWPNvk59vGQbDvGJmqbDTdgWgAqcLBCgUb | | Algorand | 842126029 | | Aptos | 0x576410486a2da45eee6c949c995670112ddf2fbeedab20350d506328eefc9d4f | | Arbitrum | 0x0b2402144Bb366A632D14B83F244D2e0e21bD39c | | Avalanche | 0x0e082F06FF657D94310cB8cE8B0D9a04541d8052 | | Base | 0x8d2de8d2f73F1F4cAB472AC9A881C9b123C79627 | | Berachain | 0x3Ff72741fd67D6AD0668d93B41a09248F4700560 | | BNB Smart Chain | 0xB6F6D86a8f9879A9c87f643768d9efc38c1Da6E7 | | Celo | 0x796Dff6D74F3E27060B71255Fe517BFb23C93eed | | Fantom | 0x7C9Fc5741288cDFdD83CeB07f3ea7e22618D79D2 | | Injective | inj1ghd753shjuwexxywmgs4xz7x2q732vcnxxynfn | | Ink | 0x3Ff72741fd67D6AD0668d93B41a09248F4700560 | | Kaia | 0x5b08ac39EAED75c0439FC750d9FE7E1F9dD0193F | | Mantle | 0x24850c6f61C438823F01B7A3BF2B89B72174Fa9d | | Moonbeam | 0xb1731c586ca89a23809861c6103f0b96b3f57d92 | | NEAR | contract.portalbridge.near | | Optimism | 0x1D68124e65faFC907325e3EDbF8c4d84499DAa8b | | Polygon | 0x5a58505a96D1dbf8dF91cB21B54419FC36e93fdE | | Scroll | 0x24850c6f61C438823F01B7A3BF2B89B72174Fa9d | | Sei | sei1smzlm9t79kur392nu9egl8p8je9j92q4gzguewj56a05kyxxra0qy0nuf3 | | Seievm | 0x3Ff72741fd67D6AD0668d93B41a09248F4700560 | | Sui | 0xc57508ee0d4595e5a8728974a4a93a787d38f339757230d441e895422c07aba9 | | Unichain | 0x3Ff72741fd67D6AD0668d93B41a09248F4700560 | | World Chain | 0xc309275443519adca74c9136b02A38eF96E3a1f6 | | X Layer | 0x5537857664B0f9eFe38C9f320F75fEf23234D904 | === "Testnet" | Ethereum Holesky | 0x76d093BbaE4529a342080546cAFEec4AcbA59EC6 | | Ethereum Sepolia | 0xDB5492265f6038831E89f495670FF909aDe94bd9 | | Solana | DZnkkTmCiFWfYTfT41X3Rd1kDgozqzxWaHqsw6W4x2oe | | Algorand | 86525641 | | Aptos | 0x576410486a2da45eee6c949c995670112ddf2fbeedab20350d506328eefc9d4f | | Arbitrum Sepolia | 0xC7A204bDBFe983FCD8d8E61D02b475D4073fF97e | | Avalanche | 0x61E44E506Ca5659E6c0bba9b678586fA2d729756 | | Base Sepolia | 0x86F55A04690fd7815A3D802bD587e83eA888B239 | | Berachain | 0xa10f2eF61dE1f19f586ab8B6F2EbA89bACE63F7a | | BNB Smart Chain | 0x9dcF9D205C9De35334D646BeE44b2D2859712A09 | | Celo | 0x05ca6037eC51F8b712eD2E6Fa72219FEaE74E153 | | Fantom | 0x599CEa2204B4FaECd584Ab1F2b6aCA137a0afbE8 | | Fogo | 78HdStBqCMioGii9D8mF3zQaWDqDZBQWTUwjjpdmbJKX | | HyperEVM :material-information-outline:{ title='⚠️ The HyperEVM integration is experimental, as its node software is not open source. Use Wormhole messaging on HyperEVM with caution.' } | 0x4a8bc80Ed5a4067f1CCf107057b8270E0cC11A78 | | Injective | inj1q0e70vhrv063eah90mu97sazhywmeegp7myvnh | | Ink | 0x376428e7f26D5867e69201b275553C45B09EE090 | | Kaia | 0xC7A13BE098720840dEa132D860fDfa030884b09A | | Linea | 0xC7A204bDBFe983FCD8d8E61D02b475D4073fF97e | | Mantle | 0x75Bfa155a9D7A3714b0861c8a8aF0C4633c45b5D | | Mezo | 0xA31aa3FDb7aF7Db93d18DDA4e19F811342EDF780 | | Monad | 0xF323dcDe4d33efe83cf455F78F9F6cc656e6B659 | | Moonbeam | 0xbc976D4b9D57E57c3cA52e1Fd136C45FF7955A96 | | NEAR | token.wormhole.testnet | | Neon | 0xEe3dB83916Ccdc3593b734F7F2d16D630F39F1D0 | | Optimism Sepolia | 0x99737Ec4B815d816c49A385943baf0380e75c0Ac | | Polygon Amoy | 0xC7A204bDBFe983FCD8d8E61D02b475D4073fF97e | | Scroll | 0x22427d90B7dA3fA4642F7025A854c7254E4e45BF | | Sei | sei1jv5xw094mclanxt5emammy875qelf3v62u4tl4lp5nhte3w3s9ts9w9az2 | | Seievm | 0x23908A62110e21C04F3A4e011d24F901F911744A | | Sui | 0x6fb10cdb7aa299e9a4308752dadecb049ff55a892de92992a1edbd7912b3d6da | | Unichain | 0xa10f2eF61dE1f19f586ab8B6F2EbA89bACE63F7a | | World Chain | 0x430855B4D43b8AEB9D2B9869B74d58dda79C0dB2 | | X Layer | 0xdA91a06299BBF302091B053c6B9EF86Eff0f930D | === "Devnet" | Ethereum | 0x0290FB167208Af455bB137780163b7B7a9a10C16 | | Solana | B6RHG3mfcckmrYN1UhmJzyS1XX3fZKbkeUcpJe9Sy3FE | | Algorand | 1006 | | Aptos | 0x84a5f374d29fc77e370014dce4fd6a55b58ad608de8074b0be5571701724da31 | | BNB Smart Chain | 0x0290FB167208Af455bB137780163b7B7a9a10C16 | | NEAR | token.test.near | | Sui | 0xa6a3da85bbe05da5bfd953708d56f1a3a023e7fb58e5a824a3d4de3791e8f690 | ## Wormhole Relayer === "Mainnet" | Ethereum | 0x27428DD2d3DD32A4D7f7C497eAaa23130d894911 | | Arbitrum | 0x27428DD2d3DD32A4D7f7C497eAaa23130d894911 | | Avalanche | 0x27428DD2d3DD32A4D7f7C497eAaa23130d894911 | | Base | 0x706f82e9bb5b0813501714ab5974216704980e31 | | Berachain | 0x27428DD2d3DD32A4D7f7C497eAaa23130d894911 | | BNB Smart Chain | 0x27428DD2d3DD32A4D7f7C497eAaa23130d894911 | | Celo | 0x27428DD2d3DD32A4D7f7C497eAaa23130d894911 | | Fantom | 0x27428DD2d3DD32A4D7f7C497eAaa23130d894911 | | Ink | 0x27428DD2d3DD32A4D7f7C497eAaa23130d894911 | | Kaia | 0x27428DD2d3DD32A4D7f7C497eAaa23130d894911 | | Mantle | 0x27428DD2d3DD32A4D7f7C497eAaa23130d894911 | | Moonbeam | 0x27428DD2d3DD32A4D7f7C497eAaa23130d894911 | | Optimism | 0x27428DD2d3DD32A4D7f7C497eAaa23130d894911 | | Polygon | 0x27428DD2d3DD32A4D7f7C497eAaa23130d894911 | | Scroll | 0x27428DD2d3DD32A4D7f7C497eAaa23130d894911 | | Seievm | 0x27428DD2d3DD32A4D7f7C497eAaa23130d894911 | | Unichain | 0x27428DD2d3DD32A4D7f7C497eAaa23130d894911 | | World Chain | 0x1520cc9e779c56dab5866bebfb885c86840c33d3 | | X Layer | 0x27428DD2d3DD32A4D7f7C497eAaa23130d894911 | === "Testnet" | Ethereum Sepolia | 0x7B1bD7a6b4E61c2a123AC6BC2cbfC614437D0470 | | Arbitrum Sepolia | 0x7B1bD7a6b4E61c2a123AC6BC2cbfC614437D0470 | | Avalanche | 0xA3cF45939bD6260bcFe3D66bc73d60f19e49a8BB | | Base Sepolia | 0x93BAD53DDfB6132b0aC8E37f6029163E63372cEE | | Berachain | 0x362fca37E45fe1096b42021b543f462D49a5C8df | | BNB Smart Chain | 0x80aC94316391752A193C1c47E27D382b507c93F3 | | Celo | 0x306B68267Deb7c5DfCDa3619E22E9Ca39C374f84 | | Fantom | 0x7B1bD7a6b4E61c2a123AC6BC2cbfC614437D0470 | | Ink | 0x362fca37E45fe1096b42021b543f462D49a5C8df | | Mezo | 0x362fca37E45fe1096b42021b543f462D49a5C8df | | Monad | 0x362fca37E45fe1096b42021b543f462D49a5C8df | | Moonbeam | 0x0591C25ebd0580E0d4F27A82Fc2e24E7489CB5e0 | | Optimism Sepolia | 0x93BAD53DDfB6132b0aC8E37f6029163E63372cEE | | Polygon Amoy | 0x362fca37E45fe1096b42021b543f462D49a5C8df | | Seievm | 0x362fca37E45fe1096b42021b543f462D49a5C8df | | Unichain | 0x362fca37E45fe1096b42021b543f462D49a5C8df | === "Devnet" | Ethereum | 0xcC680D088586c09c3E0E099a676FA4b6e42467b4 | | BNB Smart Chain | 0xcC680D088586c09c3E0E099a676FA4b6e42467b4 | ## CCTP === "Mainnet" | Ethereum | 0xAaDA05BD399372f0b0463744C09113c137636f6a | | Arbitrum | 0x2703483B1a5a7c577e8680de9Df8Be03c6f30e3c | | Avalanche | 0x09Fb06A271faFf70A651047395AaEb6265265F13 | | Base | 0x03faBB06Fa052557143dC28eFCFc63FC12843f1D | | Optimism | 0x2703483B1a5a7c577e8680de9Df8Be03c6f30e3c | | Polygon | 0x0FF28217dCc90372345954563486528aa865cDd6 | === "Testnet" | Ethereum Sepolia | 0x2703483B1a5a7c577e8680de9Df8Be03c6f30e3c | | Arbitrum Sepolia | 0x2703483B1a5a7c577e8680de9Df8Be03c6f30e3c | | Avalanche | 0x58f4c17449c90665891c42e14d34aae7a26a472e | | Base Sepolia | 0x2703483B1a5a7c577e8680de9Df8Be03c6f30e3c | | Optimism Sepolia | 0x2703483B1a5a7c577e8680de9Df8Be03c6f30e3c | === "Devnet" N/A ## Settlement Token Router === "Mainnet"
Chain NameContract Address
Ethereum0x70287c79ee41C5D1df8259Cd68Ba0890cd389c47
Solana28topqjtJzMnPaGFmmZk68tzGmj9W9aMntaEK3QkgtRe
Arbitrum0x70287c79ee41C5D1df8259Cd68Ba0890cd389c47
Avalanche0x70287c79ee41C5D1df8259Cd68Ba0890cd389c47
Base0x70287c79ee41C5D1df8259Cd68Ba0890cd389c47
Optimism0x70287c79ee41C5D1df8259Cd68Ba0890cd389c47
Polygon0x70287c79ee41C5D1df8259Cd68Ba0890cd389c47
=== "Testnet"
Chain NameContract Address
SolanatD8RmtdcV7bzBeuFgyrFc8wvayj988ChccEzRQzo6md
Arbitrum Sepolia0xe0418C44F06B0b0D7D1706E01706316DBB0B210E
Optimism Sepolia0x6BAa7397c18abe6221b4f6C3Ac91C88a9faE00D8
## Read-Only Deployments === "Mainnet" | Acala | 0xa321448d90d4e5b0A732867c18eA198e75CAC48E | | Aurora | 0x51b5123a7b0F9b2bA265f9c4C8de7D78D52f510F | | Blast | 0xbebdb6C8ddC678FfA9f8748f85C815C556Dd8ac6 | | Corn | 0xa683c66045ad16abb1bCE5ad46A64d95f9A25785 | | Gnosis | 0xa321448d90d4e5b0A732867c18eA198e75CAC48E | | Goat | 0x352A86168e6988A1aDF9A15Cb00017AAd3B67155 | | Karura | 0xa321448d90d4e5b0A732867c18eA198e75CAC48E | | LightLink | 0x352A86168e6988A1aDF9A15Cb00017AAd3B67155 | | Oasis | 0xfE8cD454b4A1CA468B57D79c0cc77Ef5B6f64585 | | Rootstock | 0xbebdb6C8ddC678FfA9f8748f85C815C556Dd8ac6 | | Sonic | 0x352A86168e6988A1aDF9A15Cb00017AAd3B67155 | | Telos | 0x352A86168e6988A1aDF9A15Cb00017AAd3B67155 | | Terra | terra1dq03ugtd40zu9hcgdzrsq6z2z4hwhc9tqk2uy5 | | Terra 2.0 | terra12mrnzvhx3rpej6843uge2yyfppfyd3u9c3uq223q8sl48huz9juqffcnhp | | SNAXchain | 0xc1BA3CC4bFE724A08FbbFbF64F8db196738665f4 | | XPLA | xpla1jn8qmdda5m6f6fqu9qv46rt7ajhklg40ukpqchkejcvy8x7w26cqxamv3w | !!!note Read-only deployments allow Wormhole messages to be received on chains not fully integrated with Wormhole Guardians. These deployments support cross-chain data verification but cannot originate messages. For example, a governance message can be sent from a fully integrated chain and processed on a read-only chain, but the read-only chain cannot send messages back. --- END CONTENT --- Doc-Content: https://raw.githubusercontent.com/wormhole-foundation/wormhole-docs/refs/heads/main/products/reference/supported-networks.md --- BEGIN CONTENT --- --- title: Supported Networks description: Learn about the networks each Wormhole product supports, and explore links to documentation, official websites, and block explorers. categories: Reference --- # Supported Networks Wormhole supports many blockchains across mainnet, testnet, and devnets. You can use these tables to verify if your desired chains are supported by the Wormhole products you plan to include in your integration. ## Supported Networks by Product ### Connect
| Ethereum | EVM | :white_check_mark: | :white_check_mark: | :white_check_mark: | :material-web:Website:material-file-document:Developer Docs:octicons-package-16:Block Explorer | | Solana | SVM | :white_check_mark: | :white_check_mark: | :x: | :material-web:Website:material-file-document:Developer Docs:octicons-package-16:Block Explorer | | Aptos | Move VM | :white_check_mark: | :white_check_mark: | :x: | :material-web:Website:material-file-document:Developer Docs:octicons-package-16:Block Explorer | | Arbitrum | EVM | :white_check_mark: | :white_check_mark: | :x: | :material-web:Website:material-file-document:Developer Docs:octicons-package-16:Block Explorer | | Avalanche | EVM | :white_check_mark: | :white_check_mark: | :x: | :material-web:Website:material-file-document:Developer Docs:octicons-package-16:Block Explorer | | Base | EVM | :white_check_mark: | :white_check_mark: | :x: | :material-web:Website:material-file-document:Developer Docs:octicons-package-16:Block Explorer | | Berachain | EVM | :white_check_mark: | :x: | :x: | :material-web:Website:material-file-document:Developer Docs:octicons-package-16:Block Explorer | | BNB Smart Chain | EVM | :white_check_mark: | :white_check_mark: | :x: | :material-web:Website:material-file-document:Developer Docs:octicons-package-16:Block Explorer | | Celo | EVM | :white_check_mark: | :white_check_mark: | :x: | :material-web:Website:material-file-document:Developer Docs:octicons-package-16:Block Explorer | | Fantom | EVM | :white_check_mark: | :white_check_mark: | :x: | :material-web:Website:material-file-document:Developer Docs:octicons-package-16:Block Explorer | | Mantle | EVM | :white_check_mark: | :white_check_mark: | :x: | :material-web:Website:material-file-document:Developer Docs:octicons-package-16:Block Explorer | | Mezo | EVM | :x: | :white_check_mark: | :x: | :material-web:Website:material-file-document:Developer Docs:octicons-package-16:Block Explorer | | Moonbeam | EVM | :white_check_mark: | :white_check_mark: | :x: | :material-web:Website:material-file-document:Developer Docs:octicons-package-16:Block Explorer | | Optimism | EVM | :white_check_mark: | :white_check_mark: | :x: | :material-web:Website:material-file-document:Developer Docs:octicons-package-16:Block Explorer | | Osmosis | CosmWasm | :x: | :x: | :white_check_mark: | :material-web:Website:material-file-document:Developer Docs:octicons-package-16:Block Explorer | | Polygon | EVM | :white_check_mark: | :x: | :x: | :material-web:Website:material-file-document:Developer Docs:octicons-package-16:Block Explorer | | Scroll | EVM | :white_check_mark: | :white_check_mark: | :x: | :material-web:Website:material-file-document:Developer Docs:octicons-package-16:Block Explorer | | Sui | Sui Move VM | :white_check_mark: | :white_check_mark: | :x: | :material-web:Website:material-file-document:Developer Docs:octicons-package-16:Block Explorer | | Unichain | EVM | :white_check_mark: | :white_check_mark: | :x: | :material-web:Website:material-file-document:Developer Docs:octicons-package-16:Block Explorer | | World Chain | EVM | :white_check_mark: | :white_check_mark: | :x: | :material-web:Website:material-file-document:Developer Docs:octicons-package-16:Block Explorer | | X Layer | EVM | :white_check_mark: | :white_check_mark: | :x: | :material-web:Website:material-file-document:Developer Docs:octicons-package-16:Block Explorer |
### NTT
| Ethereum | EVM | :white_check_mark: | :white_check_mark: | :white_check_mark: | :material-web:Website:material-file-document:Developer Docs:octicons-package-16:Block Explorer | | Solana | SVM | :white_check_mark: | :white_check_mark: | :white_check_mark: | :material-web:Website:material-file-document:Developer Docs:octicons-package-16:Block Explorer | | Arbitrum | EVM | :white_check_mark: | :white_check_mark: | :x: | :material-web:Website:material-file-document:Developer Docs:octicons-package-16:Block Explorer | | Avalanche | EVM | :white_check_mark: | :white_check_mark: | :x: | :material-web:Website:material-file-document:Developer Docs:octicons-package-16:Block Explorer | | Base | EVM | :white_check_mark: | :white_check_mark: | :x: | :material-web:Website:material-file-document:Developer Docs:octicons-package-16:Block Explorer | | Berachain | EVM | :white_check_mark: | :white_check_mark: | :x: | :material-web:Website:material-file-document:Developer Docs:octicons-package-16:Block Explorer | | BNB Smart Chain | EVM | :white_check_mark: | :white_check_mark: | :white_check_mark: | :material-web:Website:material-file-document:Developer Docs:octicons-package-16:Block Explorer | | Celo | EVM | :white_check_mark: | :white_check_mark: | :x: | :material-web:Website:material-file-document:Developer Docs:octicons-package-16:Block Explorer | | Fantom | EVM | :white_check_mark: | :white_check_mark: | :x: | :material-web:Website:material-file-document:Developer Docs:octicons-package-16:Block Explorer | | Ink | EVM | :white_check_mark: | :white_check_mark: | :x: | :material-web:Website:material-file-document:Developer Docs:octicons-package-16:Block Explorer | | Kaia | EVM | :white_check_mark: | :x: | :x: | :material-web:Website:material-file-document:Developer Docs:octicons-package-16:Block Explorer | | Mantle | EVM | :white_check_mark: | :x: | :x: | :material-web:Website:material-file-document:Developer Docs:octicons-package-16:Block Explorer | | Mezo | EVM | :x: | :white_check_mark: | :x: | :material-web:Website:material-file-document:Developer Docs:octicons-package-16:Block Explorer | | Monad | EVM | :x: | :white_check_mark: | :x: | :material-web:Website:material-file-document:Developer Docs:octicons-package-16:Block Explorer | | Moonbeam | EVM | :white_check_mark: | :white_check_mark: | :x: | :material-web:Website:material-file-document:Developer Docs:octicons-package-16:Block Explorer | | Optimism | EVM | :white_check_mark: | :white_check_mark: | :x: | :material-web:Website:material-file-document:Developer Docs:octicons-package-16:Block Explorer | | Polygon | EVM | :white_check_mark: | :white_check_mark: | :x: | :material-web:Website:material-file-document:Developer Docs:octicons-package-16:Block Explorer | | Scroll | EVM | :white_check_mark: | :x: | :x: | :material-web:Website:material-file-document:Developer Docs:octicons-package-16:Block Explorer | | Seievm | EVM | :white_check_mark: | :white_check_mark: | :x: | :material-web:Website:material-file-document:Developer Docs:octicons-package-16:Block Explorer | | Unichain | EVM | :white_check_mark: | :white_check_mark: | :x: | :material-web:Website:material-file-document:Developer Docs:octicons-package-16:Block Explorer | | World Chain | EVM | :white_check_mark: | :x: | :x: | :material-web:Website:material-file-document:Developer Docs:octicons-package-16:Block Explorer | | X Layer | EVM | :white_check_mark: | :x: | :x: | :material-web:Website:material-file-document:Developer Docs:octicons-package-16:Block Explorer |
### Token Bridge
| Ethereum | EVM | :white_check_mark: | :white_check_mark: | :white_check_mark: | :material-web:Website:material-file-document:Developer Docs:octicons-package-16:Block Explorer | | Solana | SVM | :white_check_mark: | :white_check_mark: | :white_check_mark: | :material-web:Website:material-file-document:Developer Docs:octicons-package-16:Block Explorer | | Algorand | AVM | :white_check_mark: | :white_check_mark: | :white_check_mark: | :material-web:Website:material-file-document:Developer Docs:octicons-package-16:Block Explorer | | Aptos | Move VM | :white_check_mark: | :white_check_mark: | :white_check_mark: | :material-web:Website:material-file-document:Developer Docs:octicons-package-16:Block Explorer | | Arbitrum | EVM | :white_check_mark: | :white_check_mark: | :x: | :material-web:Website:material-file-document:Developer Docs:octicons-package-16:Block Explorer | | Avalanche | EVM | :white_check_mark: | :white_check_mark: | :x: | :material-web:Website:material-file-document:Developer Docs:octicons-package-16:Block Explorer | | Base | EVM | :white_check_mark: | :white_check_mark: | :x: | :material-web:Website:material-file-document:Developer Docs:octicons-package-16:Block Explorer | | Berachain | EVM | :white_check_mark: | :white_check_mark: | :x: | :material-web:Website:material-file-document:Developer Docs:octicons-package-16:Block Explorer | | BNB Smart Chain | EVM | :white_check_mark: | :white_check_mark: | :white_check_mark: | :material-web:Website:material-file-document:Developer Docs:octicons-package-16:Block Explorer | | Celo | EVM | :white_check_mark: | :white_check_mark: | :x: | :material-web:Website:material-file-document:Developer Docs:octicons-package-16:Block Explorer | | Fantom | EVM | :white_check_mark: | :white_check_mark: | :x: | :material-web:Website:material-file-document:Developer Docs:octicons-package-16:Block Explorer | | Fogo | SVM | :x: | :white_check_mark: | :x: | :material-web:Website:octicons-package-16:Block Explorer | | HyperEVM :material-information-outline:{ title='⚠️ The HyperEVM integration is experimental, as its node software is not open source. Use Wormhole messaging on HyperEVM with caution.' } | EVM | :x: | :white_check_mark: | :x: | :material-web:Website:material-file-document:Developer Docs | | Injective | CosmWasm | :white_check_mark: | :white_check_mark: | :x: | :material-web:Website:material-file-document:Developer Docs:octicons-package-16:Block Explorer | | Ink | EVM | :white_check_mark: | :white_check_mark: | :x: | :material-web:Website:material-file-document:Developer Docs:octicons-package-16:Block Explorer | | Kaia | EVM | :white_check_mark: | :white_check_mark: | :x: | :material-web:Website:material-file-document:Developer Docs:octicons-package-16:Block Explorer | | Linea | EVM | :x: | :white_check_mark: | :x: | :material-web:Website:material-file-document:Developer Docs:octicons-package-16:Block Explorer | | Mantle | EVM | :white_check_mark: | :white_check_mark: | :x: | :material-web:Website:material-file-document:Developer Docs:octicons-package-16:Block Explorer | | Mezo | EVM | :x: | :white_check_mark: | :x: | :material-web:Website:material-file-document:Developer Docs:octicons-package-16:Block Explorer | | Monad | EVM | :x: | :white_check_mark: | :x: | :material-web:Website:material-file-document:Developer Docs:octicons-package-16:Block Explorer | | Moonbeam | EVM | :white_check_mark: | :white_check_mark: | :x: | :material-web:Website:material-file-document:Developer Docs:octicons-package-16:Block Explorer | | NEAR | NEAR VM | :white_check_mark: | :white_check_mark: | :white_check_mark: | :material-web:Website:material-file-document:Developer Docs:octicons-package-16:Block Explorer | | Neon | EVM | :x: | :white_check_mark: | :x: | :material-web:Website:material-file-document:Developer Docs:octicons-package-16:Block Explorer | | Optimism | EVM | :white_check_mark: | :white_check_mark: | :x: | :material-web:Website:material-file-document:Developer Docs:octicons-package-16:Block Explorer | | Polygon | EVM | :white_check_mark: | :white_check_mark: | :x: | :material-web:Website:material-file-document:Developer Docs:octicons-package-16:Block Explorer | | Scroll | EVM | :white_check_mark: | :white_check_mark: | :x: | :material-web:Website:material-file-document:Developer Docs:octicons-package-16:Block Explorer | | Sei | CosmWasm | :white_check_mark: | :white_check_mark: | :x: | :material-web:Website:material-file-document:Developer Docs:octicons-package-16:Block Explorer | | Seievm | EVM | :white_check_mark: | :white_check_mark: | :x: | :material-web:Website:material-file-document:Developer Docs:octicons-package-16:Block Explorer | | Sui | Sui Move VM | :white_check_mark: | :white_check_mark: | :white_check_mark: | :material-web:Website:material-file-document:Developer Docs:octicons-package-16:Block Explorer | | Unichain | EVM | :white_check_mark: | :white_check_mark: | :x: | :material-web:Website:material-file-document:Developer Docs:octicons-package-16:Block Explorer | | World Chain | EVM | :white_check_mark: | :white_check_mark: | :x: | :material-web:Website:material-file-document:Developer Docs:octicons-package-16:Block Explorer | | X Layer | EVM | :white_check_mark: | :white_check_mark: | :x: | :material-web:Website:material-file-document:Developer Docs:octicons-package-16:Block Explorer |
### CCTP
| Ethereum | EVM | :white_check_mark: | :white_check_mark: | :x: | :material-web:Website:material-file-document:Developer Docs:octicons-package-16:Block Explorer | | Solana | SVM | :white_check_mark: | :white_check_mark: | :x: | :material-web:Website:material-file-document:Developer Docs:octicons-package-16:Block Explorer | | Aptos | Move VM | :white_check_mark: | :white_check_mark: | :x: | :material-web:Website:material-file-document:Developer Docs:octicons-package-16:Block Explorer | | Arbitrum | EVM | :white_check_mark: | :white_check_mark: | :x: | :material-web:Website:material-file-document:Developer Docs:octicons-package-16:Block Explorer | | Avalanche | EVM | :white_check_mark: | :white_check_mark: | :x: | :material-web:Website:material-file-document:Developer Docs:octicons-package-16:Block Explorer | | Base | EVM | :white_check_mark: | :white_check_mark: | :x: | :material-web:Website:material-file-document:Developer Docs:octicons-package-16:Block Explorer | | Linea | EVM | :white_check_mark: | :white_check_mark: | :x: | :material-web:Website:material-file-document:Developer Docs:octicons-package-16:Block Explorer | | Optimism | EVM | :white_check_mark: | :white_check_mark: | :x: | :material-web:Website:material-file-document:Developer Docs:octicons-package-16:Block Explorer | | Polygon | EVM | :white_check_mark: | :white_check_mark: | :x: | :material-web:Website:material-file-document:Developer Docs:octicons-package-16:Block Explorer | | Seievm | EVM | :white_check_mark: | :white_check_mark: | :x: | :material-web:Website:material-file-document:Developer Docs:octicons-package-16:Block Explorer | | Sonic | EVM | :white_check_mark: | :white_check_mark: | :x: | :material-web:Website:material-file-document:Developer Docs:octicons-package-16:Block Explorer | | Sui | Sui Move VM | :white_check_mark: | :white_check_mark: | :x: | :material-web:Website:material-file-document:Developer Docs:octicons-package-16:Block Explorer | | Unichain | EVM | :white_check_mark: | :white_check_mark: | :x: | :material-web:Website:material-file-document:Developer Docs:octicons-package-16:Block Explorer | | World Chain | EVM | :white_check_mark: | :x: | :x: | :material-web:Website:material-file-document:Developer Docs:octicons-package-16:Block Explorer |
### Settlement
| Ethereum | EVM | :white_check_mark: | :x: | :x: | :material-web:Website:material-file-document:Developer Docs:octicons-package-16:Block Explorer | | Solana | SVM | :white_check_mark: | :white_check_mark: | :x: | :material-web:Website:material-file-document:Developer Docs:octicons-package-16:Block Explorer | | Arbitrum | EVM | :white_check_mark: | :white_check_mark: | :x: | :material-web:Website:material-file-document:Developer Docs:octicons-package-16:Block Explorer | | Avalanche | EVM | :white_check_mark: | :x: | :x: | :material-web:Website:material-file-document:Developer Docs:octicons-package-16:Block Explorer | | Base | EVM | :white_check_mark: | :x: | :x: | :material-web:Website:material-file-document:Developer Docs:octicons-package-16:Block Explorer | | Optimism | EVM | :white_check_mark: | :white_check_mark: | :x: | :material-web:Website:material-file-document:Developer Docs:octicons-package-16:Block Explorer | | Polygon | EVM | :white_check_mark: | :x: | :x: | :material-web:Website:material-file-document:Developer Docs:octicons-package-16:Block Explorer | | Sui | Sui Move VM | :white_check_mark: | :x: | :x: | :material-web:Website:material-file-document:Developer Docs:octicons-package-16:Block Explorer | | Unichain | EVM | :white_check_mark: | :x: | :x: | :material-web:Website:material-file-document:Developer Docs:octicons-package-16:Block Explorer |
### Multigov
| Ethereum | EVM | :white_check_mark: | :white_check_mark: | :white_check_mark: | :material-web:Website:material-file-document:Developer Docs:octicons-package-16:Block Explorer | | Solana | SVM | :white_check_mark: | :white_check_mark: | :white_check_mark: | :material-web:Website:material-file-document:Developer Docs:octicons-package-16:Block Explorer | | Arbitrum | EVM | :white_check_mark: | :white_check_mark: | :white_check_mark: | :material-web:Website:material-file-document:Developer Docs:octicons-package-16:Block Explorer | | Avalanche | EVM | :white_check_mark: | :white_check_mark: | :white_check_mark: | :material-web:Website:material-file-document:Developer Docs:octicons-package-16:Block Explorer | | Base | EVM | :white_check_mark: | :white_check_mark: | :white_check_mark: | :material-web:Website:material-file-document:Developer Docs:octicons-package-16:Block Explorer | | Berachain | EVM | :white_check_mark: | :white_check_mark: | :white_check_mark: | :material-web:Website:material-file-document:Developer Docs:octicons-package-16:Block Explorer | | BNB Smart Chain | EVM | :white_check_mark: | :white_check_mark: | :white_check_mark: | :material-web:Website:material-file-document:Developer Docs:octicons-package-16:Block Explorer | | Celo | EVM | :white_check_mark: | :white_check_mark: | :white_check_mark: | :material-web:Website:material-file-document:Developer Docs:octicons-package-16:Block Explorer | | Converge | EVM | :white_check_mark: | :white_check_mark: | :white_check_mark: | :material-web:Website | | Fantom | EVM | :white_check_mark: | :white_check_mark: | :white_check_mark: | :material-web:Website:material-file-document:Developer Docs:octicons-package-16:Block Explorer | | HyperEVM :material-information-outline:{ title='⚠️ The HyperEVM integration is experimental, as its node software is not open source. Use Wormhole messaging on HyperEVM with caution.' } | EVM | :white_check_mark: | :white_check_mark: | :white_check_mark: | :material-web:Website:material-file-document:Developer Docs | | Ink | EVM | :white_check_mark: | :white_check_mark: | :white_check_mark: | :material-web:Website:material-file-document:Developer Docs:octicons-package-16:Block Explorer | | Kaia | EVM | :white_check_mark: | :white_check_mark: | :white_check_mark: | :material-web:Website:material-file-document:Developer Docs:octicons-package-16:Block Explorer | | Linea | EVM | :white_check_mark: | :white_check_mark: | :white_check_mark: | :material-web:Website:material-file-document:Developer Docs:octicons-package-16:Block Explorer | | Mantle | EVM | :white_check_mark: | :white_check_mark: | :white_check_mark: | :material-web:Website:material-file-document:Developer Docs:octicons-package-16:Block Explorer | | Mezo | EVM | :white_check_mark: | :white_check_mark: | :white_check_mark: | :material-web:Website:material-file-document:Developer Docs:octicons-package-16:Block Explorer | | Monad | EVM | :white_check_mark: | :white_check_mark: | :white_check_mark: | :material-web:Website:material-file-document:Developer Docs:octicons-package-16:Block Explorer | | Moonbeam | EVM | :white_check_mark: | :white_check_mark: | :white_check_mark: | :material-web:Website:material-file-document:Developer Docs:octicons-package-16:Block Explorer | | Neon | EVM | :white_check_mark: | :white_check_mark: | :white_check_mark: | :material-web:Website:material-file-document:Developer Docs:octicons-package-16:Block Explorer | | Optimism | EVM | :white_check_mark: | :white_check_mark: | :white_check_mark: | :material-web:Website:material-file-document:Developer Docs:octicons-package-16:Block Explorer | | Plume | EVM | :white_check_mark: | :white_check_mark: | :white_check_mark: | :material-web:Website:material-file-document:Developer Docs:octicons-package-16:Block Explorer | | Polygon | EVM | :white_check_mark: | :white_check_mark: | :white_check_mark: | :material-web:Website:material-file-document:Developer Docs:octicons-package-16:Block Explorer | | Scroll | EVM | :white_check_mark: | :white_check_mark: | :white_check_mark: | :material-web:Website:material-file-document:Developer Docs:octicons-package-16:Block Explorer | | Sei | CosmWasm | :white_check_mark: | :white_check_mark: | :white_check_mark: | :material-web:Website:material-file-document:Developer Docs:octicons-package-16:Block Explorer | | Seievm | EVM | :white_check_mark: | :white_check_mark: | :white_check_mark: | :material-web:Website:material-file-document:Developer Docs:octicons-package-16:Block Explorer | | Sonic | EVM | :white_check_mark: | :white_check_mark: | :white_check_mark: | :material-web:Website:material-file-document:Developer Docs:octicons-package-16:Block Explorer | | Unichain | EVM | :white_check_mark: | :white_check_mark: | :white_check_mark: | :material-web:Website:material-file-document:Developer Docs:octicons-package-16:Block Explorer | | World Chain | EVM | :white_check_mark: | :white_check_mark: | :white_check_mark: | :material-web:Website:material-file-document:Developer Docs:octicons-package-16:Block Explorer | | X Layer | EVM | :white_check_mark: | :white_check_mark: | :white_check_mark: | :material-web:Website:material-file-document:Developer Docs:octicons-package-16:Block Explorer |
--- END CONTENT --- Doc-Content: https://raw.githubusercontent.com/wormhole-foundation/wormhole-docs/refs/heads/main/products/reference/testnet-faucets.md --- BEGIN CONTENT --- --- title: Testnet Faucets description: This page includes resources to quickly find the Testnet tokens you need to deploy and test applications and contracts on Wormhole's supported networks. categories: Reference --- # Testnet Faucets Don't let the need for testnet tokens get in the way of buildling your next great idea with Wormhole. Use this guide to quickly locate the testnet token faucets you need to deploy and test applications and contracts on Wormhole's supported networks.
### EVM | Ethereum Holesky | EVM | ETH | Alchemy Faucet | | Ethereum Sepolia | EVM | ETH | Alchemy Faucet | | Arbitrum Sepolia | EVM | ETH | List of Faucets | | Avalanche | EVM | AVAX | Official Avalanche Faucet | | Base Sepolia | EVM | ETH | List of Faucets | | Berachain | EVM | BERA | Official Berachain Faucet | | BNB Smart Chain | EVM | BNB | Official BNB Faucet | | Celo | EVM | CELO | Official Celo Faucet | | Fantom | EVM | FTM | Official Fantom Faucet | | HyperEVM :material-information-outline:{ title='⚠️ The HyperEVM integration is experimental, as its node software is not open source. Use Wormhole messaging on HyperEVM with caution.' } | EVM | mock USDC | Official Hyperliquid Faucet | | Ink | EVM | ETH | Official Ink Faucet | | Kaia | EVM | KAIA | Official Kaia Faucet | | Linea | EVM | ETH | List of Faucets | | Mantle | EVM | MNT | Official Mantle Faucet | | Monad | EVM | MON | Official Monad Faucet | | Moonbeam | EVM | DEV | Official Moonbeam Faucet | | Neon | EVM | NEON | Official Neon Faucet | | Optimism Sepolia | EVM | ETH | Superchain Faucet | | Plume | EVM | PLUME | Official Plume Faucet | | Polygon Amoy | EVM | POL | Official Polygon Faucet | | Scroll | EVM | ETH | List of Faucets | | Seievm | EVM | SEI | Sei Atlantic-2 Faucet | | Unichain | EVM | ETH | QuickNode Faucet | | World Chain | EVM | ETH | Alchemy Faucet | | X Layer | EVM | OKB | X Layer Official Faucet | ### SVM | Pythnet | SVM | ETH | Superchain Faucet | ### AVM | Algorand | AVM | ALGO | Official Algorand Faucet | ### CosmWasm | Celestia | CosmWasm | TIA | Discord Faucet | | Cosmos Hub | CosmWasm | ATOM | Discord Faucet | | Evmos | CosmWasm | TEVMOS | Official Evmos Faucet | | Injective | CosmWasm | INJ | Official Injective Faucet | | Kujira | CosmWasm | KUJI | Discord Faucet | | Neutron | CosmWasm | NTRN | List of Faucets | | Noble | CosmWasm | USDC | Circle Faucet | | Osmosis | CosmWasm | OSMO | Official Osmosis Faucet | | SEDA | CosmWasm | SEDA | Official SEDA Faucet | | Sei | CosmWasm | SEI | Sei Atlantic-2 Faucet | ### Move VM | Aptos | Move VM | APT | Official Aptos Faucet | ### NEAR VM | NEAR | NEAR VM | NEAR | Official NEAR Faucet | ### Sui Move VM | Sui | Sui Move VM | SUI | List of Faucets |
--- END CONTENT --- Doc-Content: https://raw.githubusercontent.com/wormhole-foundation/wormhole-docs/refs/heads/main/products/reference/wormhole-formatted-addresses.md --- BEGIN CONTENT --- --- title: Wormhole Formatted Addresses description: Explanation of Wormhole formatted 32-byte hex addresses, their conversion, and usage across different blockchain platforms. categories: Reference --- # Wormhole Formatted Addresses Wormhole formatted addresses are 32-byte hex representations of addresses from any supported blockchain. Whether an address originates from EVM, Solana, Cosmos, or another ecosystem, Wormhole standardizes all addresses into this format to ensure cross-chain compatibility. This uniform format is essential for smooth interoperability in token transfers and messaging across chains. Wormhole uses formatted addresses throughout the [Wormhole SDK](https://github.com/wormhole-foundation/wormhole-sdk-ts){target=\_blank}, especially in cross-chain transactions, such as transfer functions that utilize the `bytes32` representation for recipient addresses. ## Platform-Specific Address Formats Each blockchain ecosystem Wormhole supports has its method for formatting native addresses. To enable cross-chain compatibility, Wormhole converts these native addresses into the standardized 32-byte hex format. Here’s an overview of the native address formats and how they are normalized to the Wormhole format: | Platform | Native Address Format | Wormhole Formatted Address | |-----------------|----------------------------------|----------------------------| | EVM | Hex (e.g., 0x...) | 32-byte Hex | | Solana | Base58 | 32-byte Hex | | CosmWasm | Bech32 | 32-byte Hex | | Algorand | Algorand App ID | 32-byte Hex | | Sui | Hex | 32-byte Hex | | Aptos | Hex | 32-byte Hex | | Near | SHA-256 | 32-byte Hex | These conversions allow Wormhole to interact seamlessly with various chains using a uniform format for all addresses. ### Address Format Handling The Wormhole SDK provides mappings that associate each platform with its native address format. You can find this mapping in the Wormhole SDK file [`platforms.ts`](https://github.com/wormhole-foundation/wormhole-sdk-ts/blob/007f61b27c650c1cf0fada2436f79940dfa4f211/core/base/src/constants/platforms.ts#L93-L102){target=\_blank}: ```typescript const platformAddressFormatEntries = [ ['Evm', 'hex'], ['Solana', 'base58'], ['Cosmwasm', 'bech32'], ['Algorand', 'algorandAppId'], ['Sui', 'hex'], ['Aptos', 'hex'], ['Near', 'sha256'], ]; ``` These entries define how the [`UniversalAddress`](https://github.com/wormhole-foundation/wormhole-sdk-ts/blob/007f61b27c650c1cf0fada2436f79940dfa4f211/core/definitions/src/universalAddress.ts#L23){target=\_blank} class handles different address formats based on the platform. ## Universal Address Methods The `UniversalAddress` class is essential for working with Wormhole formatted addresses. It converts native blockchain addresses into the standardized 32-byte hex format used across Wormhole operations. Key functions: - **`new UniversalAddress()`** - use the `UniversalAddress` constructor to convert native addresses into the Wormhole format ```typescript const universalAddress = new UniversalAddress('0x123...', 'hex'); ``` - **`toUniversalAddress()`** - converts a platform-specific address into the Wormhole formatted 32-byte hex address ```typescript const ethAddress: NativeAddress<'Evm'> = toNative('Ethereum', '0x0C9...'); const universalAddress = ethAddress.toUniversalAddress().toString(); ``` - **`toNative()`** - converts the Wormhole formatted address back to a native address for a specific blockchain platform ```typescript const nativeAddress = universalAddress.toNative('Evm'); ``` - **`toString()`** - returns the Wormhole formatted address as a hex string, which can be used in various SDK operations ```typescript console.log(universalAddress.toString()); ``` These methods allow developers to convert between native addresses and the Wormhole format, ensuring cross-chain compatibility. ## Convert Between Native and Wormhole Formatted Addresses The Wormhole SDK allows developers to easily convert between native addresses and Wormhole formatted addresses when building cross-chain applications. ### Convert a Native Address to a Wormhole Formatted Address Example conversions for EVM and Solana: === "EVM" ```typescript import { toNative } from '@wormhole-foundation/sdk-core'; const ethAddress: NativeAddress<'Evm'> = toNative( 'Ethereum', '0x0C99567DC6f8f1864cafb580797b4B56944EEd28' ); const universalAddress = ethAddress.toUniversalAddress().toString(); console.log('Universal Address (EVM):', universalAddress); ``` === "Solana" ```typescript import { toNative } from '@wormhole-foundation/sdk-core'; const solAddress: NativeAddress<'Solana'> = toNative( 'Solana', '6zZHv9EiqQYcdg52ueADRY6NbCXa37VKPngEHaokZq5J' ); const universalAddressSol = solAddress.toUniversalAddress().toString(); console.log('Universal Address (Solana):', universalAddressSol); ``` The result is a standardized address format that is ready for cross-chain operations. ### Convert Back to Native Addresses Below is how you can convert a Wormhole formatted address back to an EVM or Solana native address: ```typescript const nativeAddressEvm = universalAddress.toNative('Evm'); console.log('EVM Native Address:', nativeAddressEvm); const nativeAddressSolana = universalAddress.toNative('Solana'); console.log('Solana Native Address:', nativeAddressSolana); ``` These conversions ensure that your cross-chain applications can seamlessly handle addresses across different ecosystems. ## Use Cases for Wormhole Formatted Addresses ### Cross-chain Token Transfers Cross-chain token transfers require addresses to be converted into a standard format. For example, when transferring tokens from Ethereum to Solana, the Ethereum address is converted into a Wormhole formatted address to ensure compatibility. After the transfer, the Wormhole formatted address is converted back into the Solana native format. ### Smart Contract Interactions In smart contract interactions, especially when building dApps that communicate across multiple chains, Wormhole formatted addresses provide a uniform way to reference addresses. This ensures that addresses from different blockchains can interact seamlessly, whether you're sending messages or making cross-chain contract calls. ### DApp Development For cross-chain dApp development, Wormhole formatted addresses simplify handling user wallet addresses across various blockchains. This allows developers to manage addresses consistently, regardless of whether they work with EVM, Solana, or another supported platform. ### Relayers and Infrastructure Finally, relayers and infrastructure components, such as Wormhole Guardians, rely on the standardized format to efficiently process and relay cross-chain messages. A uniform address format simplifies operations, ensuring smooth interoperability across multiple blockchains. --- END CONTENT ---